Seed Bombs and Garden Crafts: 12 Spring STEM Projects That Grow
Discover how spring garden crafts offer unique STEM learning, allowing your kids to explore living systems, develop patience, and combine art with science through hands-on projects.
- Engage your kids with living systems through garden crafts to teach real-world science.
- Cultivate patience and scientific thinking through projects requiring observation over time.
- Combine art and science in projects to boost engagement and ownership for your child.
- Explore diverse STEM concepts like biology, ecology, and physics with hands-on gardening.
- Start garden STEM projects in any space, from a backyard to a sunny windowsill.
My seven-year-old dropped a seed bomb into a crack in our driveway last spring. I told her it probably wouldn’t work — not enough soil, too much sun, not the right conditions. She shrugged and watered it with her little watering can anyway. Every single day for two weeks, she checked that crack. And then, one Tuesday morning, she came running into the kitchen screaming, “MOM, IT WORKED. THERE’S A FLOWER IN THE DRIVEWAY.”
It was a tiny wildflower — some kind of yellow clover, maybe an inch tall, growing defiantly out of a concrete crack. She stood over it like she’d performed a miracle. And honestly? She had. She’d taken clay, soil, water, and seeds, smooshed them together with her bare hands, and created life in a place where nothing was growing before. No worksheet, no lecture, no app could have taught her what that moment did: that she has the power to make things grow.
That’s what garden crafts do for kids. They’re not just STEM projects on paper — they’re STEM projects that breathe, sprout, stretch toward sunlight, and occasionally die (which is also a lesson). They combine biology, ecology, measurement, observation, art, and patience into something a child can hold in their hands and watch change over time.
Spring is the perfect window. The soil is warming up, the days are getting longer, and kids are itching to be outside after months of indoor activities. Whether you have a huge backyard, a small balcony, or just a sunny windowsill, every project in this article works for you. Let’s get our hands dirty.
Why Garden Crafts Are the Ultimate STEM Activity
I’ll be honest — when someone says “STEM activity for kids,” my brain goes to baking soda volcanoes and building bridges from popsicle sticks. Those are fine. But garden crafts are STEM at a level that most tabletop projects can’t touch, because they unfold over time and involve living systems that kids can’t fully control.
Science That’s Alive
When a child plants a seed, they’re running an experiment with variables they can observe but not entirely predict. Will this seed sprout? How fast? What does it need? What happens if we give it more water? Less light? These aren’t hypothetical questions in a textbook — they’re questions a child asks naturally while staring at a pot of soil, waiting for something to happen.
Garden STEM covers an enormous range of scientific concepts:
- Biology: Germination, photosynthesis, plant anatomy, life cycles
- Ecology: Pollination, soil ecosystems, food chains, biodiversity
- Earth Science: Water cycle, weather effects, seasons, soil composition
- Physics: Sunlight as energy, gravity’s effect on root growth, water absorption
- Chemistry: Nutrient cycles, decomposition, pH (for older kids)
The Patience Factor
Most STEM activities give kids instant results. Mix baking soda and vinegar: immediate fizz. Build a ramp: marble rolls immediately. Garden projects require something much harder and much more valuable: waiting. A seed bomb doesn’t do anything visually exciting for days or weeks. A bean maze takes a week to show results. A sunflower height tracker spans an entire season.
This is the kind of delayed gratification that builds real scientific thinking. Scientists don’t get results in 15 minutes. They observe, wait, check again, adjust, and keep watching. When your child learns to check their seedlings every morning with genuine curiosity — not boredom — they’re practicing the most fundamental skill in science: patience with uncertainty.
Art Meets Science
The projects in this article aren’t just experiments — they’re crafts. Kids paint rock markers, press flowers, build structures, decorate planters, and create observation journals. The art component isn’t a bonus; it’s essential. It keeps kids engaged during the slow parts (nothing is growing yet), gives them ownership over their projects, and connects the analytical (measuring, recording) with the creative (designing, decorating). If your kids love the creative side, they’ll find a natural connection with nature crafts for kids too.
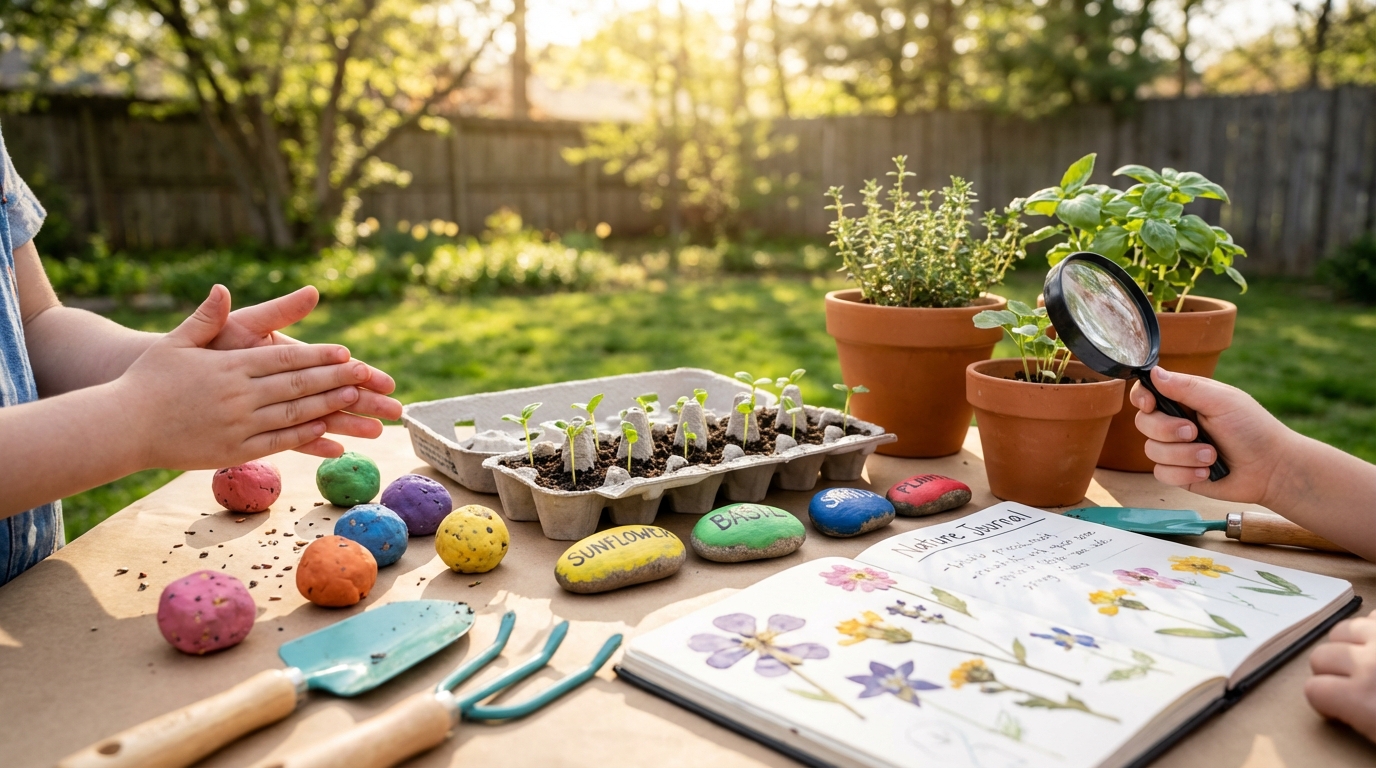
The Classic Seed Bomb: Your Gateway Garden Craft
Seed bombs are where we start because they’re the most hands-on, most satisfying, and most shareable garden craft. They’re also trending everywhere right now — you’ll see them at farmer’s markets, in eco gift shops, and all over social media. But making them at home with your kids costs almost nothing and takes about 20 minutes.
What Is a Seed Bomb?
A seed bomb is a compact ball of clay, compost, and seeds. You make it, let it dry, and then toss it onto soil (or into a bare patch of yard, a planter, or yes, a driveway crack). When it rains, the clay dissolves, the compost feeds the soil, and the seeds germinate. It’s basically a self-contained garden delivery system.
The Basic Recipe
Makes approximately 10-12 seed bombs
Materials:
- 1 cup air-dry clay (or modeling clay from a craft store)
- 1 cup compost or potting soil
- 1 packet wildflower seed mix (or specific seeds — see variations below)
- Water (small amount)
- Bowl for mixing
- Tray or plate lined with wax paper for drying
Steps:
- Crumble the clay into a bowl. Break it into the smallest pieces your child can manage. This is excellent hand-strength work.
- Add the compost or potting soil and mix with hands until evenly combined. This will be messy. Embrace it.
- Add seeds. For wildflowers, scatter about 2 tablespoons into the mixture. For larger seeds (herbs, veggies), use about 1 tablespoon.
- Add water a teaspoon at a time, mixing after each addition, until the mixture holds together when squeezed but isn’t dripping wet. Think Play-Doh consistency.
- Roll into balls about 1 inch in diameter — roughly the size of a large marble or small bouncy ball.
- Place on wax paper and let dry for 24-48 hours.
- Toss, plant, or gift!
The science behind it: The clay acts as a protective shell that prevents birds from eating the seeds and keeps them from washing away in rain. The compost provides nutrients so the seeds have a head start when they germinate. It’s agricultural engineering on a tiny scale.
Variation 1: Wildflower Seed Bombs
Best for: Bare patches of yard, community garden edges, guerrilla gardening
Seeds to use: Pre-mixed wildflower blends (look for mixes specific to your region — they’ll include flowers that local pollinators love). Common inclusions: black-eyed Susans, cosmos, zinnias, coneflowers, and clover.
Why kids love it: Wildflowers are resilient and forgiving. Even if the seed bomb lands in imperfect conditions, something usually grows. That success rate matters when you’re seven.
Variation 2: Herb Seed Bombs
Best for: Kitchen windowsill planters, container gardens, gifts for grandparents
Seeds to use: Basil, chives, cilantro, dill, or parsley. These germinate relatively quickly (7-14 days) and are rewarding because kids can eventually eat what they grew.
Why kids love it: “I grew this basil and now it’s on our pizza” is an extraordinarily powerful sentence for a child.
Variation 3: Veggie Seed Bombs
Best for: Garden beds, large planters, school garden projects
Seeds to use: Cherry tomato, lettuce, radish, or snap pea seeds. Choose fast-germinators for maximum kid satisfaction.
Why kids love it: Growing food feels like a superpower. When your child picks a cherry tomato from a plant they started as a seed bomb, they understand something fundamental about where food comes from.
Crafty Mama tip: Make a batch of each variation and package them in small paper bags decorated by your kids. These make incredible Earth Day gifts, teacher appreciation gifts, or party favors. Label each bag with the seed type and simple planting instructions.
12 Spring Garden STEM Projects
Project Overview
| # | Project | Best Age | Time to Make | Time to See Results | STEM Focus | Mess Level |
|---|---|---|---|---|---|---|
| 1 | Classic Seed Bombs | 3-10 | 20 min | 2-4 weeks | Biology, ecology | Medium |
| 2 | Mini Greenhouse from Plastic Bottles | 4-8 | 25 min | 1-2 weeks | Earth science, biology | Medium |
| 3 | Egg Carton Seed Starters | 3-7 | 15 min | 1-2 weeks | Biology, observation | Low |
| 4 | Nature Observation Journal | 5-10 | 30 min (ongoing) | Ongoing | Biology, writing, art | Low |
| 5 | Plant Observation Station | 4-9 | 20 min setup | Ongoing | Measurement, biology | Low |
| 6 | Painted Rock Plant Markers | 3-10 | 25 min | Immediate | Art, literacy, ecology | Medium |
| 7 | DIY Rain Gauge | 5-10 | 20 min | Ongoing | Measurement, weather | Low |
| 8 | Worm Composting Observation | 5-10 | 30 min setup | 2-4 weeks | Ecology, soil science | Medium |
| 9 | Pressed Flower Art | 4-10 | 15 min + 1 week drying | 1 week | Botany, art, patience | Low |
| 10 | Bean Maze in a Jar | 5-10 | 20 min | 1-2 weeks | Phototropism, biology | Low |
| 11 | Grow a Pizza Garden | 4-10 | 45 min | 6-10 weeks | Biology, nutrition, math | Medium |
| 12 | Sunflower Height Tracker | 3-10 | 15 min + ongoing | Full season | Measurement, data, biology | Low |
1. Classic Seed Bombs
Covered in full detail in the section above. This is your anchor project — the one every child should make at least once.
2. Mini Greenhouse from Plastic Bottles
Materials: Clear 2-liter plastic bottle, scissors or box cutter (adult only), small pot or yogurt cup, potting soil, seeds, water, tape
Time to make: 25 minutes | Results visible: 1-2 weeks | Mess Level: Medium
The STEM connection: The greenhouse effect, condensation, temperature regulation, germination
Steps:
- Adult prep: cut the plastic bottle in half horizontally. Keep both halves.
- Take a small pot or yogurt cup that fits inside the bottom half of the bottle. Fill it with potting soil and plant seeds (lettuce, herbs, or fast-growing flowers work best).
- Place the pot inside the bottom half of the bottle.
- Water the soil lightly.
- Place the top half of the bottle over the pot like a dome. If needed, tape the two halves together loosely — leave a small gap for airflow.
- Set in a sunny window.
- Observe daily. Point out the condensation on the inside of the bottle — that’s the water cycle in action!
The science conversation: “See those water droplets on the inside of the bottle? The sun heats the water in the soil, the water evaporates and turns into tiny drops of water vapor, then the vapor hits the cooler plastic and turns back into water droplets. Those drip back down to water the plant. We built a tiny version of the water cycle — and it’s the same thing that makes rain!”
Crafty Mama tip: Set up two identical plantings — one under the greenhouse dome and one without. Have your child predict which will sprout first and grow faster. Record observations daily. This transforms a craft into a real controlled experiment. For more weather-related science with kids, check out our weather activities and experiments.
3. Egg Carton Seed Starters
Materials: Cardboard egg carton, potting soil, seeds (one type per cup, or mix and match), water, plastic wrap (optional), markers for labeling
Time to make: 15 minutes | Results visible: 1-2 weeks | Mess Level: Low
The STEM connection: Germination, plant care, labeling/documentation
Steps:
- Cut the lid off a cardboard egg carton. Set the lid aside (it becomes the drip tray).
- Fill each cup with potting soil, pressing gently to remove large air pockets.
- Plant 2-3 seeds per cup, pushing them just below the surface. Different seeds in different cups is ideal for comparison.
- Label each cup with a marker or small stick-on label: “Basil,” “Sunflower,” “Lettuce,” etc.
- Water gently — a spray bottle works best to avoid flooding the small cups.
- Optional: cover loosely with plastic wrap to create humidity. Remove once sprouts appear.
- Place on the egg carton lid (to catch drips) in a sunny window.
- When seedlings are 2-3 inches tall with at least 2 sets of leaves, transplant to larger pots or garden beds. The cardboard cup can go directly into soil — it’ll decompose!
The science conversation: “We planted different seeds in each cup. Which one do you think will sprout first? Let’s check every morning and write down what we see. Scientists call this making observations — it’s the most important part of any experiment.”
Crafty Mama tip: Give your child a cheap magnifying glass and let them examine the sprouts up close. The detail in a brand-new seedling — the tiny hairs on the stem, the veins in the first leaves, the way the seed shell sometimes sits on top like a little hat — is genuinely awe-inspiring when magnified.
4. Nature Observation Journal
Materials: Blank notebook or folded/stapled paper, pencil, colored pencils or crayons, tape or glue stick (for attaching pressed specimens), ruler, magnifying glass (optional)
Time to make: 30 minutes initial setup, then ongoing | Mess Level: Low
The STEM connection: Scientific observation, documentation, drawing from life, seasonal changes, data collection
Steps:
- Create or buy a simple blank journal. Folding 10 sheets of paper in half and stapling the spine works perfectly. Decorate the cover.
- On the first page, write (or help your child write) a title: “Nature Journal — Spring 2026” and their name.
- Create template pages with prompts:
- Date and weather at the top
- “Today I observed:” with space for drawing and writing
- “Questions I have:” at the bottom
- Take the journal on nature walks, to the garden, or even just to the backyard.
- Encourage sketching what they see — not perfect drawings, but observation sketches. The goal is looking carefully, not artistic perfection.
- Tape in small specimens: a leaf, a pressed flower petal, a blade of interesting grass.
- Record measurements when relevant: “The tallest sunflower is 8 inches today.”
The science conversation: “Real scientists keep journals just like this. Charles Darwin filled hundreds of notebooks with drawings and observations during his travels. Your journal is your scientific record of what’s happening in nature right now, this spring, in our yard.”
Crafty Mama tip: This is the one project on this list with unlimited replay value. A nature journal isn’t a one-time craft — it’s a practice. If your child takes to it, keep it going all year. The act of sitting still, looking carefully, and drawing what you see is meditative, educational, and builds observation skills that transfer to every area of learning. If your kids enjoy outdoor observation, pair this with our outdoor nature activities for kids for structured exploration ideas.
5. Plant Observation Station
Materials: A growing plant (from projects #1-3 above, or any houseplant), ruler or measuring tape, paper for recording, markers, string, tape
Time to set up: 20 minutes | Ongoing activity | Mess Level: Low
The STEM connection: Measurement, data recording, graphing, plant growth patterns
Steps:
- Choose a plant to observe. A fast-grower like a bean, sunflower, or basil plant works best.
- Set up the “station” next to the plant: tape a strip of paper vertically to a wall or stick behind the pot. Mark inch measurements on it (like a height chart).
- Create an observation chart on paper or a poster board:
| Date | Height | # of Leaves | Color | Notes |
|---|---|---|---|---|
| Apr 5 | 1 inch | 2 | Light green | First leaves appeared! |
| Apr 8 | 2 inches | 4 | Green | Growing fast |
- Have your child measure and record every 2-3 days.
- Bonus: take a photo from the same angle each time. At the end of the season, line up the photos for a visual growth timeline.
The science conversation: “Look at how much it grew in just three days! Plants don’t grow at the same speed all the time. Can you see a pattern? It grew faster this week when it was sunny. What do you think would happen if we moved it to a darker spot?”
Crafty Mama tip: For older kids (7+), introduce simple graphing. Use graph paper to plot height (y-axis) over time (x-axis). Connecting the dots creates a growth curve — and your child has just made their first real scientific graph. This alone is worth the entire project.
6. Painted Rock Plant Markers
Materials: Smooth, flat rocks (collected from yard, park, or purchased), acrylic paint or paint pens, clear sealant spray (optional, adult use), paintbrushes
Time to make: 25 minutes | Mess Level: Medium
The STEM connection: Ecology (what grows in your garden), literacy (labeling), geology (rock types)
Steps:
- Collect smooth, flat rocks — river rocks are ideal. Wash and dry thoroughly.
- Paint each rock with a base coat if desired (white makes colors pop). Let dry.
- Paint the name of a plant or herb on each rock: “Basil,” “Tomato,” “Sunflower,” etc. Add a small illustration of the plant if your child is artistically inclined.
- For younger kids, just paint the rocks with colors or patterns that represent each plant — red for tomatoes, green for basil, yellow for sunflowers.
- Optional: spray with clear sealant to make them weather-resistant.
- Place in the garden or next to potted plants.
The science conversation: “Why do we label our plants? Because when seeds first sprout, a lot of seedlings look the same — just tiny green leaves. The labels help us remember what’s what. Real gardeners and farmers do the same thing.”
Crafty Mama tip: This pairs beautifully with our rock painting ideas for kids guide if your children want to go deeper into rock art. Also, collecting the rocks itself is a mini-adventure — talk about where rocks come from, why some are smooth (water erosion), and how old they might be. Geology lesson disguised as a craft supply run.
7. DIY Rain Gauge
Materials: Clear plastic bottle (cut to create a straight-sided cylinder), ruler, permanent marker, small rocks or pebbles, masking tape, notebook for recording
Time to make: 20 minutes | Ongoing activity | Mess Level: Low
The STEM connection: Measurement, weather science, data collection, water cycle
Steps:
- Adult prep: cut the top third off a clear plastic bottle. Flip the top piece upside down and insert it into the bottom piece like a funnel (this prevents evaporation and keeps debris out).
- Drop small rocks into the bottom for weight so it doesn’t blow over.
- Tape a ruler to the outside of the bottle, or use a permanent marker to draw measurement lines at half-inch intervals from the bottom up.
- Place outside in an open area (not under a tree or roof overhang).
- After each rainfall, have your child check the water level and record it in a notebook:
| Date | Rainfall (inches) | Weather Notes |
|---|---|---|
| Apr 6 | 0.5 | Light rain, afternoon only |
| Apr 10 | 1.25 | Heavy thunderstorm |
- Empty and reset after each reading.
- At the end of the month, add up total rainfall. Compare to the local weather service’s reported data — how close were you?
The science conversation: “Where does rain come from? Water from oceans, lakes, and rivers evaporates — turns from liquid into gas — and rises into the sky. It forms clouds, and when the clouds get heavy enough, the water falls back down as rain. Then it flows back to the rivers and oceans, and the whole thing starts again. That’s the water cycle, and we’re measuring one part of it right now.” Our weather activities and experiments for kids has even more ways to explore these concepts.
Crafty Mama tip: Track rainfall for a full month and then create a bar graph together. Which week had the most rain? Can your child connect that to what they remember about the weather? This kind of data-driven reflection is exactly what scientists do.
8. Worm Composting Observation
Materials: Large clear container (a clean jar or plastic tub), soil, sand, dead leaves, vegetable scraps (banana peels, apple cores, lettuce), worms (dig them up or buy red wigglers), spray bottle, dark cloth or paper to wrap the container
Time to set up: 30 minutes | Results visible: 2-4 weeks | Mess Level: Medium
The STEM connection: Soil science, decomposition, ecosystems, composting, animal behavior
Steps:
- In the clear container, create visible layers: 1 inch of sand, 2 inches of soil, 1 inch of dead leaves, 2 inches of soil.
- Add a few small pieces of vegetable scraps on top.
- Add 5-8 worms. (If digging in your yard, look in moist, shady spots under leaves or logs.)
- Mist with spray bottle — the soil should be moist like a wrung-out sponge, not soaking wet.
- Wrap the outside of the container with dark paper (worms don’t like light). Leave it on most of the time, but remove it for daily observations.
- Check daily: observe how the worms mix the layers, move soil around, and process the food scraps.
- After 2-4 weeks, the distinct layers will be significantly mixed. The food scraps will be partially or fully gone. The worms turned waste into rich compost.
The science conversation: “Worms are nature’s recyclers. They eat dead plants and food scraps and turn them into castings — that’s the fancy name for worm poop — which is one of the best fertilizers in the world. Every garden needs worms because they break down old things and turn them into food for new plants. Without worms, soil would run out of nutrients.”
Crafty Mama tip: This will be either your child’s absolute favorite project or the one that grosses them out the most. Usually favorite. Kids are fascinated by worms. If they love this, check out bug hunting activities for kids for more ways to explore the tiny creatures that keep ecosystems running. And make sure to release the worms back into the garden when you’re done — they have work to do!
9. Pressed Flower Art
Materials: Fresh flowers and leaves (flat varieties work best: pansies, ferns, clover, daisies, violets), heavy books, parchment or wax paper, cardstock or watercolor paper, glue, frame (optional)
Time to make: 15 minutes active + 1 week drying | Mess Level: Low
The STEM connection: Botany (flower anatomy, species identification), preservation techniques, patience
Steps:
- Go on a flower and leaf collecting walk. Look for flat flowers (pansies, daisies, violets) and interesting leaves (ferns, clover, maple). Avoid thick or fleshy flowers (roses, succulents) — they don’t press well.
- Lay each specimen between two sheets of parchment or wax paper.
- Place inside a heavy book. Stack more books on top. The more weight, the better.
- Wait 5-7 days. This is the hard part. Resist the urge to check too early.
- Carefully remove the pressed flowers. They should be flat and dry but retain their color.
- Arrange on cardstock or watercolor paper in any design: a wreath, a garden scene, a heart, random beauty.
- Glue carefully with tiny dots of white glue. Let dry.
- Frame or display.
The science conversation: “When we press flowers, we’re removing the water inside them. That’s why they get flat and dry. The color stays because the pigments — the chemicals that make flowers colorful — are still there even after the water is gone. Scientists have pressed flower collections that are hundreds of years old, and you can still see the colors!”
Crafty Mama tip: Before pressing, examine each flower with your child. Count the petals. Look at the center. Find the stem. Older kids can try to identify the species using a plant identification app or field guide. Even just naming what they see — “this one has five petals and a yellow center” — is botanical observation. For more nature-inspired art projects, explore our nature crafts for kids collection.
10. Bean Maze in a Jar
Materials: Large glass jar or clear plastic container, cardboard, scissors, tape, bean seeds (lima or runner beans work best), soil, water
Time to make: 20 minutes | Results visible: 1-2 weeks | Mess Level: Low
The STEM connection: Phototropism (plants growing toward light), plant adaptation, experimental design
Steps:
- Cut 2-3 small shelves from cardboard. These should be just slightly smaller than the inside diameter of the jar — they need to fit inside but leave a gap on one side for the plant to grow around.
- Place soil in the bottom third of the jar. Plant 2-3 bean seeds about an inch below the surface.
- Insert the first cardboard shelf about 3 inches above the soil line, taping one edge to the jar wall. Leave a 1-inch gap on the opposite side.
- Insert a second shelf 3 inches above the first, leaving the gap on the opposite side from the first shelf. This creates a zigzag path.
- Optional: add a third shelf for more complexity.
- Water the soil, place the jar in a sunny window (with the open top facing up), and wait.
- As the bean sprouts, it will grow upward, hit the first shelf, grow sideways toward the gap, continue up, hit the second shelf, and navigate the maze!
The science conversation: “Plants always grow toward light — scientists call this phototropism. The word comes from ‘photo’ meaning light and ‘tropism’ meaning turning. Our bean plant can’t see the light, but it can sense it. Special chemicals in the stem cause the side facing away from light to grow faster, which makes the stem bend toward the light. So even though our shelves are in the way, the plant will find its way to the sunshine.”
Crafty Mama tip: This is one of the most genuinely fascinating science demonstrations you can do at home. When the bean navigates around that first shelf, kids’ jaws drop. Take photos of the progress every few days. Your child will have an incredible story for show-and-tell.
11. Grow a Pizza Garden
Materials: Large container or garden bed area (at least 2 feet diameter), potting soil, seeds or seedlings (tomato, basil, oregano, bell pepper), garden stakes or labels, watering can
Time to set up: 45 minutes | Results visible: 6-10 weeks for harvest | Mess Level: Medium
The STEM connection: Biology (plant needs and growth), nutrition (where food comes from), math (spacing, measurement), ecology (companion planting)
Steps:
- Choose your container or garden spot. A large pot, a section of raised bed, or even a kiddie pool with drainage holes all work.
- Divide the growing area into “pizza slices” — wedge-shaped sections. Use sticks or string to mark the divisions.
- In each slice, plant a different pizza ingredient:
- Slice 1: Cherry tomato (plant or seed — plants give faster results)
- Slice 2: Basil seeds
- Slice 3: Oregano seeds
- Slice 4: Bell pepper (plant works better than seed)
- Slice 5: Parsley seeds
- Slice 6: Chives seeds
- Label each slice with painted rock markers (Project #6!) or popsicle stick labels.
- Water thoroughly. Place in full sun (6+ hours daily).
- Maintain throughout the season: water regularly, observe growth, note which plants grow fastest.
- When everything is ready to harvest, make pizza together with your garden ingredients!
The science conversation: “Every ingredient on our pizza came from a plant. The tomato sauce, the basil, the oregano seasoning, even the wheat in the dough — all plants. When we grow our own food, we understand that food doesn’t come from a store. It comes from soil, water, sunlight, and time.”
Crafty Mama tip: This project is a full-season commitment, and that’s part of the point. It teaches sustained responsibility. Put your child in charge of watering (with your backup). Set a phone alarm together: “Pizza Garden Water Time.” The harvest pizza is going to be the best pizza your family has ever eaten, even if it’s just cherry tomatoes and basil on store-bought dough. The pride factor is enormous.
12. Sunflower Height Tracker
Materials: Sunflower seeds, pot or garden space, measuring tape or yard stick, long strip of paper or poster board, markers, camera (phone works fine)
Time to set up: 15 minutes + ongoing all season | Mess Level: Low
The STEM connection: Measurement, data recording, graphing, growth rates, biology
Steps:
- Plant sunflower seeds according to package directions (about 1 inch deep, full sun, after last frost).
- Tape a long strip of paper to the wall near the sunflower (or use a poster board).
- Once the sunflower sprouts, start measuring. Record on the wall chart:
- Date
- Height in inches
- Draw a small picture or take a photo
- Measure once a week at minimum. Twice a week is better for seeing dramatic growth.
- Giant sunflower varieties can grow 8-12 feet tall — your child will be craning their neck by midsummer.
- When the sunflower blooms, measure the flower head diameter too.
- After the bloom fades, harvest the seeds. Count them!
Sample tracking chart:
| Week | Date | Height | Notes |
|---|---|---|---|
| 1 | Apr 12 | 0 in | Planted seed! |
| 2 | Apr 19 | 0.5 in | Sprout appeared Apr 17! |
| 3 | Apr 26 | 3 in | Growing fast, 2 leaves |
| 4 | May 3 | 7 in | 4 leaves now |
| 8 | May 31 | 28 in | Taller than my little brother! |
| 12 | Jun 28 | 60 in | TALLER THAN MOM |
| 16 | Jul 26 | 96 in | Flower bud forming!!! |
The science conversation: “Sunflowers are heliotropic when they’re young — that means they follow the sun across the sky during the day, facing east in the morning and west in the evening. Once the flower head opens, it typically faces east permanently. Scientists think this is because the east-facing side heats up faster in the morning, which attracts more pollinators.”
Crafty Mama tip: This project is spectacularly rewarding because sunflowers grow FAST and TALL. There’s nothing quite like a five-year-old standing next to a sunflower that’s three times their height, knowing they grew it from a seed. Take a photo of your child next to the sunflower every week for a side-by-side growth comparison. At the end of the season, line up the photos — it’s your own time-lapse of summer.
The Science Behind It All: A Quick Reference
One of the great things about garden projects is that the science isn’t theoretical — it’s happening in front of your child’s eyes. Here’s a cheat sheet for the key concepts, so you can explain them naturally during garden time.
Germination
What it is: The process of a seed sprouting and beginning to grow.
What kids see: The first tiny green shoot poking through the soil.
How to explain it: “Inside every seed is a tiny baby plant, plus food to help it start growing. When the seed gets water and warmth, it ‘wakes up’ and starts using that food to push a root down and a stem up. The root goes down to find water in the soil, and the stem goes up to find light.”
Projects that show it: Seed bombs (#1), egg carton starters (#3), bean maze (#10), pizza garden (#11)
Photosynthesis
What it is: The process by which plants convert sunlight into food (energy).
What kids see: Green leaves growing larger and turning toward windows.
How to explain it: “Plants are like tiny solar panels. Their green leaves catch sunlight and use it to make food from air and water. That’s why plants are green — the green stuff is called chlorophyll, and it’s the thing that captures sunlight. Without it, plants couldn’t eat.”
Projects that show it: Mini greenhouse (#2), plant observation station (#5), sunflower tracker (#12)
The Water Cycle
What it is: The continuous movement of water between earth, atmosphere, and back.
What kids see: Condensation inside the greenhouse dome, rain filling the rain gauge.
How to explain it: “Water goes on a big trip — from the ocean and lakes up into the sky (evaporation), forms clouds (condensation), falls as rain (precipitation), and flows back to the ocean. Our greenhouse does the same thing on a tiny scale — look at the water drops on the inside!”
Projects that show it: Mini greenhouse (#2), rain gauge (#7)
Soil Ecosystems
What it is: The complex community of organisms living in and maintaining healthy soil.
What kids see: Worms mixing layers, food scraps disappearing.
How to explain it: “Soil isn’t just dirt — it’s alive! There are billions of tiny creatures in every handful of soil: worms, bacteria, fungi, and insects. They break down dead leaves and food scraps and turn them into nutrients that plants need to grow. Worms are like the Earth’s recycling crew.”
Projects that show it: Worm composting (#8), seed bombs (#1), tin can planter (from our earth day crafts article)
Setting Up a Kid-Friendly Garden Space
You don’t need a backyard. You don’t need raised beds. You don’t even need outdoor space. Here’s how to create a garden space that works for your situation.
Option 1: The Sunny Windowsill (No Outdoor Space)
Works for: Apartments, condos, houses with no yard, winter months
What you need: A south-facing or west-facing windowsill, small pots or containers, a drip tray
Best projects: Egg carton starters (#3), herb seed bombs (#1, planted in pots), plant observation station (#5), bean maze (#10)
Tips:
- Group pots on a large tray to catch water
- Rotate pots a quarter turn every few days so plants grow straight
- A small clip-on grow light extends your options if your windows don’t get great sun
Option 2: The Balcony or Patio Container Garden
Works for: Apartments with outdoor space, small yards, renters who can’t modify the landscape
What you need: Pots in various sizes (5-gallon buckets with drainage holes work great and cost almost nothing), potting soil, a watering can or hose access
Best projects: All 12 projects work here. The pizza garden (#11) is ideal in a large container.
Tips:
- Put heavy pots on plant caddies with wheels so you can move them to follow the sun
- Group plants by water needs (herbs together, tomatoes together)
- Elevate pots on bricks if your balcony floor gets very hot
Option 3: The Backyard Bed or Raised Bed
Works for: Houses with yards, families ready for a bigger commitment
What you need: A sunny spot (6+ hours of direct sun), garden soil or raised bed mix, basic tools (trowel, watering can)
Best projects: Pizza garden (#11), sunflower tracker (#12), wildflower seed bombs (#1), rain gauge (#7)
Tips:
- Start small — a 4×4 foot raised bed is plenty for a first garden
- Let your child help with every step: digging, filling, planting, watering
- Put the garden where you can see it from inside the house, so checking on it becomes effortless
- Edge the bed with painted rock plant markers (#6) for color and function
Making It Kid-Sized
Whatever space you use, make sure your child can reach everything independently. If pots are too high, they’ll stop checking on them. If the watering can is too heavy, they’ll lose interest. Get a child-sized watering can. Provide a step stool for window gardens. Give them their own small set of garden tools. Ownership drives engagement, and engagement drives learning.
Connecting Garden Time to Screen-Free Learning
Let me be direct about something: garden projects are one of the most effective ways to get kids off screens without a fight. Not because you’re taking something away from them, but because you’re offering something genuinely more interesting.
A seed sprouting is more dramatic than any YouTube video. A worm moving through soil is more fascinating than any animation. A sunflower growing taller than your child is more impressive than any game. Nature doesn’t need special effects — it’s already spectacular if kids slow down enough to notice.
Here’s how to make garden time a regular screen-free habit:
Build it into the routine. “Every morning before breakfast, we check the garden.” Make it non-negotiable and brief — 5 minutes is enough. The consistency matters more than the duration.
Make it social. Garden time is conversation time. Some of the best talks I’ve had with my kids have happened while we’re watering plants or pulling weeds. There’s something about side-by-side activity that opens kids up in a way face-to-face conversation doesn’t.
Give them real responsibility. Don’t just let them “help.” Give them actual ownership of a plant, a section of the garden, or a specific project. “This is YOUR sunflower. You’re in charge of watering it.” Responsibility creates investment.
Connect it to other screen-free activities. Garden time flows naturally into outdoor play, nature walks, and art projects. One afternoon you’re watering the garden, the next you’re pressing flowers from it, the next you’re drawing it in a nature journal. For more ideas on filling time without screens, our spring break screen-free activity countdown has a full toolkit of activities that complement garden projects perfectly.
Let them eat what they grow. Nothing motivates a kid like food they produced themselves. A cherry tomato from the garden tastes better than any store-bought tomato, and your child knows it.
Frequently Asked Questions
What seeds are best for kids who are impatient?
Fast-germinating seeds are your best bet for impatient kids: radishes sprout in 3-5 days, lettuce in 5-7 days, beans in 5-8 days, and sunflowers in 7-10 days. Wildflower mixes typically take 10-14 days. Avoid slow germinators like carrots (14-21 days) or parsley (14-28 days) for first-time young gardeners. The speed of that first sprout is critical for maintaining a child’s interest.
Do seed bombs actually work?
Yes, but with realistic expectations. In good conditions (adequate moisture, sunlight, and contact with soil), seed bombs have a germination rate of roughly 50-70% — which is normal and expected. Not every seed bomb will produce plants, just like not every seed in nature grows. Position them on bare soil rather than thick grass, and water regularly for the first two weeks if there’s no rain. The ones that do grow are genuinely magical to discover.
Can I do these projects if I live in an apartment with no yard?
Absolutely. Ten of the twelve projects work entirely indoors: seed bombs (plant in pots), mini greenhouse, egg carton starters, nature journal (take to a park), plant observation station, painted rock markers, bean maze, pressed flower art, worm composting, and sunflower tracker (in a large pot on a sunny balcony or by a window). The pizza garden can work in a large container on a balcony. The rain gauge needs outdoor placement but can go on any uncovered surface — a balcony railing works fine.
My child killed their last plant. How do I set them up for success this time?
First: normalize plant death. Even experienced gardeners lose plants. It’s part of the process, not a failure. Second: choose forgiving plants. Herbs (basil, chives, mint) and sunflowers are resilient and tolerate inconsistent watering better than finicky plants. Third: create a watering routine rather than relying on memory. A phone alarm or a visual checklist on the fridge (“Did we water today? Check!”) makes it systematic. Fourth: start with multiple plants so that even if one doesn’t make it, others likely will. Redundancy is a real gardening strategy, not cheating.
Are worms safe for kids to handle?
Yes. Earthworms and red wigglers are completely harmless. They don’t bite, sting, or carry diseases transmittable to humans. That said, wash hands thoroughly after handling worms or soil, because soil can contain bacteria. The biggest risk is a squeamish parent — kids are almost universally delighted by worms. If your child is hesitant, model gentle handling and let them watch before touching. Never force it, and never use worms to scare or prank.
What if our seeds don’t sprout at all?
This happens, and it’s a valid scientific outcome worth discussing. Common causes: seeds were too old (check expiration dates), soil was too wet or too dry, temperature was wrong (most seeds need 60-75 degrees F), or seeds were planted too deep. Troubleshoot together: “Let’s be scientists about this. What could have gone wrong? What should we try differently?” Then replant. Thomas Edison famously said he didn’t fail — he found 10,000 ways that didn’t work. Gardening teaches the same lesson on a smaller scale.
How do I keep garden projects going through the summer without losing momentum?
Variety is key. Rotate between the projects in this article so there’s always something new happening. The sunflower tracker (#12) provides season-long engagement on its own. Introduce new plantings every few weeks so there are always fresh sprouts to watch. Connect garden activities to cooking (harvest basil for pasta night) and art (press flowers from the garden). And involve friends — a “garden playdate” where kids check on each other’s plants creates social accountability and shared excitement.
Can these projects work in a classroom setting?
Every one of them can work in a classroom, and many teachers already use similar projects for science units. The best classroom picks are: egg carton starters (#3, one per student), the bean maze (#10, dramatic and visible), painted rock markers (#6, art + science), and the nature journal (#4, ongoing all year). Seed bombs (#1) are ideal for a group activity with a take-home component. The worm composting observation (#8) is a phenomenal classroom pet alternative — low maintenance, high fascination, and legitimately educational.
Your Spring Garden Action Plan
If you’re feeling overwhelmed by twelve projects, here’s my recommended approach:
Week 1 (Right now): Make seed bombs (#1) and egg carton starters (#3). These get seeds started immediately and give you something to watch while you plan the rest.
Week 2: Set up the plant observation station (#5) for your egg carton seedlings. Start a nature journal (#4) and take it on your first spring walk.
Week 3: Paint rock markers (#6) for any seedlings you’ll transplant. Build the bean maze (#10) and mini greenhouse (#2) for indoor science.
Week 4: Set up the rain gauge (#7). Start the worm composting observation (#8) if your child is up for it. Plant the pizza garden (#11) and sunflower (#12) if it’s warm enough in your area.
Ongoing: Press flowers (#9) whenever you find beautiful specimens. Use the nature journal every week. Measure the sunflower. Harvest and cook from the pizza garden. Refill the rain gauge data.
By the end of spring, your child will have conducted half a dozen real science experiments, created beautiful art from nature, grown their own food, and spent dozens of hours engaged in deep, screen-free, hands-on learning. Not because you forced them. Because plants are honestly that interesting, once you slow down enough to pay attention.
Happy planting, friends. Go get your hands dirty.