Tissue Paper Crafts for Kids: 15 Colorful Ideas
Discover 15 colorful tissue paper craft ideas for kids aged 2-8, learning 4 essential techniques and important safety guidelines. You'll find projects for various ages, requiring minimal supplies and offering creative fun.
- Follow age-specific tissue paper size rules to ensure safety for young children.
- Learn 4 essential tissue paper techniques: crumpling, tearing, wrapping, and bleeding.
- Find 15 craft ideas suitable for ages 2-8, building fine motor skills and creativity.
- Gather a few inexpensive supplies like tissue paper, glue, and contact paper to get started.
This post contains affiliate links. As an Amazon Associate I earn from qualifying purchases.
Tissue paper is cheap, comes in every color, and works for a two-year-old and a seven-year-old at the same table. Toddlers scrunch and stick. Older kids layer colors on a window and watch the light come through.
This page covers 4 simple techniques, then 7 step-by-step projects and 8 quick ideas for leftover scraps, 15 ideas in all. Each one comes with ages and adult-help notes. Fair warning: expect glue on the table, dye on fingers, and sticky sleeves.
If you like open-ended art, our process art ideas, coffee filter crafts, and watercolor painting for kids pair well with these.
In this article (8 sections)
- Tissue Paper Safety: The Size Rule by Age
- Why Tissue Paper Is Good for Kids’ Crafts (and What to Buy)
- Essential Tissue Paper Techniques for Kids
- Easy Tissue Paper Crafts for Kids (7 Projects by Age)
- 8 More Quick Tissue Paper Ideas
- Glue, Mess and Drying Tips for Tissue Paper Crafts
- Tissue Paper Craft Troubleshooting
- Tissue Paper Craft FAQ
Tissue Paper Safety: The Size Rule by Age
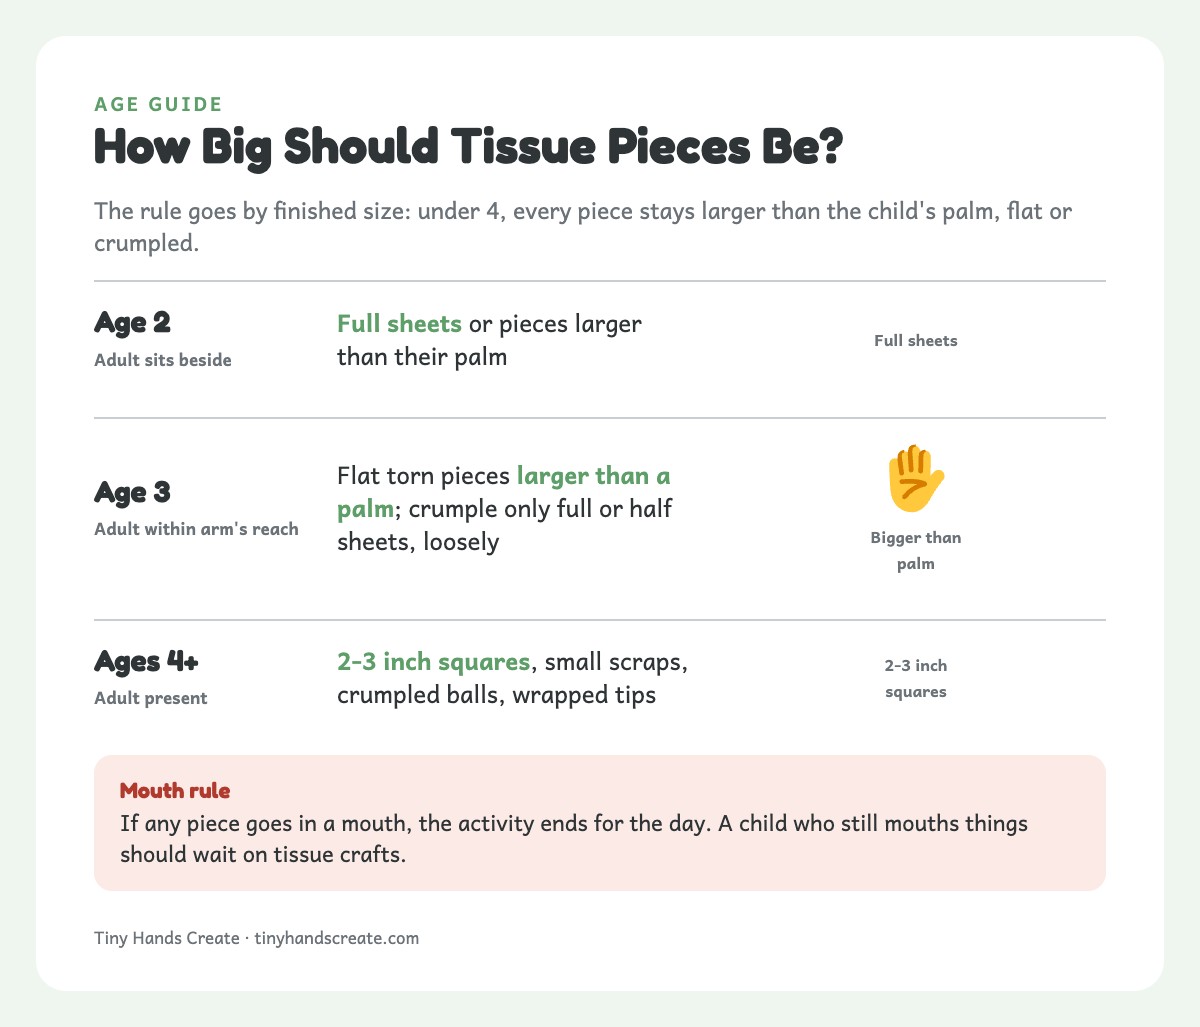
Safety firstOne size rule covers every idea on this page. Tissue is a choking and gagging risk if it goes in a mouth, especially small balls and wet scraps. The rule goes by finished size: for children under 4, every piece stays larger than their palm, flat or crumpled. A small square scrunches down into a mouth-sized ball, so squares are not for under-4s to crumple.
- Age 2: full sheets or pieces larger than their palm, with an adult sitting beside them.
- Age 3: flat torn pieces larger than their palm. Crumple only full or half sheets, loosely, so the finished ball is also larger than their palm. An adult stays within arm’s reach.
- Ages 4+: small squares, small scraps, crumpled balls, and wrapped tips, with an adult present.
If any piece goes in a mouth, the activity ends for the day. Any child who still puts things in their mouth should wait on tissue crafts until that stage passes.
Use non-toxic, washable school glue and tissue labeled non-toxic, and wash hands with soap and water afterward.
Why Tissue Paper Is Good for Kids’ Crafts (and What to Buy)
Three things make tissue paper a good fit for small hands.
- Tears easily: Even toddlers can tear and crumple it. That builds fine motor skills and the hand strength that later helps with writing.
- See-through: Light shines through, so overlapping layers mix into new colors.
- Bleeds when wet: Wet tissue on white paper leaves watercolor-style color, no paint needed.
What to buy once. This list covers the main supplies for every idea on the page. Scissors, markers, string, and ribbon can come from the junk drawer.
- One assorted pack of 100+ tissue sheets. It costs a few dollars and leaves plenty over.
- Tissue labeled “bleeding” or “non-colorfast” for the butterflies.
- Clear contact paper, two 12×12 inch pieces per sun catcher.
- White school glue (non-toxic, washable) and foam brushes.
- White cardstock, 9-inch paper plates, and white coffee filters.
- Pipe cleaners and clothespins.
- A spray bottle.
- A 1-pint jar and battery tea lights with a secured battery compartment.
Store finished pieces flat in a folder with a sheet of plain paper between them. Glued tissue sticks to whatever it touches.
Essential Tissue Paper Techniques for Kids
Learn these four moves and you can mix and match them.
| Technique | Minimum age | Adult help | Mess | Best for |
|---|---|---|---|---|
| Crumple | 4+ for small squares (full sheets at 2, full or half sheets at 3) | Adult within arm’s reach under 4 | Medium | Wreaths, clouds, textured collage |
| Tear-and-layer | 2+ (pieces larger than a palm for ages 2-3) | Adult within arm’s reach under 4 | Medium | Color mixing, portraits |
| Wrap | 4+ | Adult present | Medium | Raised, textured spots |
| Bleeding | 3+ (pieces larger than a palm at 3) | Adult sprays and stays within arm’s reach under 4 | Medium-high | Watercolor effects |
The Crumple Technique (Ages 4+ for Small Squares)
For ages 4 and up, cut tissue paper into 2-3 inch squares. Show your child how to crumple each square into a ball in their fist. Dip the ball lightly in glue, or press it onto a glue-covered surface.
Younger kids go much bigger. What counts is the size of the finished ball, not the square you start with. Even a 4-inch square scrunches down to a ball small enough to fit in a mouth.
So three-year-olds crumple only full or half sheets, loosely, into big soft balls that stay larger than their palm. Two-year-olds crumple full sheets. An adult stays within arm’s reach.
For the glued projects below, kids under 4 press on flat pieces larger than their palm instead of balls.
This is the easiest technique because it needs no precision, just grabbing and squeezing. The balls give a textured surface that reads as flowers, clouds, or treetops, depending on the colors.
The Tear-and-Layer Technique (Ages 2+)
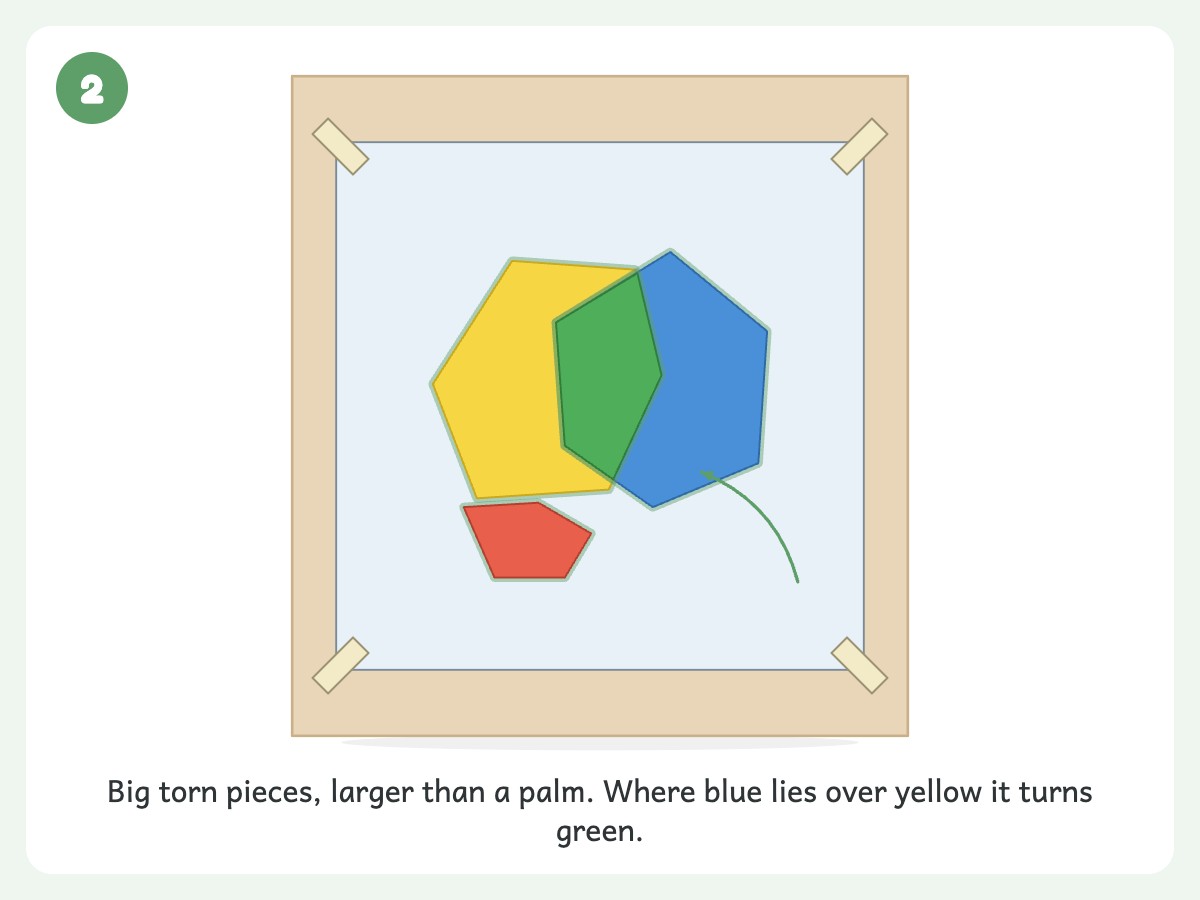
Tear tissue paper into irregular pieces (no scissors needed) and layer them onto a glue-covered surface, overlapping the edges. Where the layers overlap, the colors blend: blue over yellow makes green, and red over yellow makes orange. Kids usually spot the new colors right away, so it works as a quick color-mixing lesson.
For two- and three-year-olds, tear big. Every piece stays larger than their palm, per the size rule at the top of the page.
The Wrap Technique (Ages 4+)
Place a tissue paper square flat on the table. Put a blunt tool in the center of the square: a cotton swab, a chunky crayon, or just the child’s fingertip. Skip sharp pencils. Wrap the tissue up around the tip, dip the base in glue, and press it onto the project surface. Pull the tool out, leaving a tiny tissue paper “flower” standing upright.
The result is a dense, textured, mosaic-like surface. It uses small squares and takes more dexterity than crumpling, so save it for ages 4 and up.
The Bleeding Technique (Ages 3+)
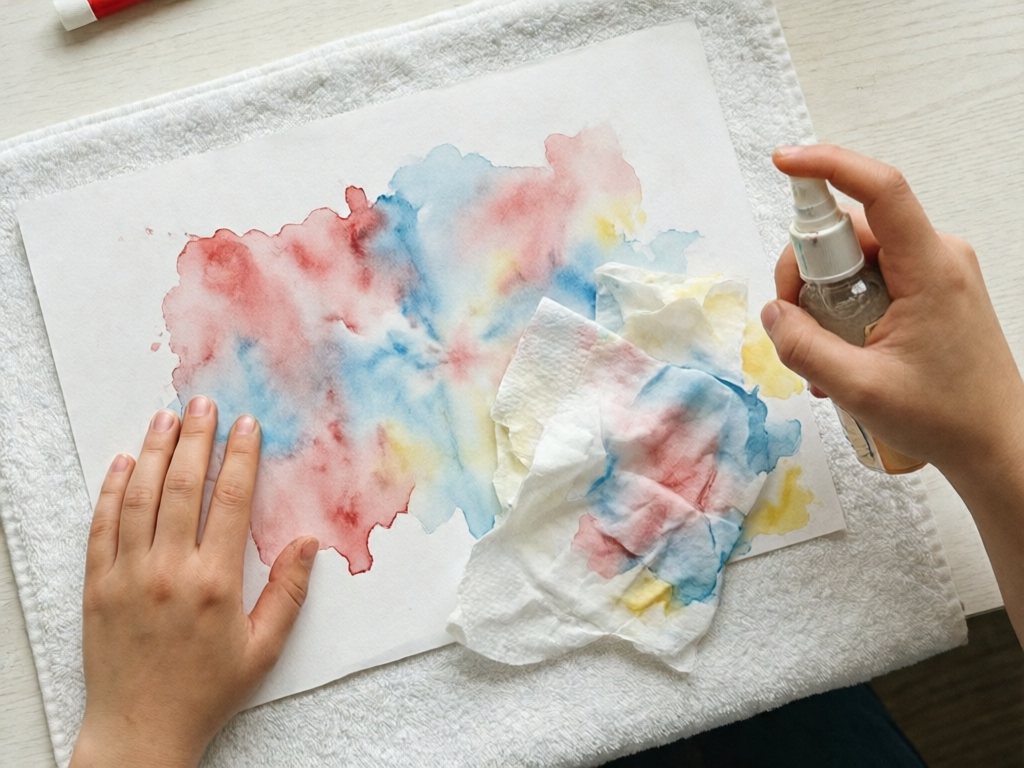
Place pieces of colored tissue paper on white paper or cardstock. Using a spray bottle or paintbrush dipped in water, wet the tissue paper thoroughly. Let it sit for 5-10 minutes, then peel off the tissue paper pieces. The color transfers from the tissue to the white paper, leaving watercolor-like prints in the shapes where the tissue sat.
Good to knowNot all tissue paper bleeds, and gift-wrap tissue is often colorfast. Look for packs labeled “bleeding” or “non-colorfast.” Test a scrap on a wet paper towel first.
Safety firstWet tissue gets mouthed. For children under 4, an adult holds the spray bottle and stays within arm’s reach, and every piece stays larger than the child’s palm. Wash hands afterward.
Easy Tissue Paper Crafts for Kids (7 Projects by Age)
These projects use the techniques above to make finished pieces worth displaying.
| Project | Ages | Time | Mess | Techniques used | Adult prep |
|---|---|---|---|---|---|
| 1. Sun catchers | 3+ (pieces larger than a palm at 3) | 20 min | Low-medium | Tear-and-layer | Cut and seal contact paper |
| 2. Mosaic art | 4+ (2-3 with pieces larger than a palm) | 30-45 min plus drying | Medium | Crumple, wrap (optional) | Draw outline |
| 3. Flowers | 5+ | 20 min | Low | Accordion fold | Adult cuts pipe cleaners and folds the ends back |
| 4. Color bleed butterflies | 3+ (pieces larger than a palm at 3) | 30 min plus drying | Medium-high | Bleeding | Spray and clip for ages 3-4; cut and fold pipe cleaners |
| 5. Collage portraits | 4+ | 30-45 min plus drying | Medium | Tear-and-layer | None |
| 6. Lanterns | 6+ | 30 min plus drying | Medium | Tear-and-layer | Handle glass, check batteries |
| 7. Wreath | 3+ (flat pieces larger than a palm at 3; balls from 4) | 30 min plus drying | Medium | Crumple (tear-and-layer under 4) | Cut plate center |
1. Stained Glass Sun Catchers
Materials:
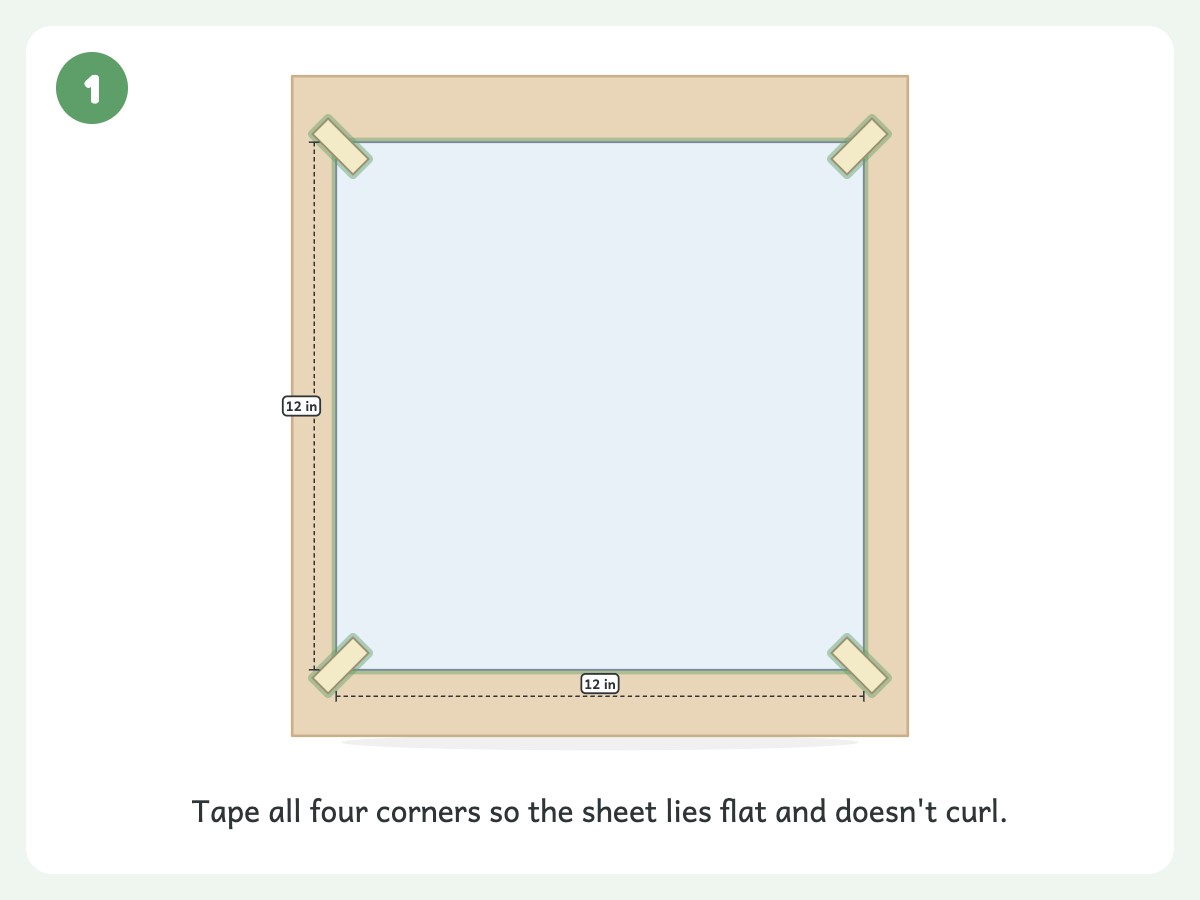
- A 12×12 inch piece of clear contact paper (sticky side up, taped to the table).
- Tissue paper torn or cut into pieces, 2-3 sheets in 2-3 colors. Keep every piece larger than a palm for 3-year-olds.
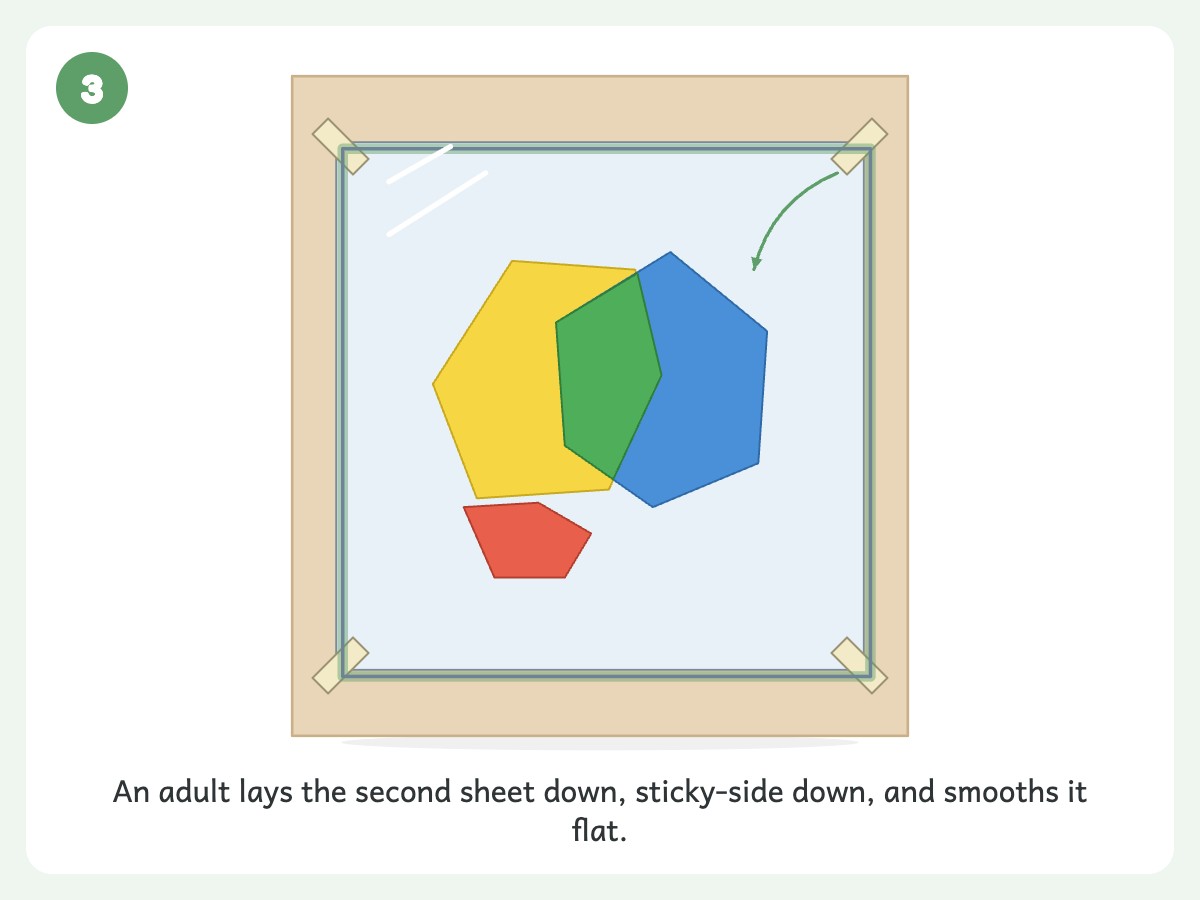
- A second 12×12 inch piece of contact paper for sealing.
- Black construction paper for the frame (optional).
- Scissors and string for hanging.
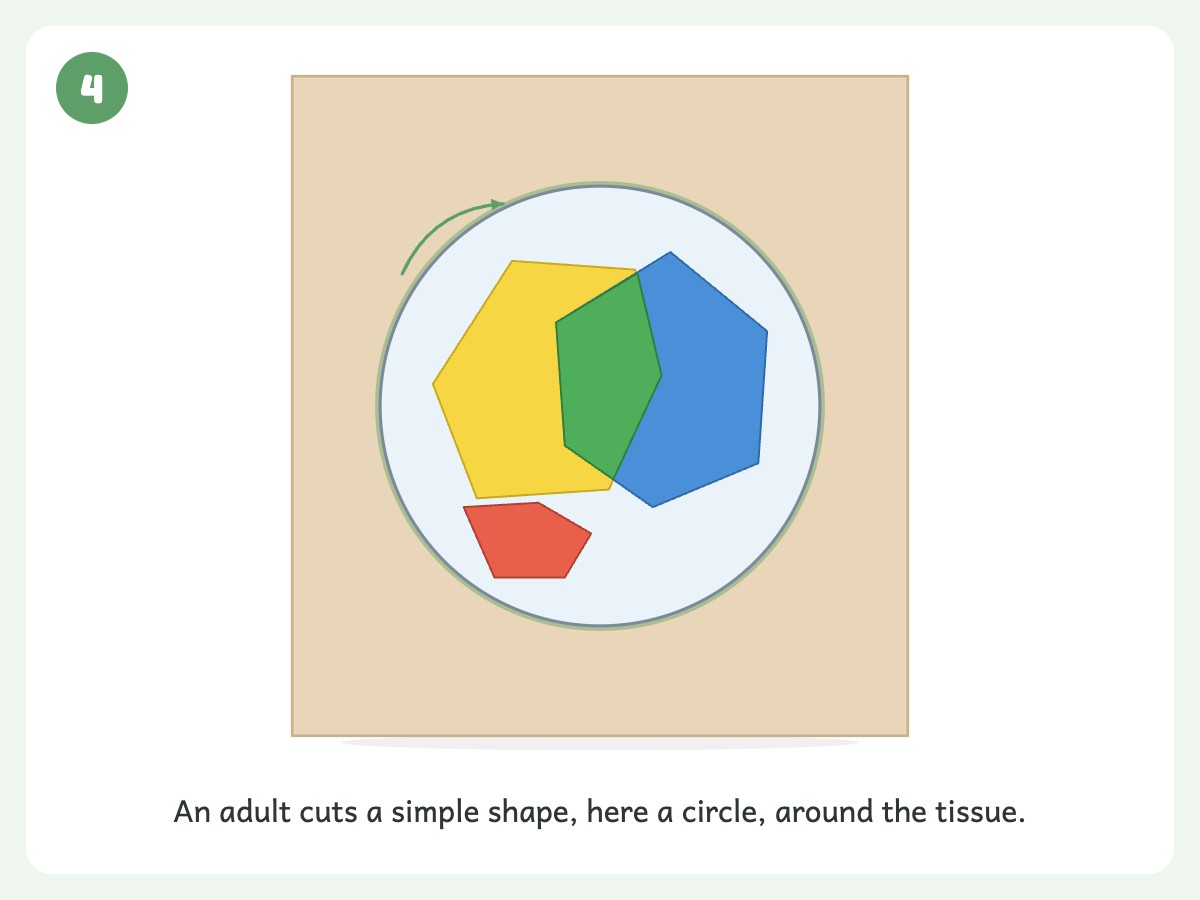
There’s no paint and no glue to clean up, but the sticky sheet needs an adult to handle it. Sleeves and elbows will get stuck to it at least once, so roll sleeves up first.
- Set up. An adult tapes clear contact paper sticky-side up to the table.
- Add tissue. Your child presses torn tissue pieces onto the sticky surface, overlapping colors.
- Seal. An adult presses a second sheet of contact paper on top.
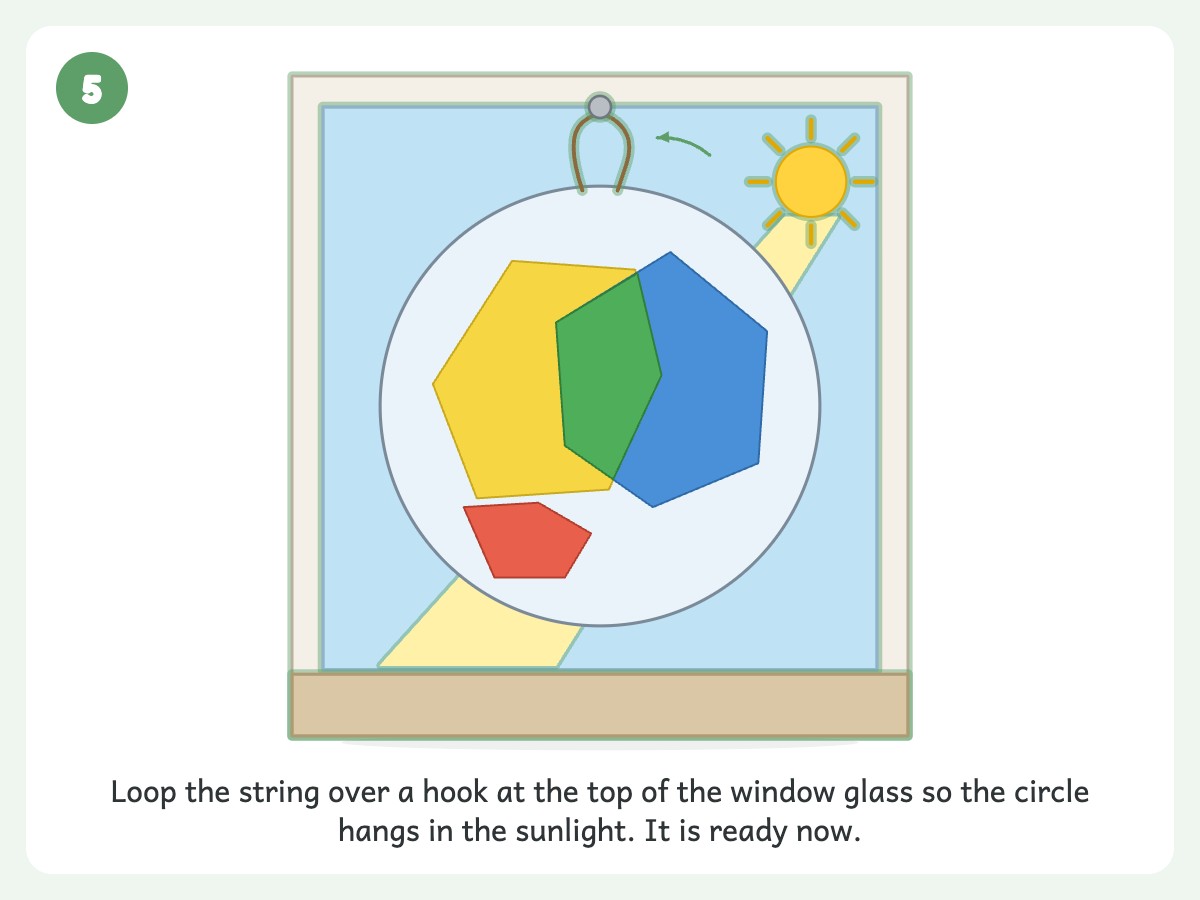
- Cut. An adult cuts shapes for kids under about 4. Older kids can use child-safe scissors with supervision, and our cutting practice sheets make a good warm-up.
- Frame (optional). Attach a black paper frame with a glue stick or tape.
- Hang. No drying needed; hang it in a sunny window right away.
TipTape the contact paper down at the corners first so it doesn’t curl. If the colors turn muddy, limit your child to 2-3 colors.
2. Tissue Paper Mosaic Art
Materials:
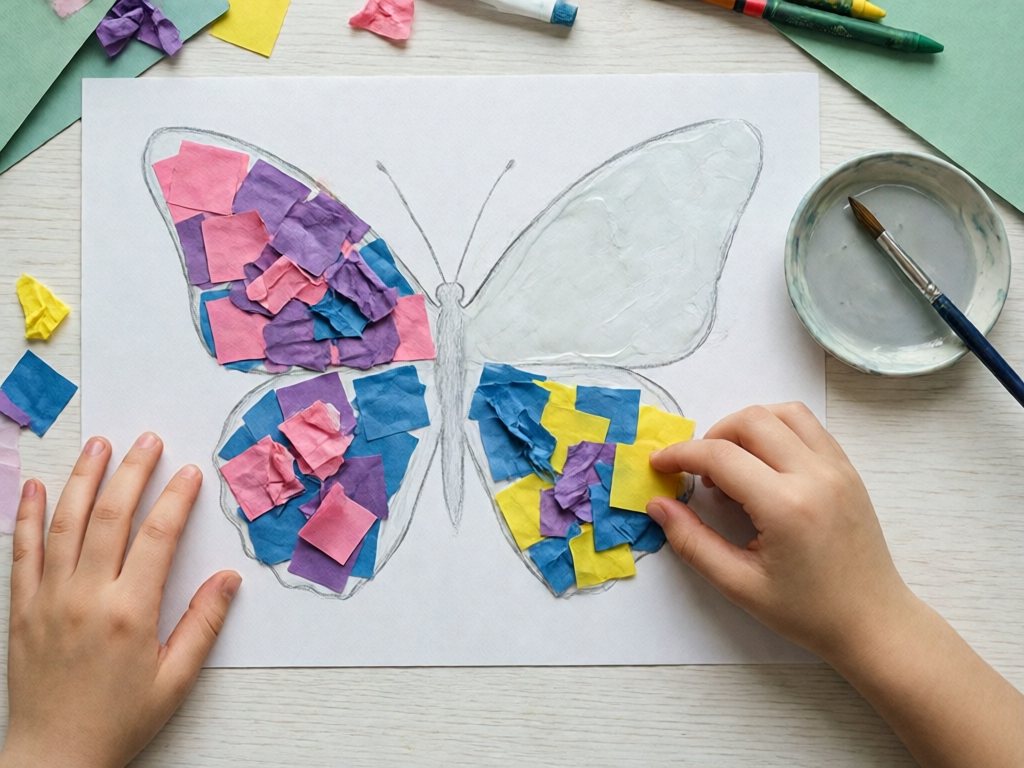
- One sheet of white cardstock with a simple outline drawn on it (a butterfly, rainbow, tree, flower, or initial letter).
- Tissue paper cut into roughly 1-inch squares for ages 4+, 3-4 sheets in 3-4 colors. For ages 2-3, tear pieces larger than a palm instead.
- White school glue thinned to about 2 parts glue to 1 part water, applied with a paintbrush. About 2 tablespoons of glue is plenty for one sheet.
- Outline. An adult draws a simple shape on the cardstock. Use a circle or heart for younger kids and a multi-section outline for older ones. Our shape recognition worksheets are handy if you want simple shapes to copy.
- Glue. Brush thinned glue inside one section.
- Fill. Your child presses on flat or crumpled squares, using one color per section.
- Repeat. Work section by section until the outline is full.
- Dry. Let it dry flat for at least 4 hours, preferably overnight.
Expect 3-4 year olds to stay with it for 10-15 minutes, so use a small shape. Two- and three-year-olds press flat pieces larger than their palm instead of small squares, with an adult within arm’s reach.
Most kids drop the glue brush within a couple of minutes and switch to fingers, which works fine.
If the paper curls, the glue was too wet. Press it flat under a book once it has dried.
Variation: swap flat squares for wrapped tips on one section for a raised, textured look (ages 4+, blunt tool only).
3. Tissue Paper Flowers
Materials:
- 5-8 sheets of tissue paper per flower (all one color or mixed).
- One pipe cleaner per flower for the stem, with the ends folded back by an adult.
- Scissors
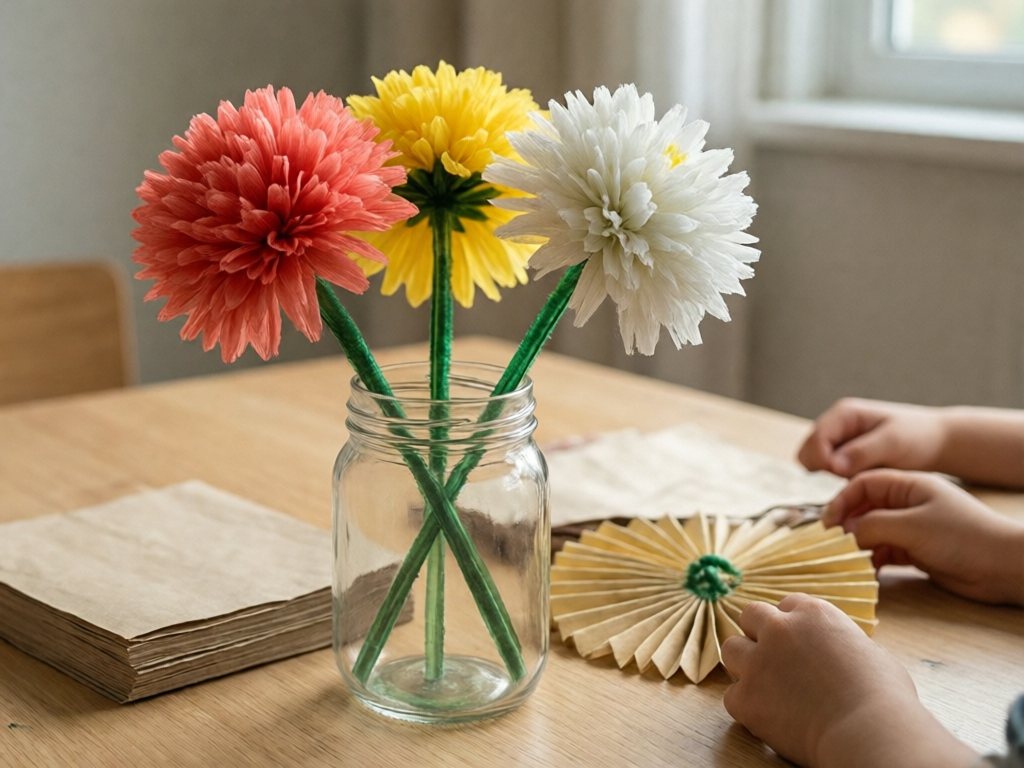
- Fold. Stack 5-8 sheets cut to about 8×10 inches. Accordion-fold them in roughly 1-inch folds, back and forth like a fan.
- Trim. Round or point the ends with scissors.
- Secure. Pinch the center and twist a pipe cleaner around it to form the stem.
- Fan out. Spread the accordion folds.
- Fluff. Gently pull each tissue layer upward and toward the center.
Safety firstAn adult cuts any pipe cleaner and folds each cut end back about 1/2 inch so no bare wire shows. Bent wire ends can still poke. Run a finger over them before you hand the stem to your child.
The result is a fluffy flower. Separating the layers takes a delicate touch, so this suits ages 5 and up. Younger kids can help with the folding and pick the colors.
Leftover stems? Our pipe cleaner crafts will use them up.
If a layer tears, just fluff the rest around it. Nobody will spot it. Most kids make a few flowers before attention drifts, which is enough for a small Mother’s Day bouquet or a centerpiece.
4. Tissue Paper Color Bleed Butterflies
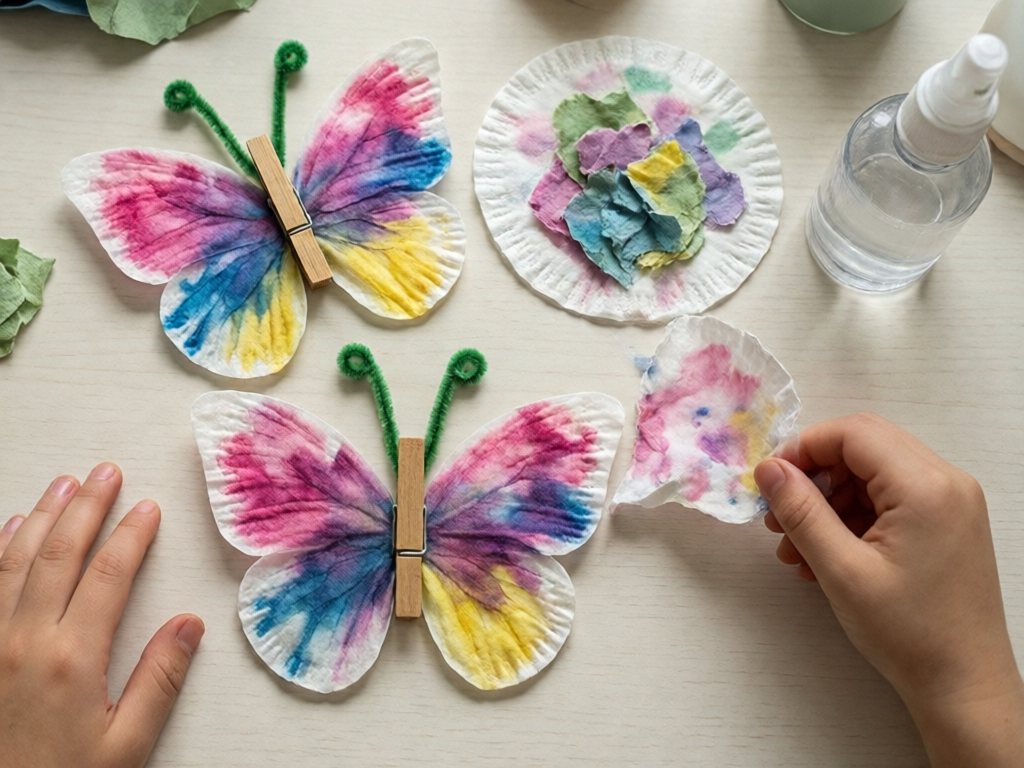
Materials:
- White coffee filters, one per butterfly (the cone type or flat-bottom basket type).
- Bleeding tissue paper pieces in 2-3 bright colors. Keep every piece larger than a palm for 3-year-olds.
- A spray bottle of water.
- A clothespin for the body.
- Pipe cleaners for antennae.
- Lay. Place pieces of colored tissue on a flattened coffee filter.
- Spray. Wet it well with water; an adult holds the bottle for children under 4.
- Wait. Let it sit 5-10 minutes, then peel off the tissue.
- Dry. Let the filter dry completely.
- Clip. Pinch the center and clip a clothespin over the pinch for the body. Clothespins can pinch small fingers, so an adult does the clipping for ages 3-4.
- Antennae. An adult cuts the pipe cleaner and folds the tips back about 1/2 inch so no bare wire shows. Check the ends for pokes, then twist it onto the clothespin. An adult attaches it for ages 3-4.
This is the messiest project on the page. The table will look tie-dyed by the end, so put a tray or an old towel under the filters.
Every butterfly comes out different depending on where the tissue sat. If the colors don’t bleed, your tissue is probably colorfast. Test a scrap on a wet paper towel next time.
5. Tissue Paper Collage Portraits
Materials:
- A large piece of white paper or cardstock, about 12×18 inches.
- Tissue paper in skin tones, hair colors, and clothing colors, about 4-6 sheets total.
- Glue
- Markers for details
- Tear. Your child tears tissue for hair, skin, and clothes.
- Layer. Brush on thinned glue (about 2 parts glue to 1 part water) and press the pieces down, overlapping edges.
- Detail. Add eyes, mouth, and background with markers.
Overlapping layers blend into a range of skin tones and hair colors. Keep to 2-3 layers per area. More than that gets muddy and wrinkly.
The hair tends to end up bigger than the whole head, and that’s the best part. Frame a few together if you want a family gallery wall.
6. Tissue Paper Lanterns
Materials:
- One clean jar per child, about 1 pint. Mason jars and recycled jam jars both work, and baby food jars make mini lanterns. Check for chips and cracks. Glass stays with the adult. Use a plastic or acrylic jar if your child will carry the lantern.
- Tissue paper torn into pieces, 2-3 sheets per jar.
- Liquid starch or a 1:1 mix of white glue and water, about 1/4 cup.
- A foam brush
- One battery-operated tea light per jar, with a screw-secured or taped-shut battery compartment.
- Adult prep. An adult checks the jar for chips and cracks, sets it on the table, and does all the lifting and moving of glass.
- Stick. Brush the 1:1 glue-and-water mix onto the jar and press tissue pieces on, overlapping colors.
- Seal. Brush another layer of the mix over the top.
- Dry. Let the jar dry upright until completely dry.
- Light. Only when fully dry, an adult adds a battery tea light.
Safety firstSwallowed button or coin batteries cause severe internal burns within hours. Use only battery-operated lights, never real candles. Pick tea lights with a screw-secured or taped-shut battery compartment, and keep spare batteries out of reach. If a battery may have been swallowed, go to emergency care now. Call the National Battery Ingestion Hotline (800-498-8666, US) without waiting for symptoms.
Glass is adult-only. Younger siblings (under 6) should not handle the finished lantern. Keep it on a high shelf where only an adult moves it.
Lit, the jar gives off a warm, colorful glow in a dark room. Set a few on a high shelf for the holidays, or give one as a gift with the tea light inside.
Fingers will be coated in dried glue by the end. It peels right off, and kids love peeling it.
7. Tissue Paper Wreath
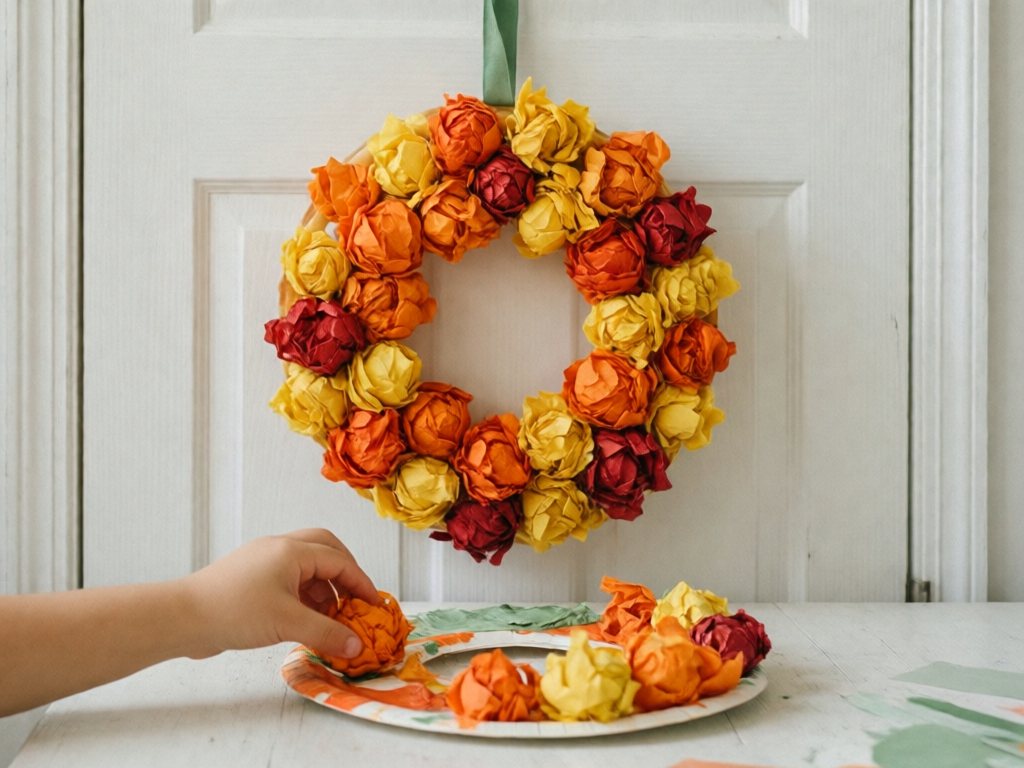
Materials:
- A 9-inch paper plate with the center cut out (adult prep).
- Tissue paper squares in seasonal colors, about 3×3 inches, for ages 4+. For 2- and 3-year-olds, tear flat pieces larger than a palm instead. About 10 sheets in 2-3 colors covers one wreath.
- White school glue
- Ribbon for hanging
- Prep. An adult cuts out the plate center.
- Glue. Spread glue on one section of the ring.
- Press. Kids 4 and up crumple squares into balls and pack them into the glue. Kids under 4 press flat pieces larger than their palm onto the glue instead.
- Repeat. Work around the ring until it’s covered.
- Dry flat. Let it dry flat for at least 4 hours, preferably overnight.
- Hang. Add a ribbon loop at the top once it’s dry.
| Occasion | Tissue colors |
|---|---|
| Valentine’s Day | Red and pink |
| Easter | Pastels |
| July 4th | Red, white, and blue |
| Fall | Orange and yellow |
| Winter holidays | Red and green |
Two- and three-year-olds skip the balls. They press flat pieces larger than their palm onto the glue, with an adult within arm’s reach. The wreath comes out flatter but just as colorful.
Gaps tend to show once the glue dries, so keep a few spare squares to fill them in. For more paper-plate ideas, see our seasonal paper plate crafts.
8 More Quick Tissue Paper Ideas
These use the same four techniques and the same supplies, so they are a good home for leftover scraps. Add them to the 7 projects above and you have 15 ideas to rotate through.
| Idea | Ages | Technique | How it works |
|---|---|---|---|
| 8. Rainbow collage | 2+ (pieces larger than a palm for ages 2-3) | Tear-and-layer | Brush thinned glue onto cardstock in arcs. Press torn strips on, one color per arc. |
| 9. Blossom tree | 3+ (flat pieces larger than a palm at 3; balls from 4) | Crumple | An adult draws a trunk and branches. Your child glues on pink or green balls for blossoms or leaves. Three-year-olds press on flat torn pieces instead of balls. |
| 10. Crumpled caterpillar | 3+ (flat pieces larger than a palm at 3; balls from 4) | Crumple | Glue a row of balls across cardstock. Draw on legs and a face with markers. Three-year-olds overlap a row of flat torn pieces instead of balls. |
| 11. Paper plate jellyfish | 3+ (pieces larger than a palm at 3) | Tear-and-layer | An adult cuts a paper plate in half. Cover the half with torn tissue, then glue long strips along the straight edge for tentacles. |
| 12. Sealed bookmarks | 4+ | Tear-and-layer | Press scraps between two strips of contact paper. An adult cuts the strips and trims the edges. |
| 13. Bleed-print cards | 3+ (pieces larger than a palm at 3) | Bleeding | Fold cardstock in half and bleed tissue shapes onto the front. Write a message inside once it is dry. |
| 14. Flower garden picture | 4+ | Wrap | Draw stems on cardstock. Add a cluster of wrapped tips at the top of each stem. |
| 15. Coffee filter flowers | 3+ (pieces larger than a palm at 3) | Bleeding | Bleed color onto a coffee filter and let it dry. Pinch the center and twist on a pipe cleaner stem. An adult cuts the pipe cleaner and folds the ends back. |
The size rule from the top of the page applies here too. The drying rule is also the same as above. Glued pieces dry flat for at least 4 hours, and sealed contact paper is ready right away.
Glue, Mess and Drying Tips for Tissue Paper Crafts
- Pre-cut tissue squares to fit your child’s age. Tearing is a great skill-builder, but if you need a lot of pieces, pre-cutting saves time and prevents frustration. Stack several sheets and cut through them all at once. Small squares are for ages 4+. Under 4, skip the squares and tear flat pieces larger than a palm.
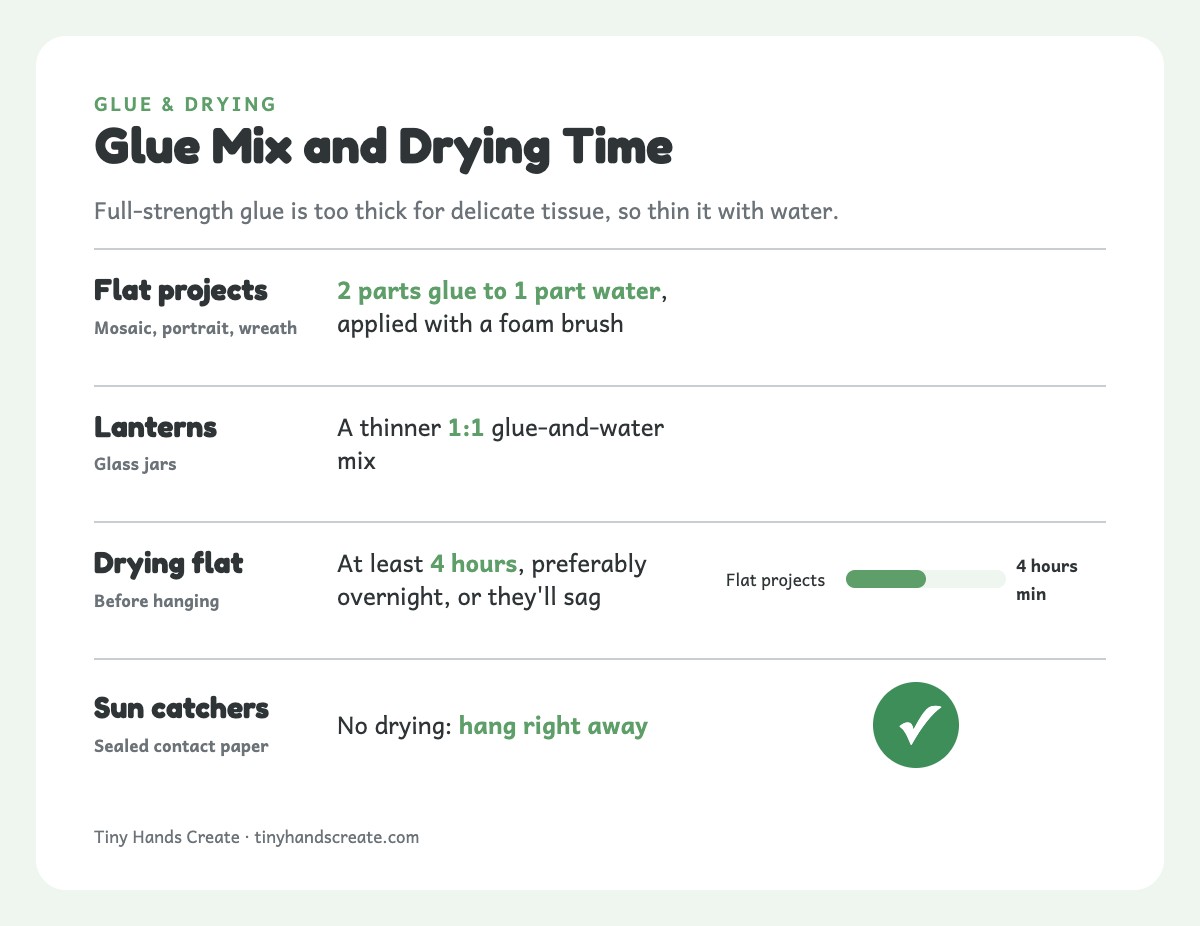
- Thin your glue. Full-strength glue is too thick for delicate tissue. It makes pieces slide off or turn see-through in patches. For flat projects, mix about 2 parts glue to 1 part water and apply with a foam brush. Lanterns use a thinner 1:1 mix.
- Use a damp paper towel station. Tissue paper dye stains fingers. Keep damp paper towels nearby for wiping between colors. Wash hands with soap and water when you finish, especially before snack.
- Work on a covered surface. Wet tissue stains tables, countertops, and clothes, so dress kids in play clothes. A layer of newspaper, a plastic tablecloth, or butcher paper protects surfaces and makes cleanup a one-step job.
- Let projects dry flat and fully. Glued flat projects (mosaic, portrait, wreath) need to dry completely before hanging or they’ll sag. Lay them flat for at least 4 hours, preferably overnight. Lantern jars dry upright, and sealed sun catchers can hang right away.
Quick set-up checklist before you start:
- Covered table and a damp towel.
- Glue thinned to about 2 parts glue to 1 part water.
- Pre-cut squares for ages 4+ (flat pieces larger than a palm under 4), and foam brushes.
- Aprons or old shirts.
- Spray bottle for bleeding projects.
- A scrap of tissue to test for bleeding.
Tissue Paper Craft Troubleshooting
Wrinkles and tears are part of the look, so let them stay. If something does go wrong, check this chart.
| Problem | Cause | Quick fix |
|---|---|---|
| Tissue slides off | Glue too thick | Thin glue and brush it on. |
| Muddy colors | Too many layers or colors | Limit to 2-3 colors. |
| Soggy paper | Too much glue or water | Blot with a paper towel and dry flat. |
| No bleed | Colorfast tissue | Test a scrap and buy bleeding tissue. |
| Tissue tears | Pulling wet pieces | Press gently and let it dry first. |
A sheet of tissue paper costs only a few cents and works for hands of any size. For more small-hands practice, try our acorn crafts for toddlers or cutting practice sheets.
Tissue Paper Craft FAQ
Does tissue paper bleed on its own?
Only bleeding (non-colorfast) tissue does, and only when wet. Test a scrap on a wet paper towel first.
What glue works best?
White school glue thinned with water. Use about 2 parts glue to 1 part water for flat projects and 1:1 for lanterns.
Is tissue paper safe for toddlers?
Tissue labeled non-toxic is fine to handle, but small balls and wet scraps are a choking risk if they go in a mouth. For 2- and 3-year-olds, stay within arm’s reach and keep every piece, flat or crumpled, larger than their palm. If a piece goes in a mouth, stop for the day. A child who still mouths things should wait.
What age can kids start?
Tearing and sticking work from about 2, with an adult sitting beside the child and pieces larger than a palm. Three-year-olds keep to flat pieces larger than a palm and crumple only full or half sheets, so the finished ball stays larger than their palm too. Small squares, small balls, and wrapped tips start at 4 with an adult present.
How do I get tissue paper dye off skin and surfaces?
Wash hands with soap and water. On tables, use a damp cloth or mild cleaner, testing a small spot first.
Can I make tissue paper crafts without glue?
Yes. Sun catchers use sticky contact paper, so no glue is needed.
Crafty Mama
Crafty Mama is a former elementary art teacher turned stay-at-home parent who believes every child is creative — they just need the right invitation. She develops age-appropriate activities, crafts, and projects that spark imagination while keeping mess (and parent stress) to a minimum.