10 Heartfelt DIY Teacher Gifts Kids Can Actually Make Themselves
Discover why handmade teacher gifts from your kids are more cherished than store-bought ones. This article provides 10 DIY ideas your children can genuinely make, with practical tips to avoid last-minute stress.
- Teachers overwhelmingly prefer your child's handmade gifts over purchased ones.
- Handmade gifts are personal keepsakes that show effort, not budget, and foster child ownership.
- Focus on gifts your child genuinely makes themselves, even if they're imperfect.
- Plan projects at least two weeks ahead; they cost $2-8 and take 20-60 minutes each.
I’m going to tell you about the moment that changed how I think about teacher gifts forever.
It was the last week of preschool, and I was standing in the Target dollar section at 9:47 PM on a Tuesday, panic-buying a “World’s Best Teacher” mug and a gift card. You know the drill. I’d meant to plan ahead. I’d pinned seventeen Pinterest-worthy ideas back in March. And yet there I was, shoving a generic mug into my cart alongside goldfish crackers and a pack of diapers, feeling like I’d failed some invisible parenting test.
The next morning, while I was wrapping the mug in tissue paper, my then-four-year-old sat down at the kitchen table with a piece of construction paper and a fistful of markers. Without any prompting, she drew a wobbly picture of herself holding hands with her teacher, wrote “I LUV YOU MS. SARA” in backwards letters, and folded it in half.
When we got to school, her teacher opened my perfectly wrapped mug, smiled politely, and set it aside. Then she opened that folded piece of construction paper, and her eyes filled with tears. She kept that card taped to her desk for the rest of the year. The mug? I spotted it in the donation bin during the fall garage sale.
That was the last store-bought teacher gift I ever gave.
If you’re reading this, you probably already suspect what I learned the hard way: the best teacher gifts are the ones your kids make themselves. Not the ones you make and pretend your kids made (we’ve all been there, no judgment). The ones where their little hands actually do the work, where the paint is slightly smudged and the letters are a little crooked and the whole thing screams “a real child made this with real love.”
So here are ten DIY teacher gifts that kids can genuinely make themselves, with age-appropriate instructions, honest mess warnings, and everything you need to pull them off without a midnight Target run.
Why Handmade Teacher Gifts Beat Store-Bought Every Time
Before we dive into projects, let me share something that might surprise you. In a 2024 survey by the National Education Association, 78% of teachers said they preferred handmade gifts from students over purchased ones. And it wasn’t even close.
Here’s what teachers consistently say they love about handmade gifts:
- They’re personal. A gift card to Starbucks says “I remembered you exist.” A handprint flower pot says “I spent time thinking about you specifically.”
- They’re keepsakes. Teachers told me they keep handmade gifts for years, sometimes decades. One retired teacher I spoke with still has a painted rock from a student who’s now in college.
- They show effort, not budget. Teachers know that families have wildly different financial situations. A handmade gift levels the playing field in a way that feels good for everyone.
- Kids feel ownership. When your child hands over something they actually made, they beam. That pride is worth more than any $25 gift card.
My daughter’s kindergarten teacher put it perfectly: “I have a drawer full of gift cards I’ve forgotten about. But I have a shelf in my living room dedicated to things my students made me. Those are the gifts that make me cry in the parking lot after school.”
Now, I’m not saying you should never include a gift card. In fact, several of these projects pair beautifully with a small gift card tucked inside. But the handmade piece is what transforms a transaction into a memory.
Before You Start: Quick Planning Guide
Let’s be practical for a minute, because I know you’re probably reading this with a finite number of weekends before the last day of school.
Budget
Every project on this list costs between $2 and $8 per gift in materials. Most use supplies you likely already have at home. I’ll call out any specialty items you’ll need to buy.
Timeline
Depending on your child’s age and attention span, each project takes 20 minutes to an hour. I’d recommend starting at least two weeks before the last day of school so you’re not doing this at 11 PM the night before (ask me how I know).
Supply Sourcing
Dollar Tree is your best friend for most of these. I also love ordering basic craft supplies from Amazon in bulk at the start of the school year so I’m always ready. The craft aisle at Walmart and Target works too, but your wallet will notice the difference.
The Master Gift Guide at a Glance
| # | Project | Ages | Cost | Time | Difficulty | Mess Level |
|---|---|---|---|---|---|---|
| 1 | Painted Flower Pot with Seed Packets | 3+ | $4-6 | 30-45 min | Easy | Medium |
| 2 | Thumbprint Bookmark Set | 2+ | $2-3 | 15-20 min | Easy | Low |
| 3 | Personalized Pencil Holder | 4+ | $3-5 | 30-40 min | Easy | Medium |
| 4 | Watercolor Thank You Cards | 3+ | $2-4 | 20-30 min | Easy | Medium |
| 5 | Scented Sugar Scrub Jars | 5+ | $5-8 | 20-30 min | Easy | Low |
| 6 | Tissue Paper Flower Bouquet | 4+ | $3-5 | 30-45 min | Medium | Low |
| 7 | Stamped Tea Towel | 3+ | $4-6 | 20-30 min | Easy | Medium |
| 8 | Photo Frame with Handprint Art | 2+ | $3-5 | 20-30 min | Easy | Medium |
| 9 | Gratitude Jar with Handwritten Notes | 5+ | $3-5 | 30-45 min | Medium | Low |
| 10 | Marbled Mug Using Nail Polish | 7+ | $5-8 | 30-45 min | Medium | High |
The 10 DIY Teacher Gift Projects
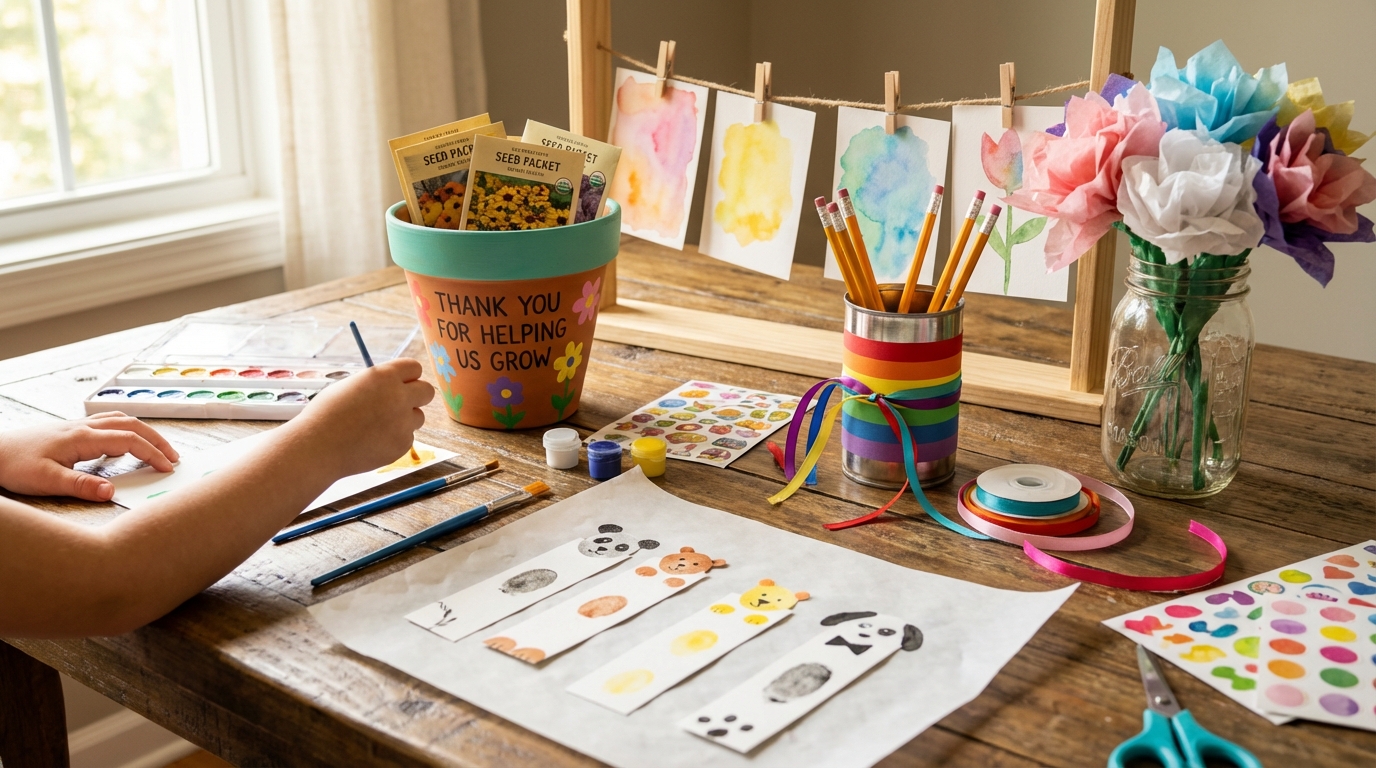
1. Painted Flower Pot with Seed Packets
This is my go-to recommendation for a reason. It’s forgiving, it’s beautiful even when it’s messy, and it’s the gift that keeps giving because the teacher gets to watch something grow. My youngest painted one of these when she was three, and honestly, the wild, chaotic paint splatters looked intentionally artistic. Sometimes toddler aesthetic works in your favor.
Supply list:
- Small terra cotta pot (4-inch, usually $1-2 at Dollar Tree)
- Acrylic paint in 3-4 colors
- Paintbrushes (wide ones for little hands)
- Clear acrylic sealer spray (parent applies this)
- 2-3 seed packets (wildflowers, sunflowers, or herbs)
- Small bag of potting soil (optional)
- Ribbon or twine
- Newspaper or plastic tablecloth for the workspace
Step-by-step instructions:
- Cover your workspace. Terra cotta pots love to collect paint drips, and acrylic paint on your kitchen table is a bad day. I put down a plastic Dollar Tree tablecloth and let the kids go wild.
- Have your child paint the outside of the pot however they want. Stripes, dots, handprints, total abstract chaos — it all works. For younger kids (3-4), I suggest two or three colors max so it doesn’t turn into brown mud.
- Let it dry completely. This is the hard part for impatient crafters. At least 2-3 hours, ideally overnight. I usually do painting one evening and assembly the next.
- Once dry, a parent should spray the outside with clear acrylic sealer. Do this outdoors and away from kids. This prevents paint from chipping and makes the pot look polished.
- Tuck the seed packets inside the pot. You can also add a small bag of soil if you want to make it a complete kit.
- Tie a ribbon around the pot and attach a handwritten tag. My kids write “Watch me grow — just like my love for you!” which is cheesy but teachers eat it up.
Age modifications:
- Ages 3-4: Let them fingerprint or handprint the pot. Provide the colors already squeezed onto a paper plate. Expect full hand coverage in paint.
- Ages 5-7: They can attempt patterns, write the teacher’s name, or draw flowers. Provide a pencil for sketching first.
- Ages 8-10: Challenge them to plan a design, use fine-tipped brushes, or paint a scene. They can also write a message directly on the pot with paint pens.
What could go wrong:
The paint might peel if you skip the sealer. Three-year-olds will absolutely try to paint the inside of the pot and their own arms. The pot might look like a Jackson Pollock — that’s a feature, not a bug. If paint colors get muddy, let it dry and add dots of contrasting color on top.
Presentation idea: Place the pot in a small cellophane bag, tie with ribbon, and tuck a card inside. Looks like it came from a boutique.
2. Thumbprint Bookmark Set
This one is magical because even the tiniest kids can do it, and the results look genuinely charming. My two-year-old made a set of these for her daycare teachers, and each little fingerprint got turned into a ladybug. I cried a little. Don’t judge me.
Supply list:
- Cardstock cut into bookmark strips (2″ x 6″, any color)
- Washable ink pads or acrylic paint
- Fine-tip markers (for parent/older kid to add details)
- Laminator or clear packing tape (for durability)
- Hole punch
- Ribbon or tassel
Step-by-step instructions:
- Cut cardstock into bookmark-sized strips. I usually make 3-4 per teacher so they can keep extras or share.
- Have your child press their thumb or fingertip onto the ink pad, then press it onto the cardstock. Make a row of prints, or scatter them randomly.
- Once the prints are dry, use fine-tip markers to turn each thumbprint into something: a ladybug, a flower, a heart, a bee, a caterpillar (line up several prints in a row for this). Younger kids will need a parent to do this part; older kids can do it themselves.
- Write the child’s name and “2026” on the back, or add a message like “You left your thumbprint on my heart.”
- Laminate the bookmarks or cover both sides with clear packing tape. This is essential — without it, the ink smudges and the bookmarks fall apart.
- Punch a hole at the top and thread a ribbon or tassel through it.
Age modifications:
- Ages 2-3: They do the thumbprints; you do everything else. Keep prints to one or two colors. Have wipes ready because they will put inky fingers in their mouths.
- Ages 4-6: They can help turn prints into creatures with markers and write their name.
- Ages 7-10: Let them design the whole thing — they can create entire scenes from thumbprints.
What could go wrong:
Ink pads dry out fast when kids press too hard. Have extras. Some kids will stamp their entire palm instead of just a thumb. The laminator can bubble if you feed the bookmark in crooked — go slowly. If you’re using packing tape instead of a laminator, overlap the strips so there are no gaps.
Presentation idea: Bundle 3-4 bookmarks together with twine and a small tag that reads “From the thumbs of [child’s name].”
3. Personalized Pencil Holder (Decorated Tin Can)
This is recycled crafting at its finest, and I love it because the base material is literally garbage. We eat a lot of canned beans in this house, so I’m never short on supplies. Plus, teachers actually use pencil holders every single day, making this both sentimental AND practical.
Supply list:
- Clean tin can with label removed (standard 15-oz size works great)
- Sandpaper or nail file (to smooth any sharp edges)
- Acrylic paint or spray paint (for base coat)
- Decorating materials: buttons, washi tape, ribbon, stickers, googly eyes, foam letters
- Hot glue gun or craft glue (parent supervises hot glue)
- Felt or foam sheet (optional, for lining the inside)
Step-by-step instructions:
- Clean the can thoroughly and remove the label. Run your finger around the inside top edge — if there are any sharp spots, smooth them with sandpaper. Safety first.
- Paint the outside of the can with a base coat. White or a light color works best as a base for decorating. Let dry 1-2 hours.
- Let your child go to town decorating. Buttons, foam letters spelling the teacher’s name, washi tape stripes, stickers, the works. My kids love using foam letter stickers to spell “BEST TEACHER” or the teacher’s name.
- Once decorations are secure and dry, optionally line the inside with a circle of felt to prevent pencils from scratching the metal.
- Fill with sharpened pencils, pens, or markers for bonus points.
Age modifications:
- Ages 4-5: Stick to stickers, washi tape, and foam shapes that peel and stick. Avoid small buttons (choking hazard for the younger end).
- Ages 6-8: Introduce button patterns, ribbon wrapping, and glitter glue details.
- Ages 9-10: They can attempt more sophisticated techniques — decoupage with tissue paper, painting detailed designs, or wrapping the can in fabric.
What could go wrong:
The biggest risk is sharp edges on the can. Always check twice. Stickers don’t stick well to unpainted tin — the base coat matters. If you use Mod Podge or decoupage, it takes forever to dry and kids get impatient. Glitter glue looks amazing wet and disappointing dry (it loses its sparkle). Regular glitter with white glue is better for visual impact.
Presentation idea: Fill with pencils and wrap the whole thing in cellophane tied with a bow. Add a tag that says “Thank you for helping me WRITE my story.” (Puns are mandatory in teacher gifts; it’s the law.)
4. Watercolor Thank You Cards
If your kids love painting, this is the project. Watercolors are forgiving, beautiful, and hard to mess up in a way that doesn’t still look artsy. I wrote about watercolor techniques for kids in detail if you want to level up their skills, but honestly, even a three-year-old’s watercolor wash looks like something you’d buy at a stationery store.
Supply list:
- Watercolor paper or heavyweight cardstock (pre-fold into card size)
- Watercolor paints (the cheap Crayola set is perfectly fine)
- Paintbrushes (round brushes, medium size)
- Cup of water
- Paper towels
- Markers or colored pencils (for writing the message inside)
- Envelopes
Step-by-step instructions:
- Pre-fold your paper into card size (approximately 5″ x 7″ when folded). Watercolor paper gives the best results, but heavyweight cardstock works if that’s what you have.
- Wet the front of the card with a wide brush dipped in clean water. This creates a wet surface for the paint to flow on — it’s called the “wet-on-wet” technique and it makes everything look dreamy.
- Have your child drop colors onto the wet surface. They’ll bloom and blend naturally. Encourage gentle touches — watercolor doesn’t need heavy brushing. This is great process art territory because the paint does beautiful things all on its own.
- Let the front dry completely (30-60 minutes, or use a hair dryer on low).
- Once dry, your child can add details on top: a flower, a heart, a sun, or just their name.
- Open the card and write a message inside. For pre-writers, they can draw a picture inside while you write what they dictate. I always write exactly what they say, word for word, including the weird parts. Last year my son dictated “Dear Mr. Ryan, thank you for letting me be the line leader that one time. Also your shoes are cool. Love, Miles.” It was perfect.
Age modifications:
- Ages 3-4: Focus entirely on the wet-on-wet technique — it’s basically magic water painting. They add color and watch it spread. You handle the folding, message writing, and details.
- Ages 5-7: They can paint a simple scene (rainbow, flowers, sun) and attempt to write their own message.
- Ages 8-10: Encourage planned compositions, layered techniques (let the first layer dry, then add details on top), and thoughtful personal messages.
What could go wrong:
Too much water = a buckled, warped card. Use watercolor paper if possible, or press the dried card under heavy books overnight. Too many colors = brown soup. Stick to 3-4 colors max, and avoid mixing complementary colors (red + green, blue + orange) directly on the paper. Kids will dip their brush from dark paint straight into light paint and ruin it — give them two cups of water and remind them to rinse between colors.
Presentation idea: Slide the card into a kraft envelope, seal with a heart sticker, and write the teacher’s name in your child’s handwriting on the front. Simple and elegant.
5. Scented Sugar Scrub Jars
This one feels fancy but is shockingly easy. The first time I made these with my kids, my seven-year-old said “Wait, we can just MAKE bath stuff?” and honestly, his mind was blown. Teachers love these because they’re a genuine self-care treat, not another classroom supply.
Supply list:
- Small mason jars or clear containers with lids (4-8 oz size)
- 1 cup granulated white sugar per jar
- 1/2 cup coconut oil (melted)
- Essential oil or extract (lavender, vanilla, peppermint, or lemon)
- Food coloring (optional)
- Small spoon or craft stick for mixing
- Ribbon, labels, or gift tags
- Small bowl for mixing
Step-by-step instructions:
- In a bowl, combine 1 cup sugar and 1/2 cup melted coconut oil. Stir until it reaches a thick, wet sand consistency.
- Add 8-10 drops of essential oil or 1 teaspoon of extract. Vanilla is the safest crowd-pleaser. Lavender is lovely. Peppermint is refreshing. Let your child pick the scent — they feel very important making this decision.
- If you want to add color, stir in 2-3 drops of food coloring. A tiny bit goes a long way. My daughter added too much blue once, and the scrub turned navy and stained her hands for two days. Lesson learned.
- Have your child spoon the mixture into the jar. Pack it gently — not too tight, not too loose.
- Close the lid and decorate the outside with a ribbon and a tag. We write things like “You deserve a little sweetness — thank you for an amazing year!”
Age modifications:
- Ages 5-6: They can measure (with help), stir, choose the scent, and spoon into jars. Keep essential oils away from their direct handling — you add the drops.
- Ages 7-8: They can do almost everything independently. Let them read the “recipe” and follow steps on their own.
- Ages 9-10: Challenge them to create their own custom blend. My older kid made a “lemonade” scrub with lemon oil and yellow food coloring that was actually genius.
What could go wrong:
If coconut oil is too hot when mixed, the sugar dissolves and you get syrup instead of scrub. Let it cool to barely warm — it should be liquid but not hot. Too much essential oil can irritate skin, so stick to the recommended drops. If you’re gifting to a teacher with sensitive skin or allergies, use vanilla extract instead of essential oils — it’s safer and smells amazing.
Presentation idea: Tie a small wooden spoon to the jar with ribbon. Include a label with the scrub “flavor” and usage instructions (“Massage into hands, rinse with warm water, feel fancy”). Print labels on kraft sticker paper for an extra-polished look.
6. Tissue Paper Flower Bouquet
These never wilt, they cost almost nothing, and a bouquet of them in a mason jar is honestly gorgeous. My kids and I made a huge batch of these last year — we spent a Sunday afternoon at the kitchen table with music playing, assembling flowers, and it became one of those unexpectedly perfect family afternoons.
Supply list:
- Tissue paper in assorted colors (5-6 sheets per flower)
- Green pipe cleaners or wooden skewers wrapped in green floral tape
- Scissors
- String, twist ties, or small rubber bands
- Mason jar or small vase (optional, for presentation)
- Green construction paper (optional, for leaves)
Step-by-step instructions:
- Stack 5-6 sheets of tissue paper. For standard-size flowers, cut the stack to about 8″ x 12″. For smaller flowers, cut to 4″ x 6″.
- Accordion-fold the stack, making each fold about 1 inch wide. When done, it should look like a paper fan.
- Pinch the folded stack in the center and secure with a twist tie, pipe cleaner, or small rubber band.
- Using scissors, round the edges of each end for a peony look, or cut them into points for a more angular flower. This is where you can get creative — scalloped edges, fringed edges, pointy edges all create different flower styles.
- Gently separate each layer of tissue paper, pulling it upward toward the center, one layer at a time. Be patient — tissue paper tears easily. This is the part that tests everyone’s fine motor skills and patience.
- Fluff and adjust until you have a full, round flower.
- Attach the pipe cleaner as a stem by twisting it around the center, or tape a wooden skewer to the back.
- Make 5-7 flowers for a full bouquet. Mix colors!
Age modifications:
- Ages 4-5: They can help with the accordion folding (with guidance) and the fun part — pulling the layers apart. They’ll tear some layers. That’s okay. Slightly ragged flowers look more organic.
- Ages 6-8: They can do the full process with minimal help. Let them choose color combinations. Teach them the different edge cuts.
- Ages 9-10: Challenge them to make different flower types (roses, carnations, dahlias) by varying the technique. They can look up tutorials and experiment.
What could go wrong:
Tissue paper tears easily, especially when kids pull too fast or too hard. Have extra sheets on hand. The flowers look flat and sad if you don’t separate enough layers — really coax each one up gently. If using pipe cleaners for stems, the flower head can droop — reinforce with tape. Folding too loosely creates a floppy flower; folding too tightly makes it hard to separate layers.
Presentation idea: Arrange 5-7 flowers in a mason jar (painted by your child, if you’re ambitious) or wrap the bouquet in kraft paper tied with twine, like flowers from a farmer’s market. Add a tag: “Thank you for helping me bloom.”
7. Stamped Tea Towel
This one is practical, cute, and wildly easy. I made these with my kids for Christmas gifts too, and the technique connects well to mess-free art approaches when you use stamps instead of freehand painting.
Supply list:
- Plain white or cream flour sack tea towel (these are $1 at Dollar Tree, or a pack of 5 for $5 on Amazon)
- Fabric paint in desired colors
- Stamp materials: apple halves, potato stamps, foam stamps, or your child’s handprint
- Paper plates (for paint palettes)
- Cardboard (to slide inside the towel to prevent bleed-through)
- Iron (for heat-setting, parent only)
Step-by-step instructions:
- Pre-wash the towel to remove any sizing (that factory coating that makes it feel stiff). This helps the paint adhere.
- Lay the towel flat on your workspace and slide a piece of cardboard inside so paint doesn’t bleed through to the back.
- Pour fabric paint onto paper plates in thin layers — you want even coverage on the stamp, not globs.
- Choose your stamp method:
- Apple halves: Cut an apple in half, pat the cut side dry with a paper towel, press into paint, stamp onto towel. Creates beautiful apple prints.
- Potato stamps: Cut a potato in half, carve a simple shape (heart, star, circle) into the flat side. Press into paint and stamp.
- Handprints: Press your child’s hand into paint on the plate, then press firmly onto the towel. This creates the most personal design.
- Foam stamps: Standard craft stamps work great — letters, shapes, animals.
- Let the towel dry completely, at least 4-6 hours or overnight.
- Heat-set the paint by ironing the design on the reverse side (medium heat, no steam) for 3-4 minutes. This makes the design permanent and washable. Parent job only.
Age modifications:
- Ages 3-4: Handprints are best. You control the paint application — press their hand into the paint on the plate, guide it to the towel, press down. Expect paint on arms, face, and the dog.
- Ages 5-7: They can use stamps independently. Let them plan a pattern or create a scene.
- Ages 8-10: They can design the whole layout, use multiple stamp types, and even write messages with letter stamps.
What could go wrong:
Too much paint on the stamp = blobby, unrecognizable prints. Dab excess on scrap paper first. Fabric paint takes much longer to dry than regular paint — do not let your child touch it “to check.” Apple stamps get mushy after a few uses — have backup apples. If you skip the heat-setting step, the design will wash out in the laundry.
Presentation idea: Fold the towel neatly, tie with a ribbon, and attach a small cookie cutter or wooden spoon with a tag that says “Thanks for ‘stirring’ up a love of learning.” (Again: teacher gift puns are not optional.)
8. Photo Frame with Handprint Art
This project falls squarely into process art territory, and it doubles as a keepsake frame that teachers actually display. I’ve seen these on teacher desks years after the child moved on. Something about a tiny handprint frozen in time just gets to people.
Supply list:
- Wooden picture frame (unfinished, from Dollar Tree or craft store)
- Acrylic paint in 2-3 colors
- Paintbrushes
- A class photo or individual photo of your child (4×6 or whatever fits the frame)
- Clear acrylic sealer spray (parent applies)
- Optional: gems, buttons, stickers for extra decoration
- Newspaper or plastic tablecloth
Step-by-step instructions:
- Remove the glass and backing from the frame. You’re only painting the wooden frame part.
- Paint the frame a base color. White, light blue, or yellow are all great bases. Let dry.
- Apply paint to your child’s hand (use a brush to spread it evenly) and press their handprint onto the frame. Position it in a corner or along one side. You can do one handprint or all four corners — whatever fits.
- Let handprints dry completely.
- Your child can add additional decorations: painted dots, small stickers, gems, their name written in marker.
- Once everything is dry, a parent seals the frame with clear acrylic spray. Outdoors, away from kids.
- Insert the photo, reassemble the frame, and add a note on the back with the child’s name, age, and year.
Age modifications:
- Ages 2-3: This is basically a handprint stamping session. You do the frame prep, paint application, and guiding. They provide the adorable tiny hand. That’s enough. It’s more than enough.
- Ages 4-6: They can paint the base coat, do their own handprint (with guidance), and add decorations.
- Ages 7-10: Let them paint a miniature scene or portrait on the frame, or use fine brushes for detailed designs. Their handprint still goes on there — it’s the whole point.
What could go wrong:
Hand paint dries fast, so work quickly from paint application to stamping. If the print is blurry, don’t try to “fix” it by pressing again — you’ll get a smudge. Just let it dry and add another print in a slightly different spot. Kids will try to wiggle their fingers during the press. Hold their wrist gently but firmly. The frame glass is breakable, obviously — keep it separate until the very end.
Presentation idea: Insert a current photo of your child (or a class photo if you have one), wrap the whole frame in tissue paper, and write “Framed with love by [name], [year]” on the back.
9. Gratitude Jar with Handwritten Notes
This is hands-down the most meaningful gift on this list. Every teacher I’ve talked to says that specific, personal words of appreciation mean more than anything else. This project turns that sentiment into a physical object the teacher can keep and revisit whenever they’re having a tough day.
Supply list:
- Mason jar or clear glass jar with lid (pint size works well)
- Colored paper or cardstock, cut into small strips (about 2″ x 4″)
- Markers, colored pencils, or pens
- Ribbon
- Stickers, washi tape, or paint for decorating the jar
- Optional: glitter, small gems for the jar exterior
Step-by-step instructions:
- Decorate the outside of the jar. Your child can paint it, wrap it in washi tape, or stick on gem stickers. A simple ribbon around the middle looks great too. This is also a terrific opportunity to practice the skills from Earth Day recycled crafting — use a repurposed pasta sauce jar instead of buying new.
- Cut colorful paper into strips. I usually prep 15-20 strips per jar.
- On each strip, your child writes one thing they love, remember, or appreciate about their teacher. These can be:
- Specific memories: “I loved when you read us Charlotte’s Web”
- Qualities: “You never yell even when we’re loud”
- Funny moments: “Remember when the class hamster escaped and you screamed”
- Simple feelings: “You make me feel smart”
- Fold each note and place it in the jar.
- Decorate the lid — paint it, cover with washi tape, or wrap in fabric secured with a rubber band.
- Add a label to the front: “[Name]’s Gratitude Jar” or “Open when you need a smile.”
Age modifications:
- Ages 5-6: They can write simple sentences with help. Phonetic spelling is perfect — “u r the best teecher” is infinitely more charming than a dictated, parent-written message. Let the spelling be real.
- Ages 7-8: They can write longer, more specific memories and reflections. Encourage them to think of particular moments.
- Ages 9-10: They can write thoughtful paragraphs, include quotes, and even add small drawings to each strip. This age can produce notes that are genuinely moving.
What could go wrong:
Kids sometimes struggle to think of specific things. Prompt them: “What’s your favorite thing the teacher does?” “What did you learn this year that was hard but you did it?” “What makes this teacher different from other teachers?” If they’re really stuck, have them draw pictures instead of writing — a drawing of their favorite classroom moment is just as powerful.
Presentation idea: Tie a ribbon around the jar with a decorative tag. Include a small card on top that explains the concept: “Inside this jar are [X] reasons why you’re an amazing teacher. Open one whenever you need a reminder.” I’m not going to pretend I didn’t cry while helping my daughter fill hers last year. I definitely cried.
10. Marbled Mug Using Nail Polish
Okay, this is the most advanced project on the list, but the results are STUNNING. The first time we tried this, my eight-year-old stared at the finished mug and whispered “we made this?!” with genuine awe. Fair warning: this one is messy and requires more supervision, but it’s worth every towel you sacrifice.
Supply list:
- Plain white ceramic mug (Dollar Tree, $1.25)
- Nail polish in 2-3 colors (cheap brands work great — the wilder the colors, the better)
- A disposable container deep enough to submerge the mug (old takeout container works)
- Warm water
- Toothpick or wooden skewer
- Nail polish remover and cotton balls (for cleanup)
- Newspaper or trash bags (to protect your workspace)
- Disposable gloves (recommended)
- Clear acrylic spray sealer (for durability)
Step-by-step instructions:
- IMPORTANT: Do this outside or in a well-ventilated area. Nail polish fumes are strong. I cannot overstate this. Open every window. Consider the garage or porch.
- Fill your disposable container with warm (not hot) water, about 3 inches deep.
- Quickly drip nail polish onto the surface of the water — it should spread into a thin film. Work fast because nail polish dries quickly. Add drops of each color, one at a time.
- Use a toothpick to swirl the colors gently. Don’t over-swirl — 2-3 passes creates the prettiest marble effect. Over-swirling turns everything muddy.
- Hold the mug by the handle and slowly roll it through the nail polish film on the water’s surface. The polish will transfer onto the mug in a marble pattern.
- Set the mug on newspaper to dry. Don’t touch the design for at least 2 hours.
- Once completely dry, spray with clear acrylic sealer to protect the design. Let cure for 24 hours.
- NOTE: Marbled mugs are hand-wash only. The design will not survive a dishwasher. Include this info on your gift tag.
Age modifications:
- Ages 7-8: They can drip the nail polish and do the swirling, but an adult should handle the dipping (it’s easy to smudge). Gloves are a must — nail polish is no fun to scrub off little fingers.
- Ages 9-10: They can do the full process with supervision. Let them experiment with color combinations and swirl patterns.
- Under 7: I’d skip this one and go with one of the others. The fumes, the precision needed, and the cleanup make it frustrating for younger kids.
What could go wrong:
The nail polish sinks instead of floating: your water is too cold (use warmer water) or the polish is too thick (try a different brand). The colors mix into a brownish mess: you swirled too much or used colors that don’t contrast well. Stick to combos like teal + gold, purple + white, blue + green. The design smudges when dipping: you moved the mug too fast. Go slowly and steadily. The kitchen smells like a nail salon for three days: you didn’t do it outside. Learn from my mistakes, please.
Presentation idea: Fill the mug with wrapped chocolates or tea bags, wrap in cellophane, and tie with a ribbon. Include a “hand-wash only” tag so the teacher doesn’t ruin it in the dishwasher.
Presentation Ideas That Make DIY Gifts Look Polished
Here’s a secret: presentation is what separates “cute kid craft” from “wow, this looks like it came from Etsy.” And it takes about 5 minutes of extra effort.
The Gift Bag Approach:
Drop the finished gift into a solid-colored gift bag from Dollar Tree. Add tissue paper on top. Attach a handwritten tag with twine. Done. This works for virtually every project on this list.
The Cellophane Wrap:
For items like painted pots, mugs, or jars, cellophane wrap with a ribbon makes everything look boutique-level. Buy a roll of clear cellophane from Dollar Tree (it comes in a big sheet) and cut to size. Gather at the top and tie with ribbon.
The Kraft Paper Bundle:
For flat items like cards, bookmarks, or tea towels, wrap in kraft paper and tie with baker’s twine. Add a small sprig of dried lavender or a fresh flower from your yard if you’re feeling fancy. This takes 90 seconds and looks like a professional gift.
The Tag:
Always, always include a handwritten tag or card from your child. Even if the whole gift IS a card (like the watercolor cards), add a small note. “For [Teacher’s Name], from [Child’s Name]” at minimum. Let the child write it — crooked letters and all.
The Combo Gift:
Pair a handmade item with a small purchased item for maximum impact. A painted flower pot + a $5 coffee gift card. A sugar scrub jar + a bar of fancy soap from TJ Maxx. The handmade piece shows heart; the purchased piece shows you know teachers are real humans who enjoy real things.
When to Start Making Teacher Gifts (Timeline Working Backward)
I used to be a last-minute person. Now I’m a “three weeks before the last day of school” person, and my stress levels thank me. Here’s how I plan it:
3-4 weeks before the last day of school:
- Choose your project(s)
- Take inventory of supplies you already have
- Make your shopping list
2-3 weeks before:
- Buy supplies (one trip, everything at once)
- Do any prep work: cut paper, pre-fold cards, remove labels from cans, pre-wash tea towels
2 weekends before:
- Main crafting session. This is the big one. Set aside 1-2 hours on a Saturday or Sunday. Put on music, lay out supplies, and make it a fun family activity, not a stressful assignment. If you have multiple teacher gifts to make (classroom teacher, art teacher, music teacher, bus driver, after-school program), assembly-line style is your friend. Do all the base coats at once, all the handprints at once, all the decorating at once.
1 week before:
- Finishing touches: sealing, heat-setting, adding photos to frames
- Presentation: wrapping, tagging, assembling gift bags
- Write (or dictate) personal messages
The day before the last day of school:
- Final quality check. Make sure everything is dry, sealed, wrapped, and labeled.
- Pack gifts carefully for transport. Nothing sadder than a beautiful painted pot cracking in a backpack.
The morning of:
- Hand the gift to your child. Let THEM present it. Watch their face when the teacher reacts. Try not to cry in the hallway. (You will cry in the hallway.)
Frequently Asked Questions
How much should I spend on a teacher gift?
There’s no right answer, but most school etiquette guides suggest $10-25 for an end-of-year teacher gift. The beauty of DIY is that you can create something worth far more in sentiment for $3-8 in materials. Many schools have policies about gift values, so check your school handbook if you’re unsure. Whatever you spend, a handmade component makes it feel more personal than a gift card alone.
My child’s teacher has 25+ students. Won’t they be overwhelmed with gifts?
Teachers do receive a lot of gifts at the end of the year, and yes, 25 mugs is a lot of mugs. That’s actually another argument FOR handmade gifts — they stand out from the sea of gift cards and generic purchases. Teachers consistently say it’s the personal, handmade items that make it to their “keep forever” shelf. A handprint bookmark takes up almost no space but carries enormous meaning.
What if my kid’s teacher has allergies? Are any of these gifts risky?
Good thinking. The sugar scrub (Project 5) could be an issue if the teacher has skin sensitivities — consider using unscented or vanilla extract instead of essential oils, and include an ingredient label. The marbled mug (Project 10) is hand-wash only and shouldn’t cause allergies once sealed. Painted items are generally safe once fully dried and sealed. When in doubt, stick with paper-based projects like cards, bookmarks, or the gratitude jar.
Should I make gifts for ALL the teachers my child has?
This is a personal call, but I usually make gifts for the main classroom teacher, any aides who are in the room daily, and any specialist teacher my kid talks about regularly. If your child takes a bus, the bus driver is often forgotten and deeply appreciated. For secondary teachers (art, music, PE) where the relationship is less personal, a card alone is a lovely gesture. My rule: if my kid can tell me something specific about the person, they get a gift.
What if my toddler literally cannot make anything?
If your child is under two, a handprint or footprint on a card or frame is plenty. You’re doing the work, and everyone knows it, and nobody cares. The handprint IS the gift. That tiny, perfect, paint-covered handprint captures a moment in time that’s gone before you know it. Pair it with a heartfelt note (written by you) and call it done. I promise no teacher has ever looked at a baby handprint and thought “this isn’t crafty enough.”
Can I make teacher gifts as a classroom parent for the whole class?
Absolutely! Several of these projects work brilliantly as group gifts. The gratitude jar is perfect — collect a note from every student and fill one big jar. The photo frame can include a class photo. A flower pot can be covered in thumbprints from every child. Coordinate with other parents through your class communication channel, assign each family a simple task (bring one note, one thumbprint, etc.), and assemble it yourself. Teachers are especially moved by whole-class gifts because they represent every student.
My child wants to give their teacher something they made totally on their own without my help. Should I let them?
YES. A thousand times yes. Even if the result is a crumpled piece of paper with an unrecognizable drawing and a message that reads “yor the besst teetcher in the hole wrld,” that is PERFECT. The whole point of a handmade gift is the child’s authentic expression of gratitude. Your child’s voice, your child’s art, your child’s words. Resist the urge to “fix” it, re-do it, or supplement it. The mess is the magic.
There you have it — ten teacher gifts that come from the heart (and from your craft drawer, and probably from the recycling bin). Whatever you choose to make, remember that the best part isn’t the finished product. It’s your kid at the kitchen table, tongue sticking out in concentration, making something for someone they care about. That’s the gift within the gift.
Now if you’ll excuse me, I need to go buy terra cotta pots. We have three teachers, one aide, a bus driver, and an after-school counselor to make gifts for, and the last day of school is in six weeks.
Happy crafting, friends. You’ve got this.
Have you made any of these teacher gifts? I’d love to see your results! Tag us on social media or send a photo — especially the ones that went hilariously wrong. Those are my favorite.