Hanukkah Crafts for Toddlers: 8 Easy Menorah Ideas
Discover 8 easy, toddler-safe Hanukkah menorah crafts for ages 1-3, along with essential safety rules and choke-hazard-checked material swaps to keep your little one safe.
- Use the toilet paper tube test for small parts; avoid beads, standard pom-poms, and googly eyes for ages 1-4.
- Opt for big paper shapes, large torn tissue, and chunky dough as safe craft materials.
- Never use real candles in toddler crafts; keep real menorahs well out of reach.
- Choose non-toxic, washable materials with an ACMI AP seal, assuming everything goes in their mouth.
- Stay within arm's reach, clean up scraps, and manage mixed-age craft sessions carefully.
This post contains affiliate links. As an Amazon Associate I earn from qualifying purchases.
Beads, tiny gems, and mini dreidels show up on most holiday craft lists, and a one-year-old will taste them long before decorating with them.
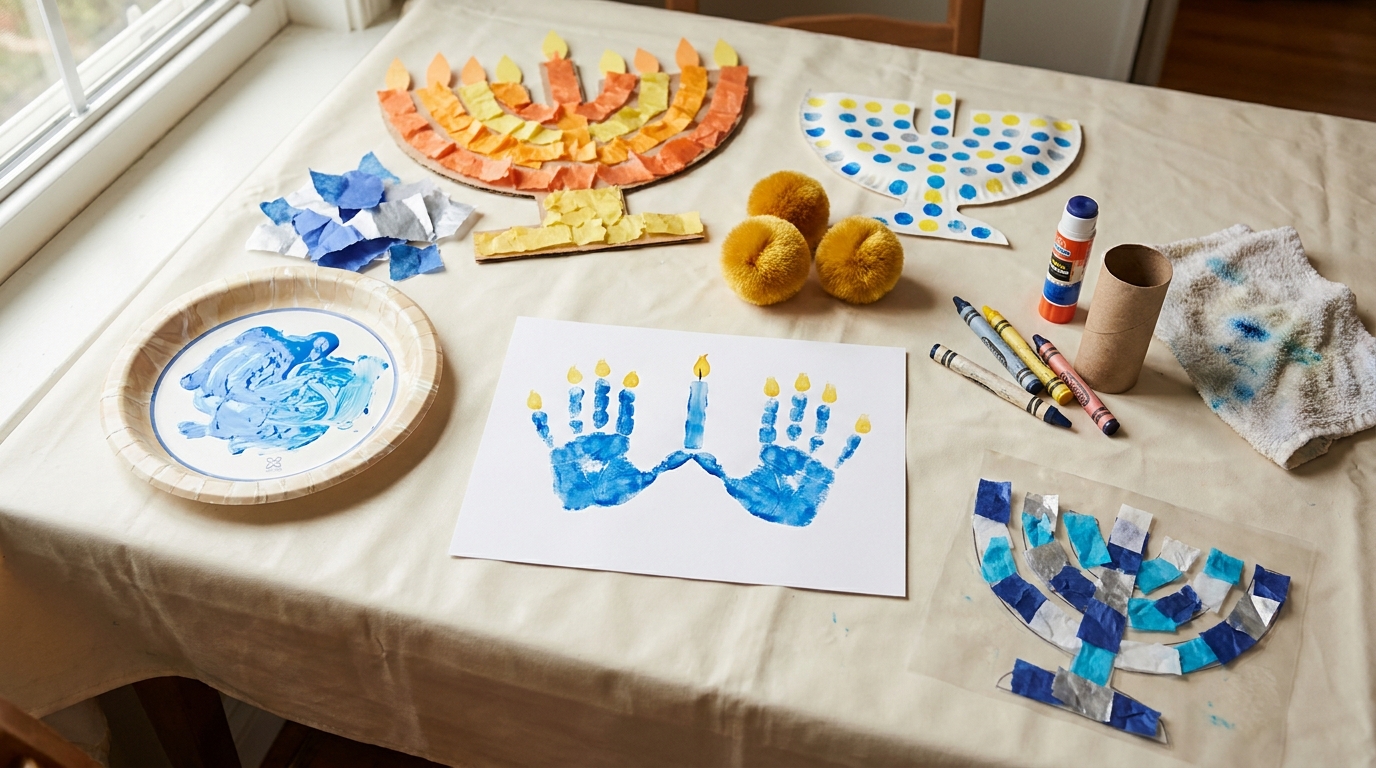
This post is the toddler-safe version for ages 1-3: eight easy menorah crafts, a small-parts swap table, and an age guide, all built from paper, tissue, handprints, dot markers, and chunky dough. Read the safety rules first, or scroll straight to the crafts.
In this article (14 sections)
- The Choke-Safe Ground Rules
- The Choke-Hazard-Checked Supply Swap Table
- Set Up a Toddler Craft Table
- 8 Easy Menorah Crafts for Toddlers
- Which Craft for Which Age?
- A Quick Hanukkah Primer
- Hanukkah Crafts for 2-Year-Olds
- Easy Hanukkah Crafts for Preschoolers and Mixed Ages
- Turn It Into a Night-by-Night Ritual
- Displaying and Keeping Your Menorah Crafts
- Troubleshooting: When the Craft Goes Sideways
- A Short Supply List to Make Everything Above
- Frequently Asked Questions
- Final Tips
The Choke-Safe Ground Rules
Before the crafts, here are the rules that keep this page toddler-safe. They apply to every idea below.
The toilet paper tube test
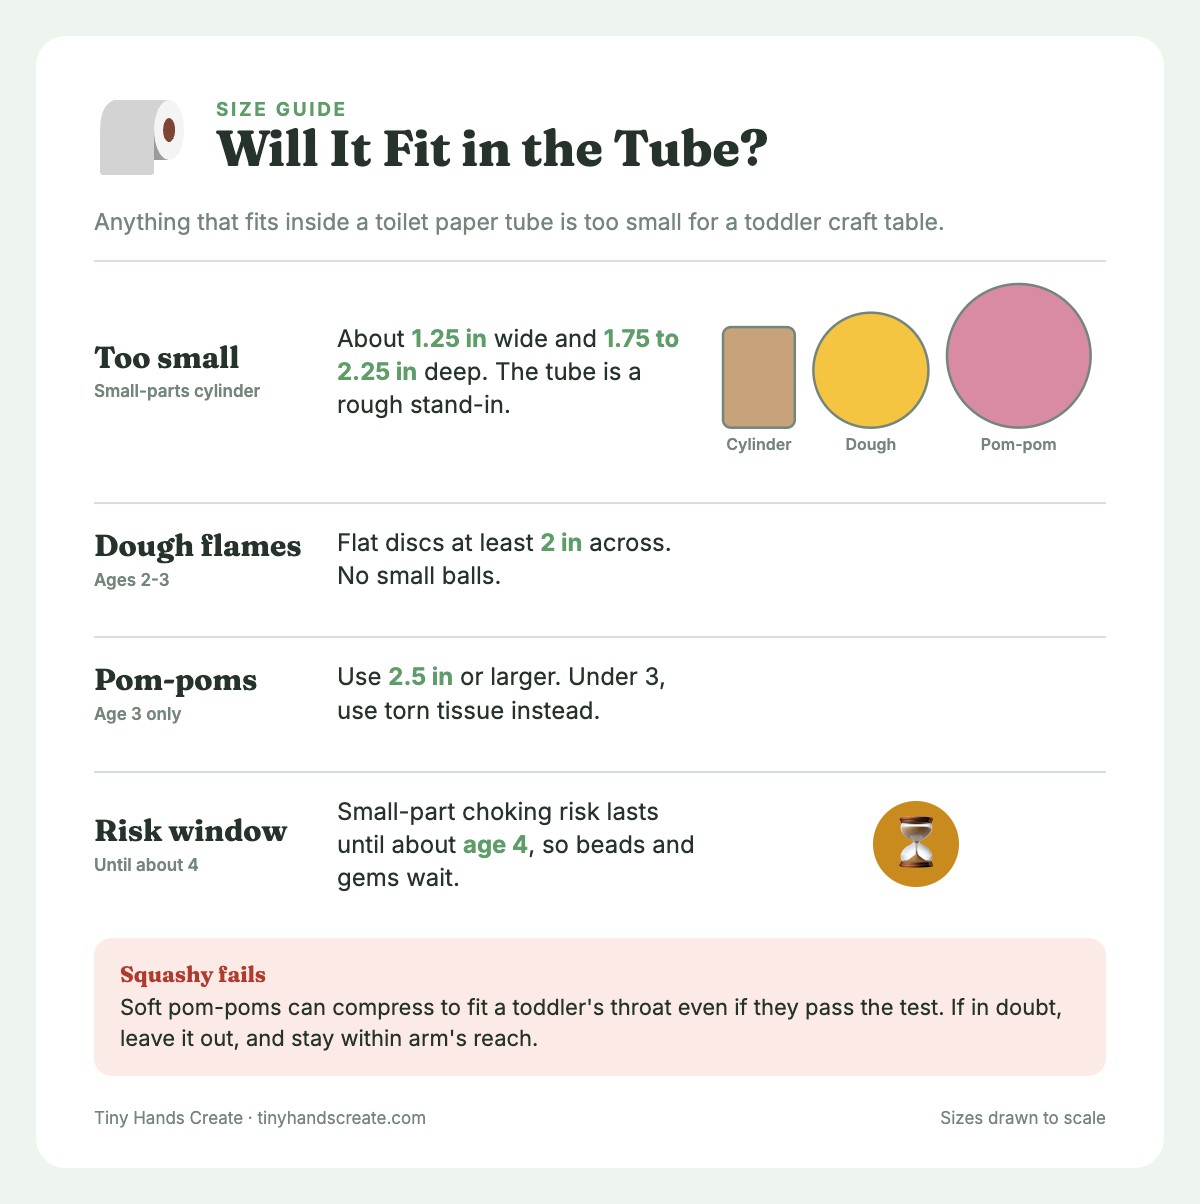
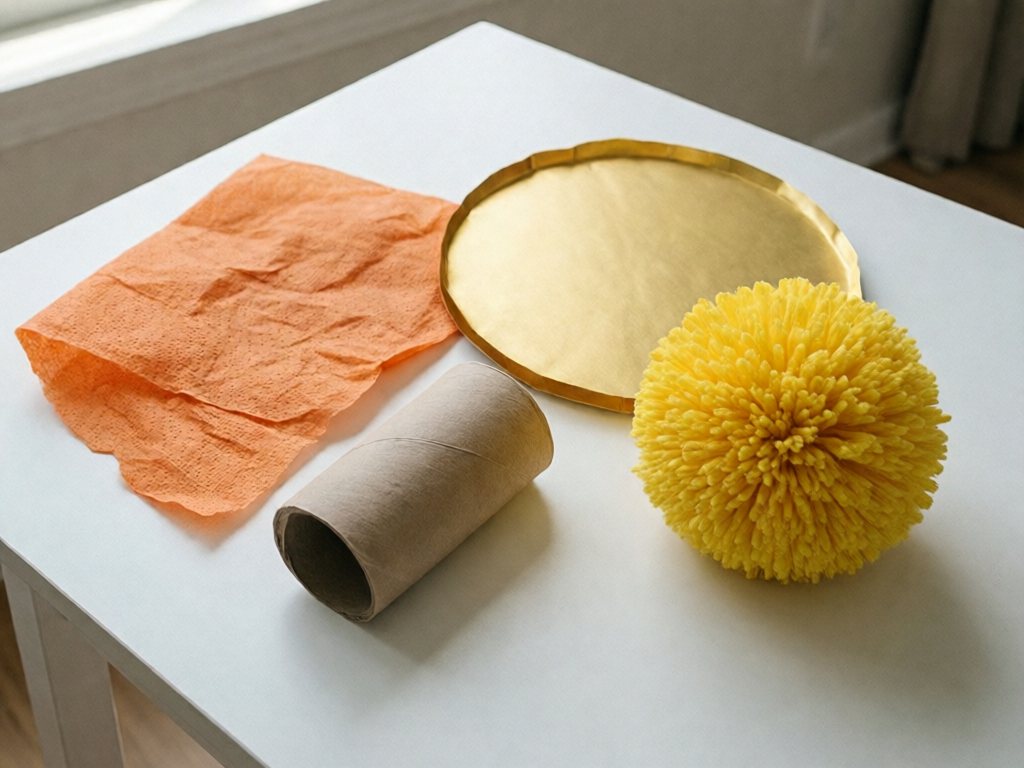
The simplest small-parts check is already in your recycling bin. The official small-parts cylinder is about 1.25 inches wide and 1.75 to 2.25 inches deep. A toilet paper tube is a rough, slightly roomier stand-in. If an object fits inside the tube, it counts as a small part for children under three, so it doesn’t belong at a toddler craft table.
Choking risk doesn’t end on a third birthday, though. It continues until about age 4, so this page keeps small parts away from three-year-olds too and saves beads and gems for kids 4 and up.
This is why standard pom-poms, beads, googly eyes, sequins, rhinestones, wooden bead dreidels, and most buttons are out.
Safety firstThe tube is only a rough proxy. Soft, squashable items (like pom-poms) can compress to fit a toddler’s throat even if they pass the test. If in doubt, leave it out, and stay within arm’s reach.
Choose big, soft, and paper-based
Most swaps on this page lean on paper, tissue, and dough. Skip pom-poms under age 3, and use 2.5 inches or larger at 3. Big paper shapes and large torn tissue pass the tube test. Jumbo smooth craft sticks are an adult-placed option for age 2+ only. Size alone doesn’t make an item safe, so if you’re unsure, skip it.
Other toddler-specific rules
- No real candles, ever, in the craft area. These are decoration crafts. If you light a real menorah, keep it well out of reach on a stable surface. Keep paper crafts and curtains at least about 3 feet away, and supervise it the way you’d supervise any flame.
- Everything should be non-toxic and washable. Look for the ACMI AP (Approved Product) seal, meaning the product was evaluated by a toxicologist and is not expected to cause harm when used as directed. Non-toxic does not mean edible. Washable paints will save your sanity and your table.
- Assume everything goes in the mouth at least once. Toddlers taste paint, glue, paper, and sometimes the cat’s tail. Pick non-toxic materials so an accidental lick or taste isn’t an emergency, and redirect mouthing every time.
- Skip loose glitter. It gets everywhere, it’s hard to clean, and it ends up in eyes and mouths. Tissue paper and construction paper give you the sparkle of color without the mess.
- Stay within arm’s reach. The most useful safety tool at the craft table is you. Sit at the table, not across the room.
- Pick up the leftovers. Dropped paper scraps, marker caps, and pom-poms on the floor are an invitation for a crawling baby. Do a quick floor sweep when you’re done.
If you have a younger sibling around, set up the craft with the baby in a high chair or playpen, or save it for nap time. A mixed-age craft session is the one most likely to go wrong, since a big sibling’s small bits can become a one-year-old’s snack in seconds.
The Choke-Hazard-Checked Supply Swap Table
This is the heart of the page. Roundups love to suggest the supplies in the left column. Use the swap in the right column instead.
| Common idea you’ll see online | Why it’s a problem (ages 1-3) | Safe swap |
|---|---|---|
| Glass or plastic beads on pipe cleaners as “candles” | Classic choking hazard, and pipe cleaner ends can poke | Thick paper strips glued upright as candles |
| Standard small pom-poms or sequins for flames | Often under 1 inch, soft ones squash to fit a throat, and sequins are tiny and sharp | Torn orange or yellow tissue (pom-poms only at 2.5 inches or larger, age 3) |
| Googly eyes, rhinestones, gem stickers, or buttons | Small, hard, peelable, and easy to mouth | Marker-drawn details, large paper circles glued on by an adult, or dot-marker dabs (no stickers for under 2s) |
| Mini wooden or plastic dreidels as decoration | Small spinning parts and tiny plastic pieces | A large cardstock dreidel shape to color, or a big felt cutout |
| Loose glitter, foil stars, or tiny confetti | Gets into eyes and mouths and is nearly impossible to clean | Blue and silver tissue squares, foil paper strips, or large torn paper pieces |
| Standard wooden craft sticks as branches | Rough edges, can snap into splinters, and can poke or gag | Paper strips or rolled dough logs; jumbo smooth sticks only if an adult places them, age 2+ |
| Real mini candles or birthday candles in a clay base | Choking pieces, wax, and fire risk | Paper or felt “candles” glued in place |
| Plastic coins or “gelt” embellishments | Small and round, a perfect airway blocker | Large gold paper circles you cut yourself, or skip |
| Craft foam letters in tiny sizes | Small pieces that peel apart | Big foam shapes (over 2 inches), or letters drawn with a crayon |
A couple of quick notes about the table:
- If you already own the left-column supplies, keep them for kids 4 and up, and use them at a different time and place, away from your toddler.
- Compressible items like pom-poms can squash small enough to be swallowed even when they pass the test. If you’re using jumbo pom-poms, check each one. Some craft stores sell “jumbo” packs that are actually quite small, and cheap pom-poms can shed fuzzy fibers. When in doubt, drop it in the tube.
- “Tube test” is a rule of thumb, not a guarantee. It does not replace supervision.
If you’re a pom-pom lover, our guide to pom-pom crafts for toddlers covers which sizes are safe and how to keep them from migrating around the house.
Set Up a Toddler Craft Table
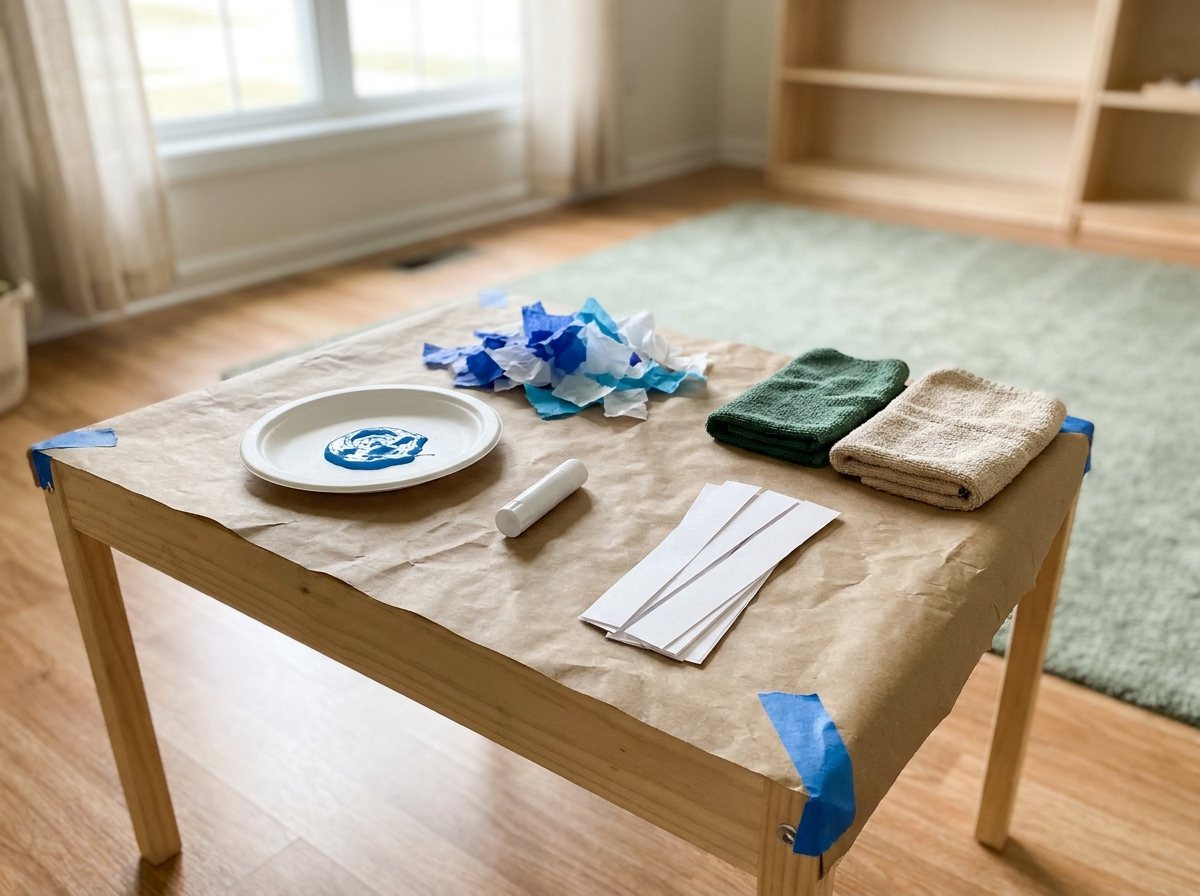
A few minutes of prep make toddler crafting go much more smoothly. Here’s what I do.
Set up a “yes space”
Cover your table with a wipeable cloth, a cheap plastic tablecloth, or a few sheets of kraft paper. Tape the corners down so a toddler can’t pull the whole thing off. Put your child in clothes you don’t mind ruining, or in just a diaper if the room is warm. Keep a damp washcloth and a dry towel within arm’s reach.
Prep everything before your child sits down
Toddlers have very little patience when the supplies aren’t ready. Pre-cut the paper strips, squeeze paint into shallow containers, tear the tissue, and peel the backing off the contact paper before your child arrives.
Keep the goal tiny
For a one-year-old, the goal is “touch paint.” For a two-year-old, it might be “stick tissue on the paper.” For a three-year-old, it might be “make nine candles.” None of these is a failure. Process matters more than product at this age, which is why “process art” is a whole movement in early childhood education. If you want to lean in, our post on fine motor activities for toddlers explains how tearing, squeezing, and sticking build the hand strength your child will need for writing later.
Each craft below lists its own mess level and time. The handprint menorah is the messiest (plan 10-15 minutes of cleanup), and the contact paper sun-catcher is the tidiest.
The “one more thing” supply kit
Keep these within reach: baby wipes, a roll of paper towels, a few spare sheets of paper, tape, and a snack. A hungry toddler is a toddler who tries to eat paint.
8 Easy Menorah Crafts for Toddlers
Here are eight menorah ideas for toddlers, with notes on what each one asks of a little one. Pick one or two and ignore the rest. You do not need to do all eight.
1. Handprint Menorah (the Classic)
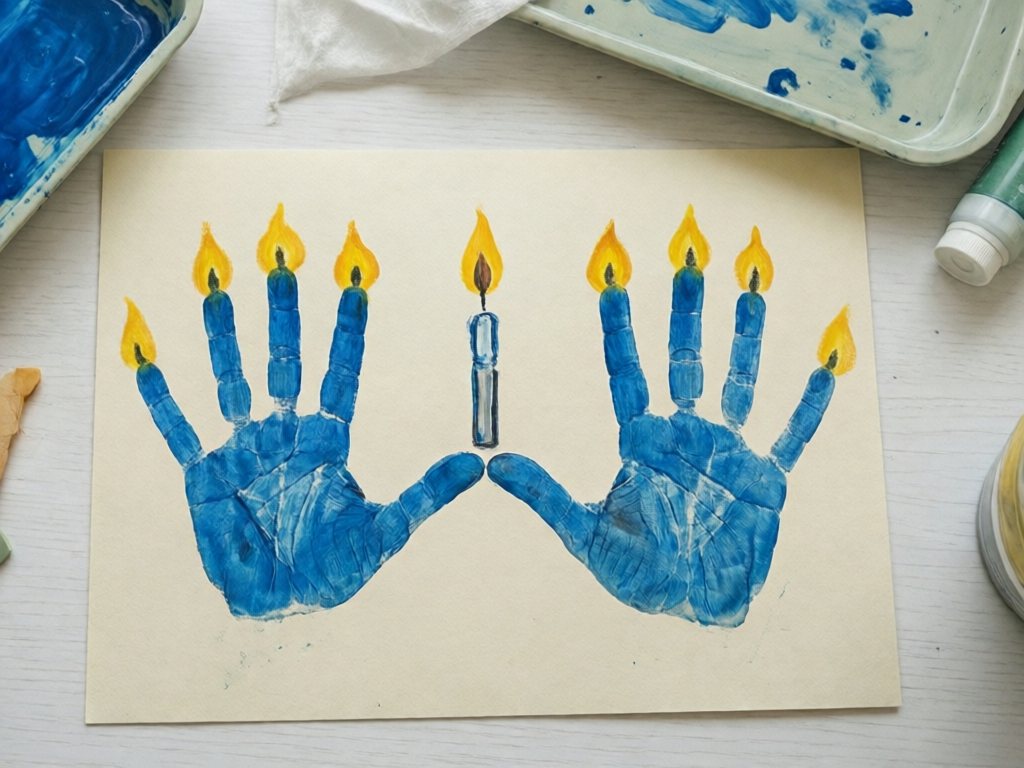
Best for: ages 1-3 | Mess: high | Time: 15 minutes plus drying
A handprint menorah is the keepsake you’ll want to hold onto. The fingers become the candles, and you’ll love looking at it in ten years.
What you need
- Washable blue paint (or any color)
- A paper plate or shallow tray for paint
- A large sheet of white or cream cardstock
- Yellow or orange paint or tissue for flames
- Crayons or a marker
- Baby wipes and a wet towel
- Pour the paint. Spread a thin layer of blue paint in the tray. Too thick and the print turns into a smear.
- Stamp both hands. Press your child’s right hand into the paint, then onto the left half of the paper with fingers spread. Repeat with the left hand on the right half, so both thumbs point toward the center. You’ll have eight fingers (the candles) and two thumbs.
- Dry it. Air dry, or have an adult run a hairdryer on cool, away from the child’s face.
- Add flames. Use a fingertip dipped in yellow paint to add a flame above each finger.
- Add the shamash. Draw a ninth, taller candle in the middle between the thumbs.
- Sign it. Write your child’s name and the year at the bottom.
TipOlder toddlers can help dip. Younger ones do better if you hold their wrist and guide the stamp. If the fingers won’t stay spread, press the back of the hand gently to the paper and use your other hand to separate the fingers. For a cleaner paint option, see our mess-free painting ideas for toddlers.
Good to knowBlobby fingers? Draw in the candles with a marker after drying.
2. Paper Strip Menorah
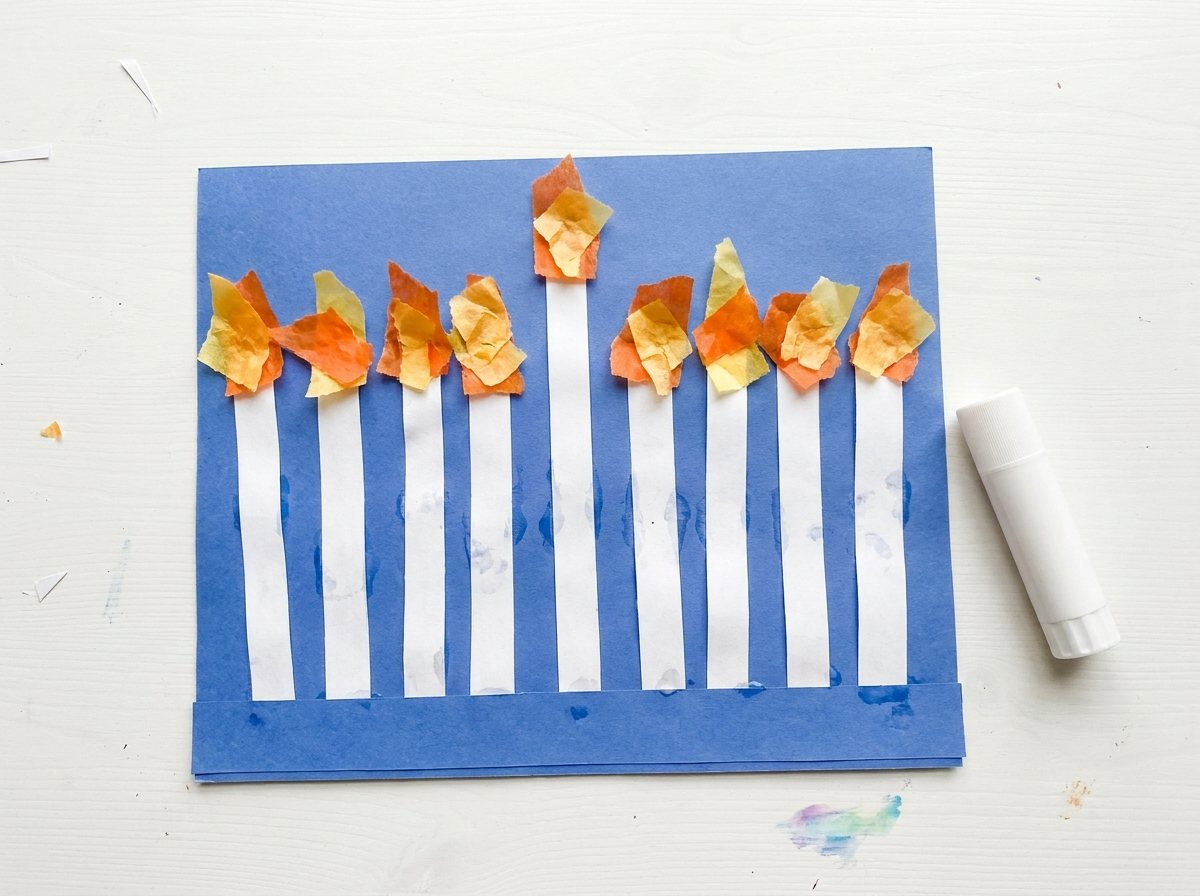
Best for: ages 2-3 (with help from 18 months) | Mess: low | Time: 10 minutes
This one is the easiest menorah to make, and it works wonderfully as a “first glue stick” craft.
What you need
- A large sheet of construction paper (any color) for the background
- Strips of colored paper (about 1 inch wide and 5-6 inches long), nine of them
- A glue stick (much tidier than liquid glue for beginners)
- Orange or yellow tissue paper, torn into large pieces
- A strip of blue paper for the base
- Pre-cut. Cut nine strips and make one slightly longer for the shamash.
- Glue the base. Stick the base strip along the bottom of the paper.
- Add candles. Help your child glue the eight shorter strips upright in a row above the base, with the longer one in the center.
- Add flames. Let them scrunch or stick torn tissue to the top of each strip.
TipSkip counting. Let your child glue strips wherever feels right.
Make it easierPut a dab of glue on each spot ahead of time and let your toddler press the strip in. That removes the hardest part for beginners.
3. Jumbo Pom-Pom Flame Menorah
Best for: age 3 (tissue flames for under 3) | Mess: medium | Time: 15 minutes
Pom-poms are a favorite, but they must be big. Use ones 2.5 inches or larger as flames, and only for age 3. Under 3, use torn orange tissue instead, which makes this craft overlap with #2 and #4.
What you need
- Pom-poms 2.5 inches or larger in yellow or orange (age 3 only), or torn orange tissue for under 3
- Cardstock or heavy paper with a menorah outline drawn on it
- Tacky glue in a shallow dish, plus a big paintbrush
- Crayons for decorating the base
- Draw the outline. Use a thick marker to draw a simple menorah with nine upright lines.
- Stick the flames. Show your child how to dip a pom-pom in a dab of glue and press it at the top of each line.
- Color. Let them color the rest however they like.
- Dry. Let it dry flat for several hours.
Safety firstDrop every pom-pom in the tube before the activity begins and throw away any that fall through. Even jumbo pom-poms can shed fibers or come loose after gluing, so sit with your child the whole time and hang this craft out of reach of younger siblings.
Good to knowTacky glue goes everywhere. A glue stick won’t hold pom-poms, so keep the wet washcloth close.
4. Torn Tissue Paper Menorah
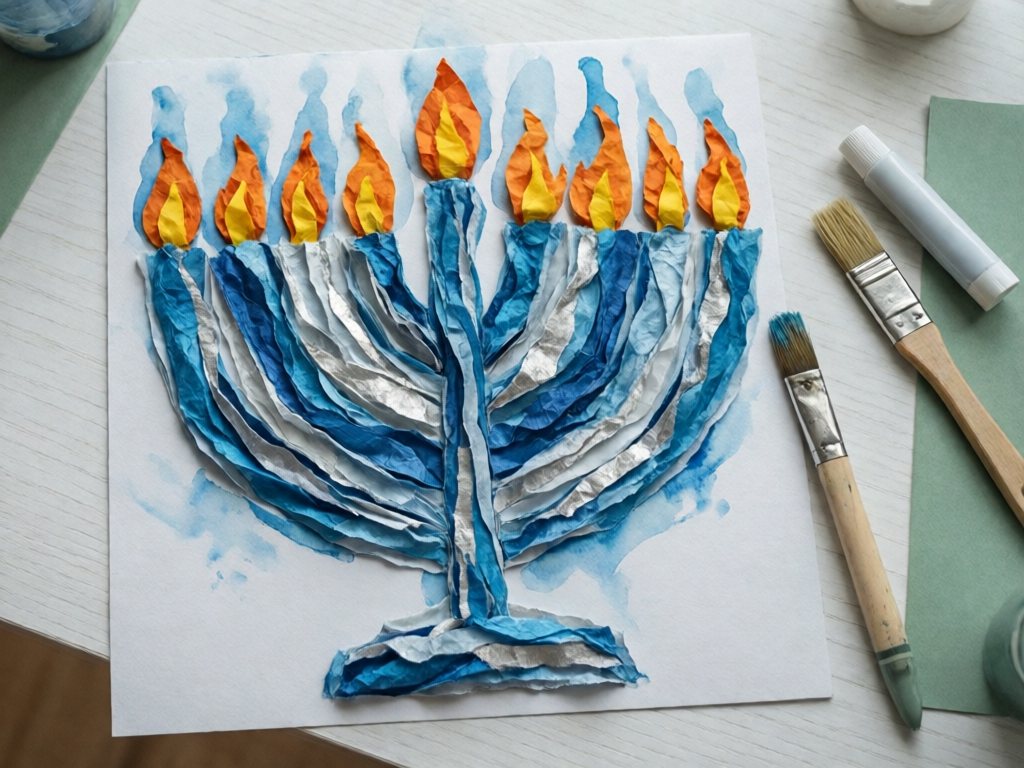
Best for: ages 1-3 | Mess: low to medium | Time: 15 minutes
Tearing paper is great fine-motor practice, and tissue is forgiving and soft. For more ideas, see our tissue paper crafts for kids.
What you need
- Blue, white, and silver tissue paper
- Orange and yellow tissue for flames
- A sheet of cardstock with a simple menorah outline
- Diluted white school glue (equal parts glue and water) and a wide brush, or a glue stick
- Tear. Let your child tear the tissue into pieces. Size doesn’t matter, and bigger pieces are safer and easier.
- Glue. Brush glue over a section of the menorah outline.
- Press and seal. Press tissue onto the glue, then brush a thin glue layer over the top.
- Add flames. Put the orange and yellow pieces on last.
TipTearing is half the fun. Let your child tear a whole pile before you introduce glue, or the paper will end up on the floor instead of on the craft.
Good to knowTissue bleeds color when wet, so you may get blue watercolor-style swirls.
Safety firstWet tissue and glue both end up in mouths. Sit within arm’s reach, calmly redirect mouthing, and use the glue stick for children under 2.
5. Dot Marker Menorah
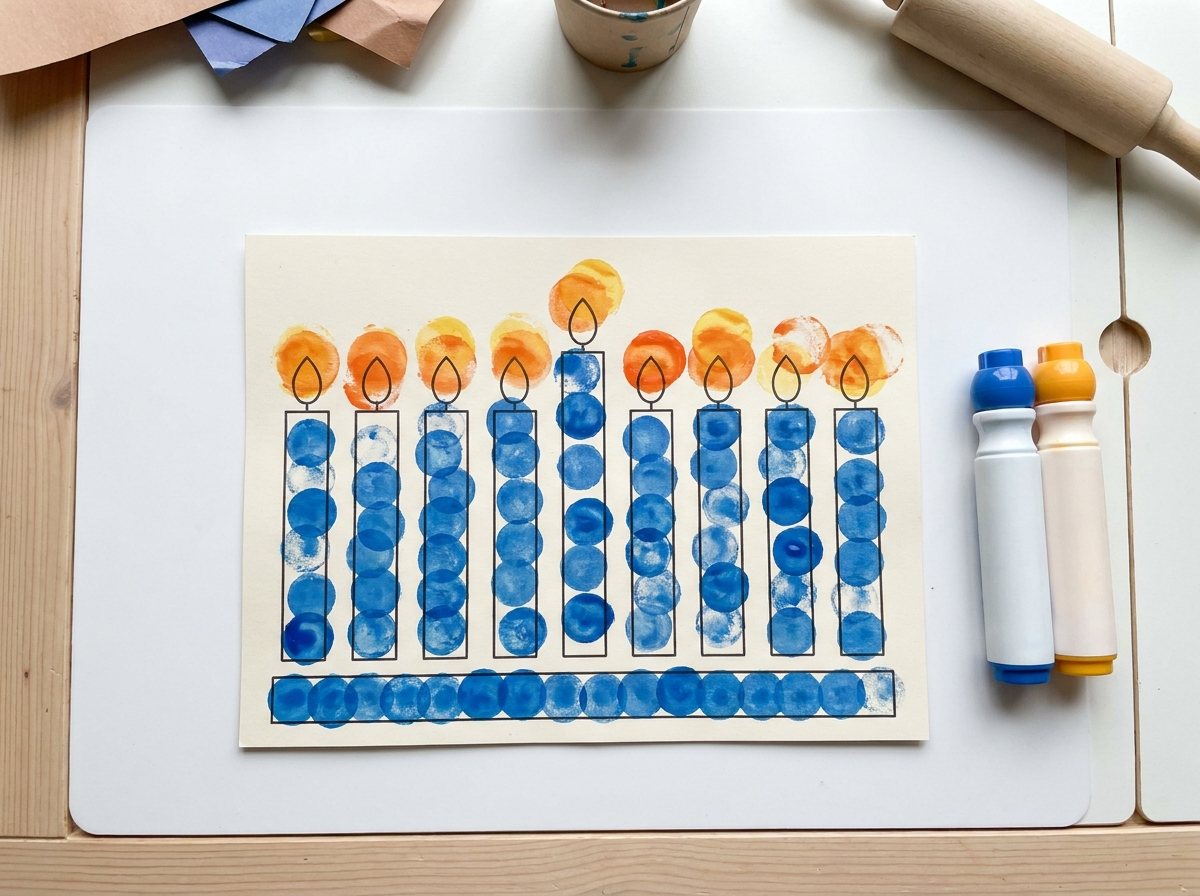
Best for: ages 1-3 (adult holds and removes caps for under 2) | Mess: low | Time: 10 minutes
Washable, non-toxic dot markers (the chunky kind made for small hands) are far cleaner than paint. If your toddler loves them, our do-a-dot printables give them more pages to stamp.
What you need
- Washable, non-toxic dot markers in blue, yellow, and orange, with large caps
- Cardstock with nine vertical outlines drawn on it
- A wipeable placemat
- Stamp the base. Take the cap off a blue marker, keep the cap yourself, and hand your child the marker. Show them how to stamp dots along the base and body.
- Add flames. Switch to orange or yellow for the tops of the candles.
- Count. Count each dot out loud if your child is into counting.
TipPressing straight down is easier than drawing a line, so dot markers suit younger toddlers. With a one-year-old, I hold the marker with them and stamp hand-over-hand. Put away whichever colors you’re not using, or you’ll find mystery blue dots on the carpet.
Safety firstMarker caps are a mouthing and choking item. For children under 2, an adult removes each cap and keeps it off the table, and hands over one marker at a time. At any age, cap unused colors and keep them out of reach. Choose washable, non-toxic markers, stay within arm’s reach, and redirect any mouthing.
6. Chunky Play Dough Menorah
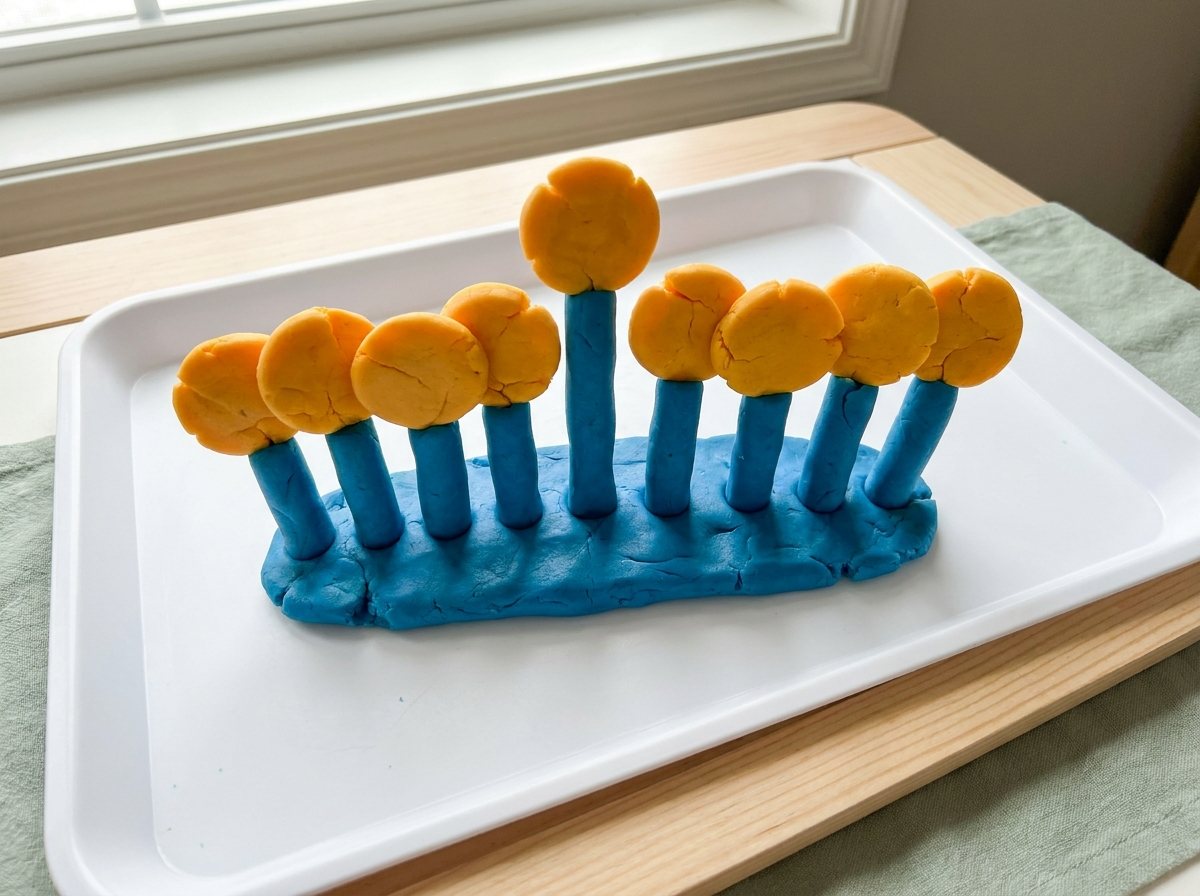
Best for: ages 2-3 (rolling and squishing only for 12-24 months) | Mess: medium (crumbs) | Time: 20 minutes
No candles, no worries. This is a sensory craft that you can do over and over.
What you need
- Blue or white play dough (store-bought, or try one of our homemade play dough recipes)
- A flat tray or laminated menorah mat
- Thick rolled dough logs as candles (optional for ages 2 and up: jumbo smooth craft sticks, placed by an adult)
- Orange or yellow dough for flames
- Make the base. Roll a log of blue dough and flatten it slightly on the tray.
- Stand the candles. Help your child press nine thick rolled dough “candles” upright into the base. For ages 2 and up, an adult can push a jumbo smooth craft stick into each one instead.
- Add flames. Press flat discs or short logs of yellow dough, at least 2 inches across, onto the tops. No small balls.
- Squish and repeat. Admire it, squish it, and start again.
Safety firstSkip craft sticks for children under 2 and for any child who mouths them. Even jumbo sticks can poke, gag, or splinter, so an adult places them. Play dough is not for eating. If your child mouths it, calmly take it away and redirect.
Good to knowThis one lasts. Your toddler can re-make the menorah every day of Hanukkah without wasting a sheet of paper.
7. Cardboard Tube Menorah
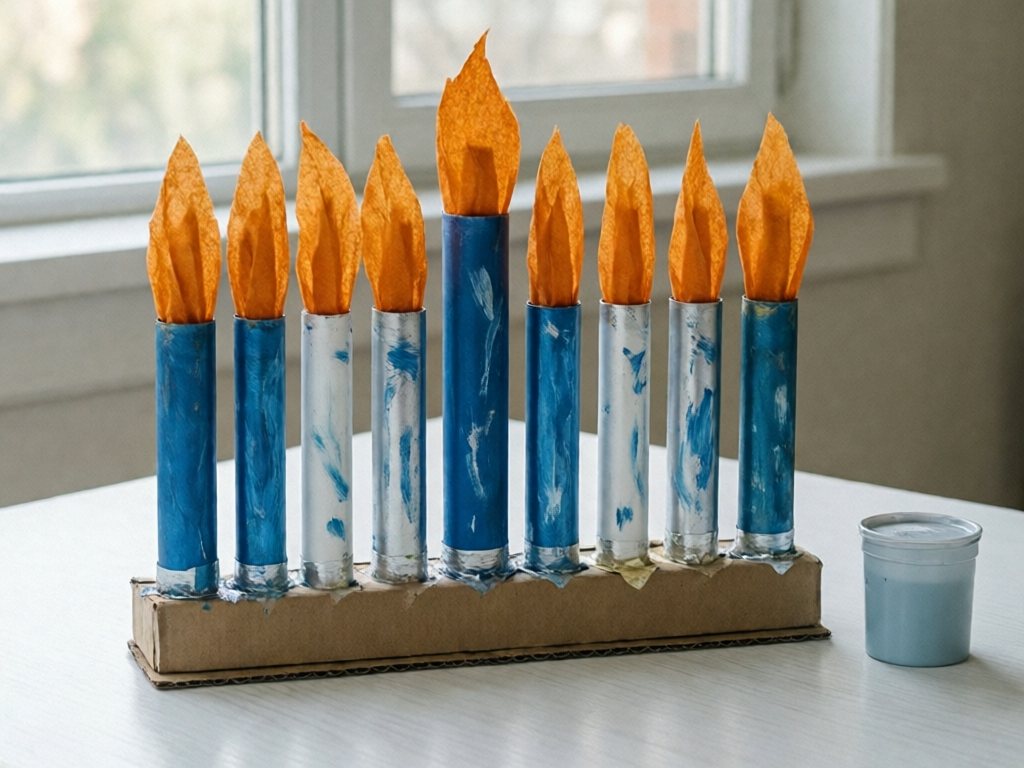
Best for: ages 2-3 (18-24 months with close help) | Mess: low to medium | Time: 20 minutes
Recycle your tubes and turn them into candles. If you have a stash from the tube test, you’re ready. For more ways to use the recycling bin, see our recycled art projects for kids.
What you need
- Nine cardboard tubes (toilet paper rolls cut shorter, with one left longer for the shamash)
- A sturdy piece of cardboard for the base
- Washable paint in blue, white, and silver
- Tape or strong craft glue
- Orange tissue for flames
- Paint the tubes. Let your child paint them. They don’t need to be perfect.
- Assemble. While the paint dries, do the grown-up part: glue the tubes upright along the cardboard base, with strong tape on the inside for extra stability.
- Add flames. Glue a large tissue flame onto the top of each tube so it is fixed in place, or paint the flames on.
TipPainting a tube feels like painting a tower, which little hands love. Let your child paint a few extras for fun.
Safety firstMake sure the tubes are taped or glued firmly. If your child can pull a tube off, they can mouth it, so supervise. Remove any tissue that comes loose and gets mouthed, and tape over cut tube ends so the edges aren’t sharp.
8. Contact Paper Sun-Catcher Menorah
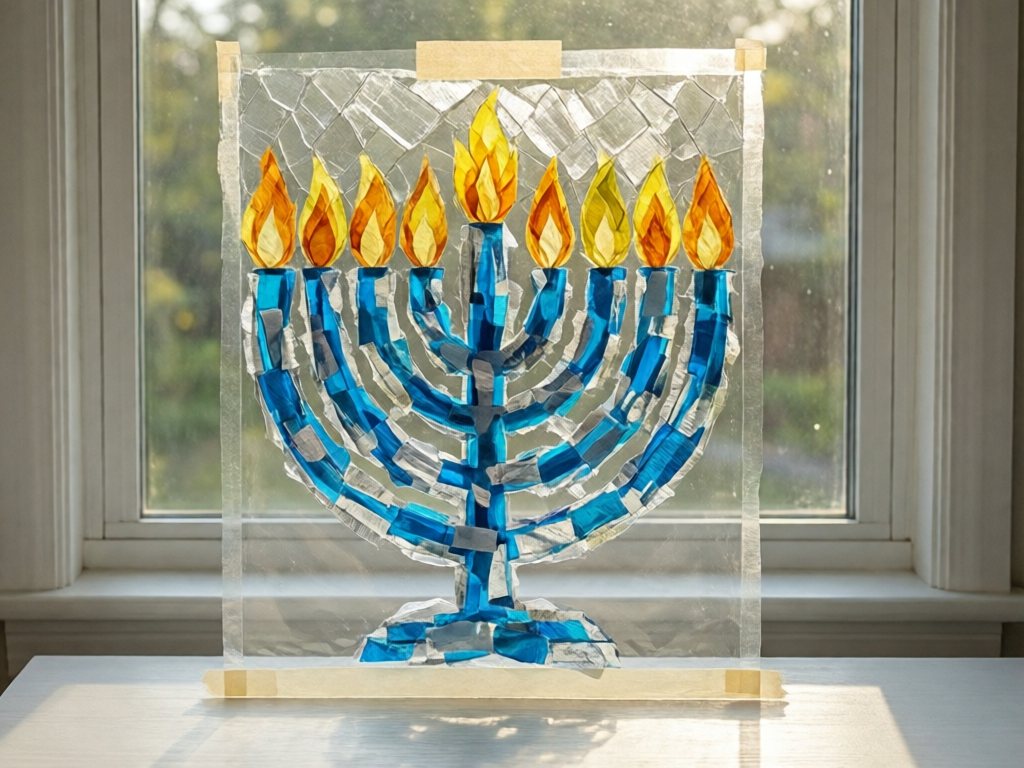
Best for: ages 1-3 | Mess: very low | Time: 10 minutes
This is the nearly mess-free option, and it’s the one I reach for on cranky days. For more low-mess ideas, see our mess-free art activities for toddlers.
What you need
- Clear contact paper
- Blue, silver, white, yellow, and orange tissue paper, torn into pieces
- Painter’s tape
- Black or blue construction paper (optional, for a frame)
- Tape it up. Tape a sheet of contact paper to a window or table, sticky side out.
- Add a guide. Draw a menorah shape on paper and slip it behind the contact paper so you can trace the lines, or just let your child stick tissue freely.
- Stick the tissue. Let your child press tissue onto the sticky surface.
- Seal. Cover with a second sheet of contact paper, sticky side in.
- Hang. Trim and hang in a sunny window so the light shines through. Pick a window away from where you light a real menorah.
TipThere’s no glue, no wet paint, and no waiting, and it looks like stained glass when the sun hits it. If your toddler pulls the tissue off and re-sticks it, that’s the whole activity.
Safety firstKeep the contact paper away from your toddler’s face and hair. If the sheet is large, tape the edges down so it can’t wrap around a small arm.
Which Craft for Which Age?
This is a rough guide. Your child may be on a different timeline, and that’s perfectly okay.
Safety firstEvery “Yes” assumes you are within arm’s reach and using large pieces only.
| Craft | 12-18 months | 18-24 months | 2-3 years |
|---|---|---|---|
| Handprint menorah | Yes, with full help | Yes | Yes, plus add flames |
| Paper strip menorah | Watch only | With help | Yes |
| Jumbo pom-pom flame menorah | No | No (tissue flames only, see #2 or #4) | Age 3 with pom-poms; under 3 use tissue |
| Torn tissue menorah | Yes (tissue gets mouthed: stay within arm’s reach, offer large pieces) | Yes | Yes |
| Dot marker menorah | Yes, hand-over-hand; adult removes and holds the caps | Yes; adult removes and holds the caps | Yes |
| Play dough menorah | Yes: rolling and squishing only, no sticks | Yes, no sticks | Yes (adult-placed jumbo sticks optional) |
| Cardboard tube menorah | No | With close help | Yes |
| Contact paper sun-catcher | Yes | Yes | Yes |
If you only have time for one, the handprint menorah and the contact paper sun-catcher work for the widest range of ages.
A Quick Hanukkah Primer
New to Hanukkah, or explaining it to a two-year-old? Here is the short version.
- Hanukkah is an eight-night festival of lights. In 2026 it begins at sundown on Friday, December 4, and ends the evening of Saturday, December 12.
- The candleholder is a hanukkiah, commonly called a menorah. (Strictly, “menorah” means the seven-branch temple lamp; this page uses the common name.) It holds nine candles: eight for the nights, plus the shamash (SHAH-mahsh), the “helper” candle used to light the others.
- The shamash sits higher than the other eight, or apart from them. It is lit every night.
- One candle is lit the first night, and one more is added each night.
- A dreidel is a spinning top with four Hebrew letters, played with chocolate coins called gelt.
For crafts, aim for eight matching candles plus one helper that is taller or a different color. Toddlers won’t count that high, and a blobby menorah still belongs on the fridge. Families celebrate in different ways, so adjust anything here to fit your own traditions.
Hanukkah Crafts for 2-Year-Olds
A two-year-old is in a funny spot. They want to do it themselves, they can’t quite do it, and they will tell you so loudly. Here’s what works. For more age-matched ideas, see our crafts for 2-year-olds at home.
- Offer two choices, not ten. “Blue or yellow?” is a good question. “What color do you want?” opens the door to a meltdown.
- Let them lead. If your child wants to cover the whole page in blue dots, that’s a menorah now. Call it a “blue night sky menorah.”
- Do the hard parts yourself. Cutting, tape, and fine placement are your job. Your toddler’s job is the squishy, sticky, messy parts.
- Narrate, don’t correct. “You’re pressing so hard!” works. “That’s not how you do it” does not.
- Quit while it’s fun. When your child leaves the table, the craft is done. Finish it later, or don’t.
If your child has big feelings about glue on their hands, a contact paper craft or a dot marker craft will be a better fit than the messy ones. Sensory preferences are real, and some toddlers hate the feel of wet paint.
Easy Hanukkah Crafts for Preschoolers and Mixed Ages
If you have a three- or four-year-old at the table as well, you can upgrade any of the crafts above for the older child while keeping the toddler version safe.
- Count the candles together. Let the older child place numbered stickers (one through eight) above the candles.
- Add the shamash on purpose. Ask the preschooler to find the helper candle and make it taller.
- Letter practice. A preschooler can trace the letters of their name on the base. Skip tiny letter stickers, and write the letters with crayons.
- Color sorting. Set out blue and silver paper and let your older kid sort it into piles before gluing. Our sorting activities for toddlers have more ideas.
- Sort the supply bins by age. Everyone under 4, including your three-year-old, uses the toddler bin. Beads, gems, and standard pom-poms go in a separate bin for kids 4 and up.
Safety firstChoking risk from small parts continues until about age 4, so beads, gems, and standard pom-poms aren’t for three-year-olds either. Offer them only to children 4 and up, sit right beside them the whole time, and use a separate table away from any younger child. Put the bin back on a high shelf as soon as the craft is done, and sweep the floor for strays.
A good rule for mixed ages: the youngest child’s supplies set the safety bar for the whole table. Never mix the two supply bins, and if a four-year-old’s craft needs beads, do it at nap time.
Turn It Into a Night-by-Night Ritual
One craft is great, but eight nights is a lot of nights. Here’s an easy way to spread the fun over the whole festival without exhausting yourself.
| Night | Idea |
|---|---|
| 1 | Handprint menorah (the keepsake) |
| 2 | Paper strip menorah |
| 3 | Dot marker menorah |
| 4 | Play dough menorah (repeatable) |
| 5 | Torn tissue menorah |
| 6 | Cardboard tube menorah |
| 7 | Contact paper sun-catcher |
| 8 | Look at all of them together and talk about your favorite |
You don’t have to do a craft every night. Even two or three is plenty. Or repeat the paper strip menorah: on the first night, glue on the taller shamash strip plus one candle strip, then add one candle strip each night, just like the real candles.
Add a tiny ritual
- Sing a simple song while your child works. “Hanukkah, Oh Hanukkah” or a made-up counting song both work. For more songs to move to, see our music and movement activities.
- Count the candles on your paper menorah together. “One, two, three” over and over is great language practice.
- Say the day’s number out loud and let your child point to it.
- Read a short picture book about Hanukkah before or after crafting.
If your family has its own blessings or songs, bring those in. These crafts are a warm-up to your own traditions, not a replacement for them.
Displaying and Keeping Your Menorah Crafts
You’ve made a bunch of art. Now what?
- Window gallery. Tape sun-catchers, tissue crafts, and paper menorahs on a window with painter’s tape. Use a different window from the one where you light a real menorah.
- Wall display. Tape crafts flat to a wall above toddler reach with painter’s tape. Skip strings and clothespins, which are a strangulation and mouthing risk.
- Fridge rotation. Put one craft up each night, taking the older ones down to the keepsake folder.
- Gift giving. A handprint menorah makes a lovely gift for grandparents. Slip it in a simple frame.
- Memory box. Date the back of each craft. In five years you’ll be glad you did.
For safety, hang crafts well out of reach of curious hands, especially anything with pom-poms or tubes. A pom-pom that survives the gluing may not survive a determined toddler on the floor.
Safety firstPaper, tissue, and contact paper catch fire easily. If you light a real menorah, keep every craft, plus curtains and paper decorations, at least about 3 feet from the flames. Never hang crafts in the window where the menorah stands.
Troubleshooting: When the Craft Goes Sideways
Even the best-planned craft session can unravel. Here are the usual culprits and what to do about them.
My toddler eats the glue stick. Hold the glue stick yourself and dab the glue on, or switch to the contact paper craft, where there’s no glue at all. Stay within arm’s reach and calmly redirect a child who mouths glue. Non-toxic does not mean edible.
Paint pools and the paper tears. Use less paint, spread it thin, and switch to cardstock or a paper plate. Wet crafts need heavy paper.
The tissue colors bleed into muddy brown. Keep colors apart, use fewer layers, and let your child stick one color at a time.
My child refuses to touch paint. That is a sensory preference. Offer a dot marker, a crayon, or a brush on a long handle. A chunky crayon or dot marker gives the same color with no wet mess.
My toddler wants to do something else after two minutes. You’re done. Snap a photo of whatever they made and hang it up.
I ended up doing most of it. Toddler crafts are often joint projects, and your child’s part can be a single smear of paint.
Want more low-pressure ideas for the season? These guides share many of the same simple supplies:
- Process art for toddlers
- Mess-free painting for toddlers
- Tissue paper crafts for kids
- Christmas crafts for 2-year-olds
A Short Supply List to Make Everything Above
Here’s a shopping list that covers all eight crafts. Most of it is probably already in your closet.
- White and blue cardstock
- Construction paper in blue, white, silver, and yellow
- Tissue paper in blue, silver, white, yellow, and orange
- Clear contact paper
- Washable blue, yellow, and orange paint
- Washable dot markers and chunky crayons
- Glue sticks, tacky glue, and school glue (for diluting)
- Painter’s tape
- Play dough
- Cardboard tubes
- Paper plates for paint trays
- Baby wipes and old towels
- Optional: jumbo smooth craft sticks (age 2+, adult-placed)
- Optional: pom-poms 2.5 inches or larger (age 3 only)
Before you buy anything, remember the swap table above. If a “Hanukkah craft kit” includes beads, tiny gems, or small dreidels, save those pieces for a child 4 or older, or skip the kit entirely.
Frequently Asked Questions
What are the best Hanukkah crafts for toddlers?
The best Hanukkah crafts for toddlers use big, safe materials and don’t ask for precision. Handprint menorahs, torn tissue paper collages, dot marker menorahs, and contact paper sun-catchers all fit the bill. They’re quick, forgiving, and free of small parts. Choose one that matches your child’s mood, and skip anything that requires beads or tiny pieces.
What are good Hanukkah crafts for 2 year olds?
Two-year-olds do well with sticky, sensory, repetitive crafts. Try a play dough menorah, a paper strip menorah with pre-glued spots, or a contact paper menorah. Offer two choices at a time, expect a short attention span, and let your child lead. If they only want to tear tissue for ten minutes, that counts as a craft.
How do I make a DIY menorah craft for a toddler without small parts?
Use paper strips, handprints, tissue paper, and chunky play dough, plus pom-poms only if they are 2.5 inches or larger. Check every item against a toilet paper tube before you start. The official small-parts cylinder is about 1.25 inches wide and 1.75 to 2.25 inches deep, so the tube is a rough stand-in. If in doubt, leave it out. Skip beads, buttons, sequins, glitter, and googly eyes. The supply swap table above lists a safe replacement for each one.
Do these menorah crafts use real candles?
No. Every craft here is a decoration with paper, paint, tissue, or dough “candles” and flames. A craft menorah never needs a real flame. If your family lights a real menorah, keep it out of your toddler’s reach on a stable, non-flammable surface and supervise it at all times. Keep paper crafts and curtains at least about 3 feet away, and don’t hang crafts in the window where it stands.
What Hanukkah crafts work for preschoolers and toddlers together?
Choose a base craft that’s safe for the youngest child, such as a handprint menorah or a torn tissue menorah, and let the older child add counting, letters, or numbered stickers. Choking risk from small parts lasts until about age 4, so save beads and gems for children 4 and up, use them at a separate table under close supervision, and put them away right afterward. The youngest child’s safety rules set the standard for the whole table.
What are some easy Hanukkah crafts for kids that aren’t menorahs?
Try a large cardstock dreidel to color. Or make a paper-plate Star of David, where an adult cuts the plate and your child presses on big tissue squares. Another option is a blue-and-white crayon-resist painting: draw with a white crayon, then wash blue washable paint over it. Stick to large shapes and skip small gelt coins and mini dreidels as embellishments. Draw details with markers instead of gluing on tiny pieces.
How many candles should my toddler’s menorah craft have?
A traditional menorah has nine candles. For a toddler, don’t stress about the count. If you want it to look recognizable, aim for nine with one taller or in a different color. If your child makes five or fifteen, it’s still a perfectly good menorah.
Final Tips
Not sure where to start? For ages 1-2, pick the handprint or contact paper sun-catcher. For 2-3, try dot markers, paper strips, or play dough. Date the back, put it on the fridge, and enjoy the lights of the season together.