Snowman Craft for Toddlers with Cotton Balls (Mess-Free)
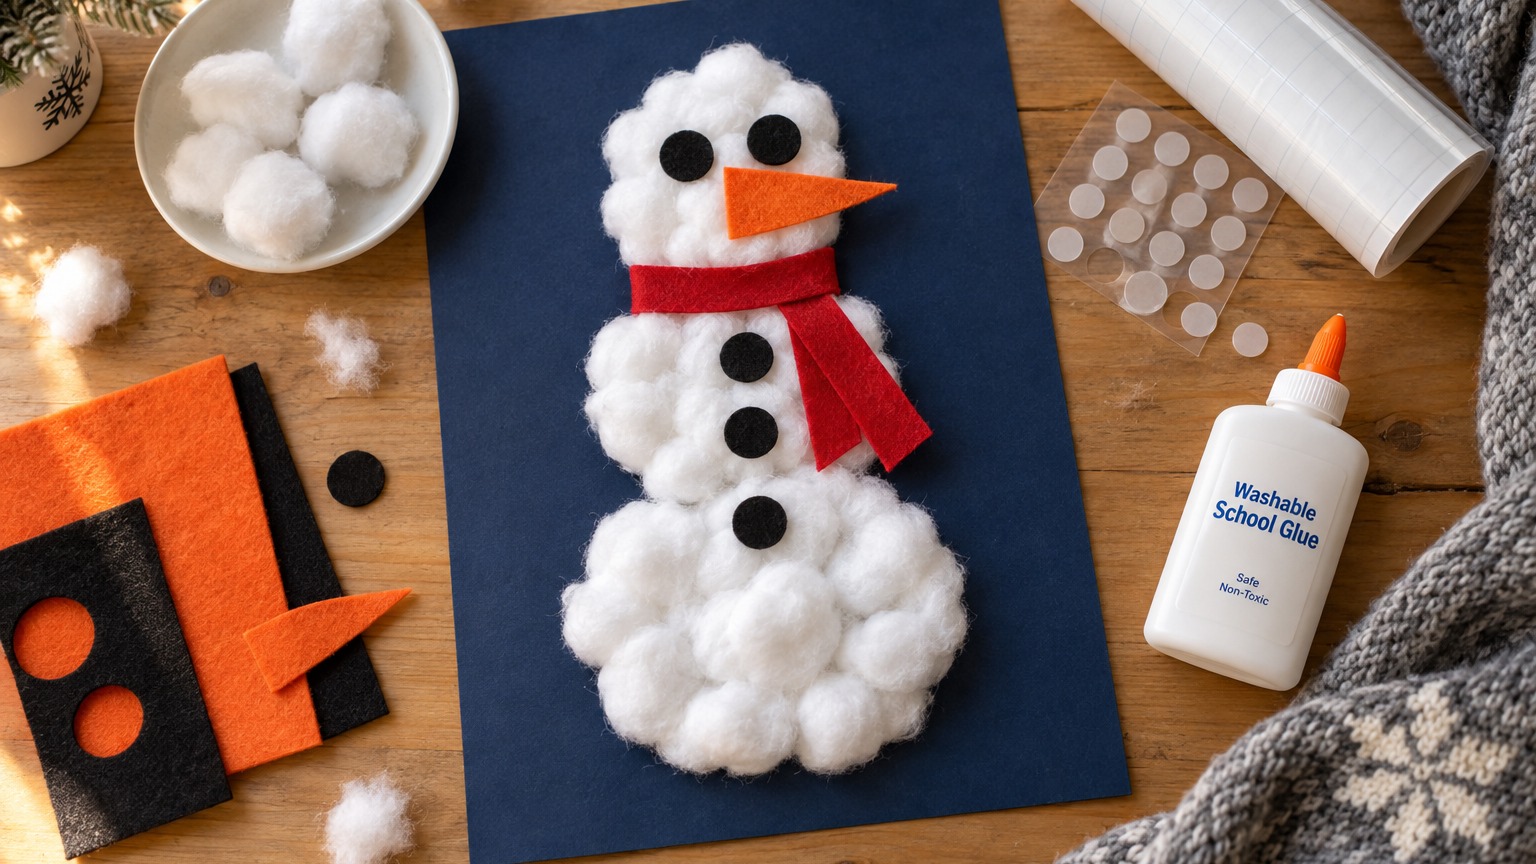
You'll learn how to set up a mess-free cotton ball snowman craft for toddlers with safe materials and zero glue mess.
- Use jumbo or pulled-apart cotton and stay within arm's reach to prevent choking.
- Size flat craft pieces to at least 2 inches so they are larger than a toilet paper tube.
- Expect sensory exploration and clumps rather than a neat, recognizable snowman.
- Serve cotton pieces on small plates one at a time and put leftovers away immediately.
This post contains affiliate links. As an Amazon Associate I earn from qualifying purchases.
Last December my two-year-old nephew emptied a whole glue bottle onto my snowman craft in one joyful pour. Nobody was hurt, but I knew I needed a better setup.
Here it is: a mess-free cotton ball snowman for ages 18 months to 3, with an age-by-age safety table, a glue-dot and contact-paper method, and no-cotton swaps. For more low-mess ideas, see my mess-free art activities for toddlers.
In this article (16 sections)
- Cotton Ball Snowman Craft for Toddlers: What You’re Making
- Cotton Ball Safety for Toddlers: Read This Before You Start
- Materials: Everything You Need for the Cotton Ball Snowman
- The Mess-Free Glue-Dot Method (My Favorite Part)
- Step-by-Step: Build the Snowman
- Customizing the Craft by Age
- No-Cotton Alternatives (When You’d Rather Skip It)
- Face and Accessory Ideas That Are Actually Toddler-Safe
- Setup and Mess Management for Toddler Snowman Crafts
- Troubleshooting: What Goes Wrong and How to Fix It
- Cleanup in Under Five Minutes
- Extending the Snowman Fun All Week
- Variations to Try When Your Toddler Wants a Second Round
- What to Do When Your Toddler Won’t Do the Craft
- Frequently Asked Questions
- Quick Recap: Mess-Free Toddler Snowman Craft
Cotton Ball Snowman Craft for Toddlers: What You’re Making
Your toddler’s job is pressing soft things onto sticky things. Here’s what to expect, because the Crafty Mama rule is realistic mess expectations:
- Your toddler will not make a recognizable snowman. They will make a rectangle of paper with some cotton on it, maybe in a clump in one corner. That is a successful craft.
- Some cotton will end up on the floor, the cat, and your sleeve. Cotton fluff is light and clingy but cleans up in a couple of minutes with a handheld vacuum or a damp paper towel.
- The activity will last somewhere between 5 and 20 minutes. Younger toddlers may stick six cotton balls and leave. Older ones may go back for a second paper.
- The finished product is a keepsake, not a masterpiece. Put it on the fridge anyway.
I try not to oversell crafts, but pinching, pressing and peeling is real fine motor practice. Soft, dry cotton is also a sensory change from paint or playdough, and a good excuse to repeat words like “soft,” “stick” and “snow.” None of that needs a perfect snowman.
If you want the deeper reasoning behind letting toddlers lead like this, my guide to process art for toddlers goes into why the squishing and sticking matters far more than the finished snowman.
Cotton Ball Safety for Toddlers: Read This Before You Start
Safety firstUse jumbo or pulled-apart cotton pieces only, keep your child seated, and stay within arm’s reach. If a child is coughing, gagging, silent or struggling to breathe, call emergency services. If they can’t cough, cry or breathe, start the choking first aid for a child over 1 (abdominal thrusts, with back blows as your training teaches). Never sweep the mouth blindly with a finger.
Run through this quick check before every session:
- Jumbo or pulled-apart cotton only
- Child seated, adult within arm’s reach
- One small plate of cotton at a time
- Leftovers put away the moment you finish
Cotton balls are soft, which makes them feel harmless. But a cotton ball is also a compressible, absorbent wad that can swell with saliva, and toddlers explore with their mouths. For children under 3, anything that can be squished small enough to fit in the mouth deserves close attention. That doesn’t mean you can’t use cotton balls. It means you choose the right size, set up the activity so that sticking is easier than mouthing, and stay within arm’s reach.
I’m a crafty parent, not a pediatrician, so treat this as practical guidance and not medical advice. Skip the cotton balls if your child still puts most objects in their mouth. Skip them too if there’s a history of choking or swallowing issues, or if your pediatrician has said to avoid small parts. Use one of the no-cotton alternatives further down instead.
The Quick Test I Use for Any Craft Supply
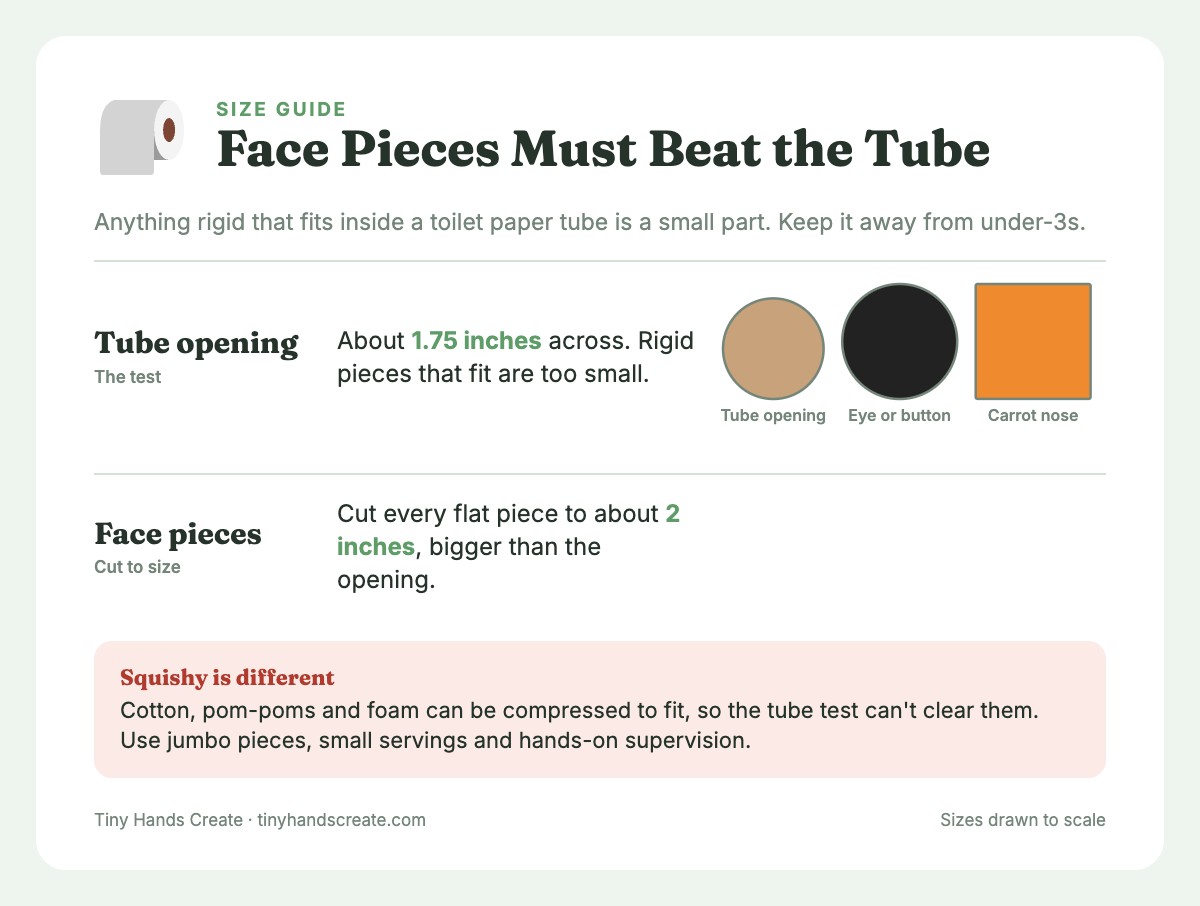
Take a toilet paper tube. Anything rigid that fits inside it, uncompressed, is a “small part” by the standard toy-safety rule of thumb, so keep it away from under-3s. A tube opening is about 1.75 inches across, so I cut every flat face piece in this craft to about 2 inches, bigger than the opening. Paper and felt can still be crumpled, so hand pieces over one at a time. If your child tends to mouth things, check each piece against the tube before you start.
Squishy materials like cotton, pom-poms and foam can always be compressed to fit, so the tube test alone can’t clear them. For those, we manage risk with size (jumbo or pulled-apart pieces), small servings, and hands-on supervision. If your child still mouths most things, skip them.
Age-by-Age Cotton Ball Size and Safety Table
| 18 months to 2 years | 2 to 3 years | |
|---|---|---|
| Best cotton size | Jumbo cotton balls, or standard balls pulled apart into large, wide, flat fluffy sheets about the size of your palm | Jumbo balls or pulled-apart large pieces for every child under 3; standard balls are a 3+ option, only for a child who doesn’t mouth objects |
| Why | Larger, flatter pieces are somewhat less likely to be mouthed whole, but they still need hands-on supervision | Many 2.5-year-olds are past the heavy mouthing stage, but it varies a lot by child, and cotton still compresses small |
| Supervision | Hands-on. You sit shoulder to shoulder, and you place the cotton on the table one piece at a time | Seated adult within arm’s reach; cotton served in a bowl |
| Sticking method | Contact paper (no glue needed), or glue dots you pre-place | Glue dots, or a glue stick the toddler can swipe |
| Cotton serving | 2 to 3 pieces at a time on a small plate | 3 to 4 pieces at a time on a small plate, refilled as needed |
| Face and scarf bits | Large pre-cut felt or paper shapes; no buttons, no beads, no googly eyes | Large paper or felt shapes; black paper circles or marker-drawn eyes, no googly eyes |
| Where to do it | At a table or highchair tray, seated, never walking around with cotton in hand | At a table, seated |
| When to skip cotton | If your child still grabs and mouths everything, use paper scraps or tissue paper | If they are in an intense mouthing phase, use paper or felt instead |
A few more safety notes that apply to both ages:
- Seated only. Toddlers should sit while they craft. Walking or running with objects in the mouth or hands raises choking and injury risk.
- One small plate at a time. Don’t put the whole bag out. A big pile invites a big handful.
- Put leftovers away immediately. The moment you’re done, cotton goes up and out of reach.
- If a piece goes in the mouth, stay calm. If it’s visible at the lips, wipe it away or ask your child to spit it out. Never sweep blindly with a finger. If your child is coughing, gagging, silent or struggling to breathe, call emergency services. If they can’t cough, cry or breathe, follow the choking first aid you learned for a child over 1: abdominal thrusts, with back blows as your training teaches. It’s also a great moment to look up a local infant and child CPR class if you haven’t taken one.
- Watch the fibers. Fuzzy cotton strands can stick to a damp tongue. If your child sneezes or coughs from the fluff, wipe and move on to a bigger piece.
If You’re Not Comfortable With Cotton Balls At All
That’s a completely valid call, and the craft still works. Skip to the section on no-cotton alternatives, where I show how to make the same snowman using torn white tissue paper, pom-poms stuck on contact paper, and even playdough. Your child will have just as much fun.
Materials: Everything You Need for the Cotton Ball Snowman
You probably own most of this already, and a few of these choices matter a lot for toddlers.
TipTo skip the drawing and cutting, grab my free Toddler Snowman Craft Card Pack + Safety Checklist. It has a large three-circle snowman template, big nose, eye, button and scarf shapes to cut out, the age-by-age safety cheat-sheet, a sticking-method chooser and a no-cotton swap card to keep at the craft table.
The snowman base
- Dark blue, black, or gray construction paper or cardstock (cardstock holds up better to squishing)
- White paper or cardstock for the snowman circles (or draw the circles on the dark paper in chalk)
- Cotton balls, jumbo size if you can find them (see the table above)
The sticking method (pick one)
- Glue dots: the small, sticky, peel-and-press adhesive dots found in the scrapbook aisle
- Washable school glue in a squeeze bottle for making your own glue dots
- Clear contact paper, sticky side up, taped to the table (the true no-mess winner for 18 to 24 months)
The snowman details
- Orange paper or felt cut into a chunky carrot nose, about 2 inches on each side
- Black paper or felt circles for eyes and three buttons, about 2 inches across so they’re bigger than a toilet paper tube opening, plus a black paper strip for the mouth
- A strip of colored felt or paper for the scarf
- Optional: a paper or felt hat at least 2 inches across, cut and placed by an adult. A stick-on foam hat is fine from about 2.5 years, but only for a child who doesn’t tear things apart or mouth objects
For cleanup
- A damp washcloth or baby wipes
- A small handheld vacuum or lint roller (it picks up cotton fluff like magic)
- A plastic tablecloth or a cheap vinyl placemat
The Dollar-Store Shopping List
If you’re starting from nothing, here’s what to buy:
| Item | Where I find it | Approx. cost |
|---|---|---|
| Jumbo cotton balls | Pharmacy beauty aisle, craft store | $2 to $3 |
| Clear contact paper (1 roll) | Dollar store or hardware aisle | $1 to $4 |
| Construction paper pack | Dollar store | $1 |
| Felt sheets (orange, black, red) | Craft store | $0.30 each |
| Glue dots | Scrapbooking aisle | $3 to $4 |
The Mess-Free Glue-Dot Method (My Favorite Part)
Here’s the trick that changed this craft for me. Instead of handing a toddler a bottle of glue, you do the gluing, and they do the pressing. Toddlers love the pressing part anyway. The sticky squeeze is the part that causes floods.
Pre-placed dots mean zero puddles, and you decide where the cotton lands. Here’s how the four sticking methods compare:
| Method | Best age | Mess | Prep | Cost |
|---|---|---|---|---|
| Store-bought glue dots | 18 mo to 3 yrs | Very low | 5 min | Highest per craft |
| DIY glue dots | 2 to 3 yrs | Low | 5 min plus 1-2 min wait | Lowest |
| Glue stick swipe | 2 to 3 yrs | Low | 1 min | Low |
| Contact paper | 18 mo to 2 yrs | Very low | 8 min | Low |
Option A: Store-Bought Glue Dots
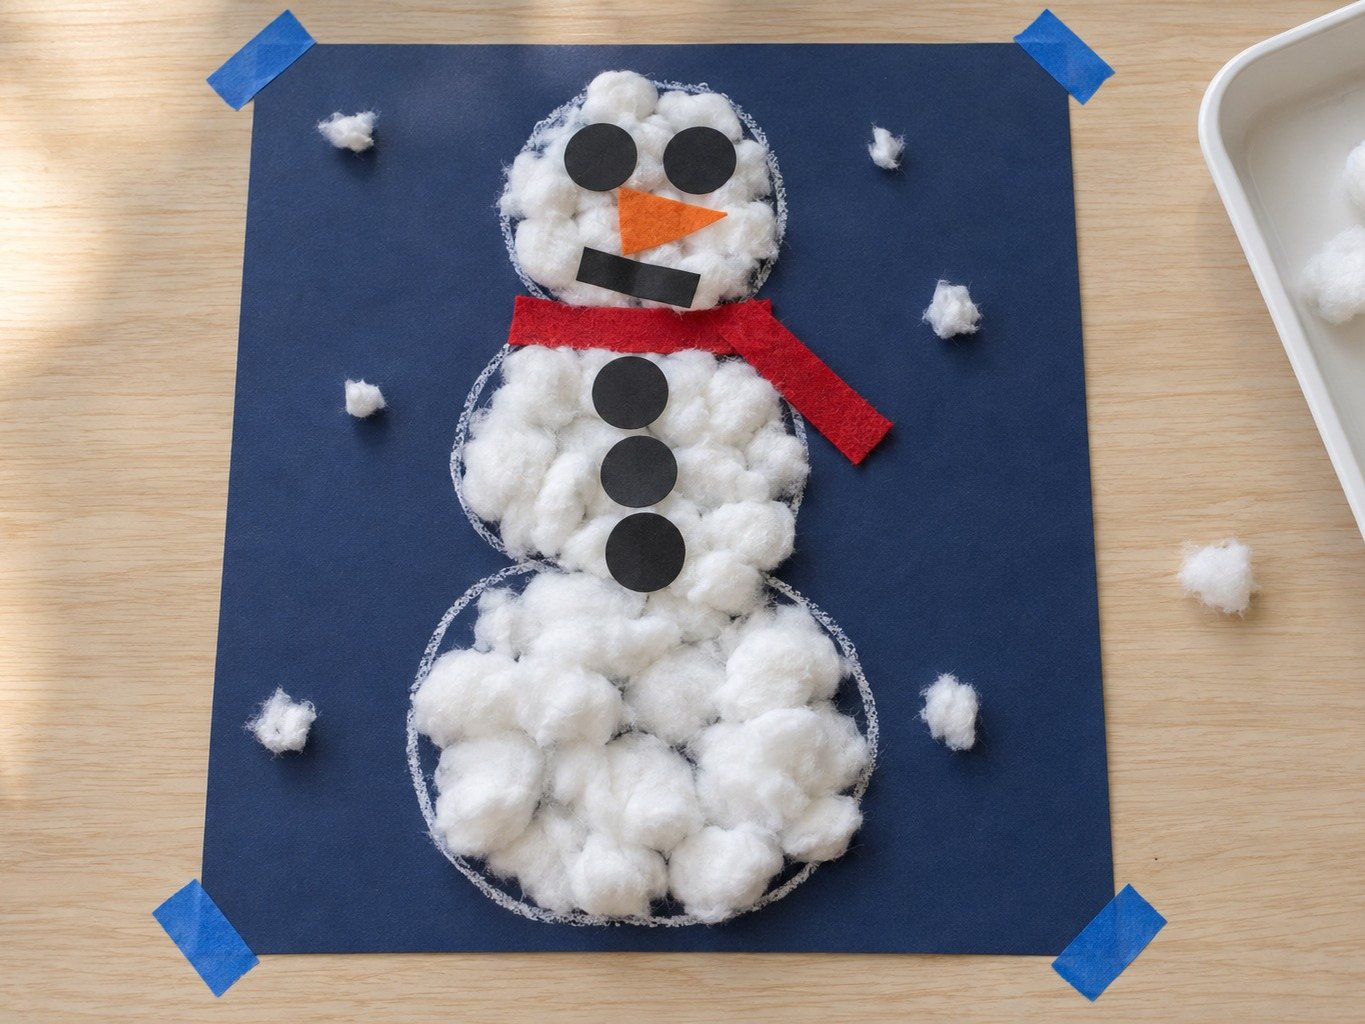
- Draw or tape a snowman outline onto dark paper. Three stacked circles: big on the bottom, medium in the middle, small on top.
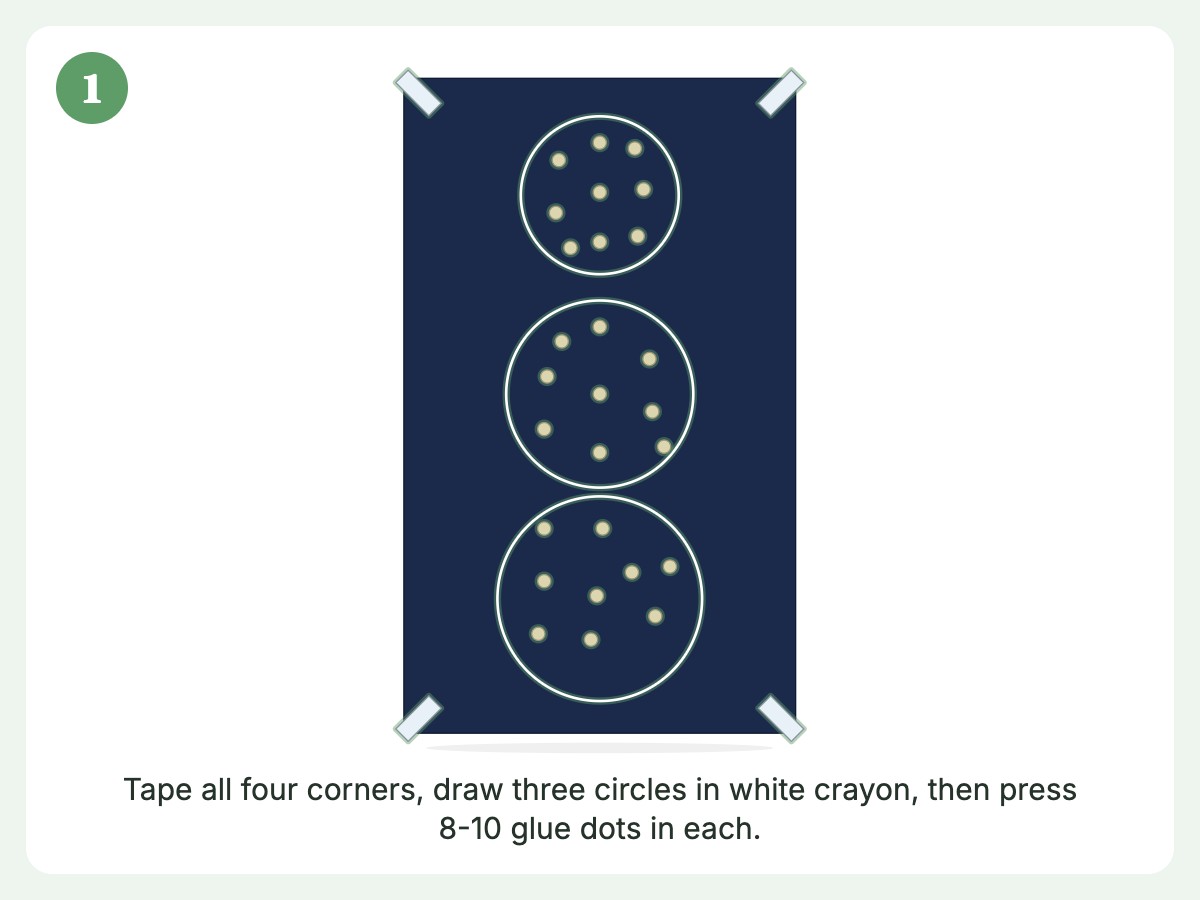
- Peel glue dots off their sheet and press them in a loose scatter inside each circle. Aim for 8 to 10 dots per circle. Leave the backing paper on the opposite side so it’s easy to peel.
- Tape the paper to the table on all four corners so it doesn’t slide.
- Put 2 to 4 jumbo or pulled-apart cotton pieces on a small plate in front of your child (2 to 3 for under-2s).
- Say, “Can you press the white fluff onto the sticky spots?”
Done. They’ll probably press one at a time, then start rubbing, squishing, and dragging. All fine.
Use non-toxic craft glue dots, keep the sheet out of reach, and discard any dot that comes off the paper so it can’t end up on a hand or in a mouth.
Option B: DIY Glue Dots (Cheaper)
- Fill a small squeeze bottle with washable school glue. A bottle with a narrow tip works best.
- Squeeze a dime-sized dot of glue wherever you want a cotton ball. Make the dots about an inch apart.
- Wait 1 to 2 minutes, until the glue feels tacky when you touch it lightly. This keeps it from soaking into the cotton or spreading.
- Hand over the cotton.
The key is the pause. Fresh glue is slippery and wet, and cotton soaks it up and goes gray. Slightly tacky glue grips the cotton and stays white.
Option C: The Glue Stick Swipe (Ages 2 and Up)
If your child is old enough to hold a glue stick, make a game of it.
- Let your toddler swipe the glue stick across the circle shapes. It leaves a thin, tacky layer, so they can’t flood the page.
- Then they press cotton wherever they see shiny glue.
Glue sticks are the lowest-mess option for older toddlers because they can’t pour them, but they do dry fast, so work on one circle at a time.
Option D: Contact Paper (No Glue at All)
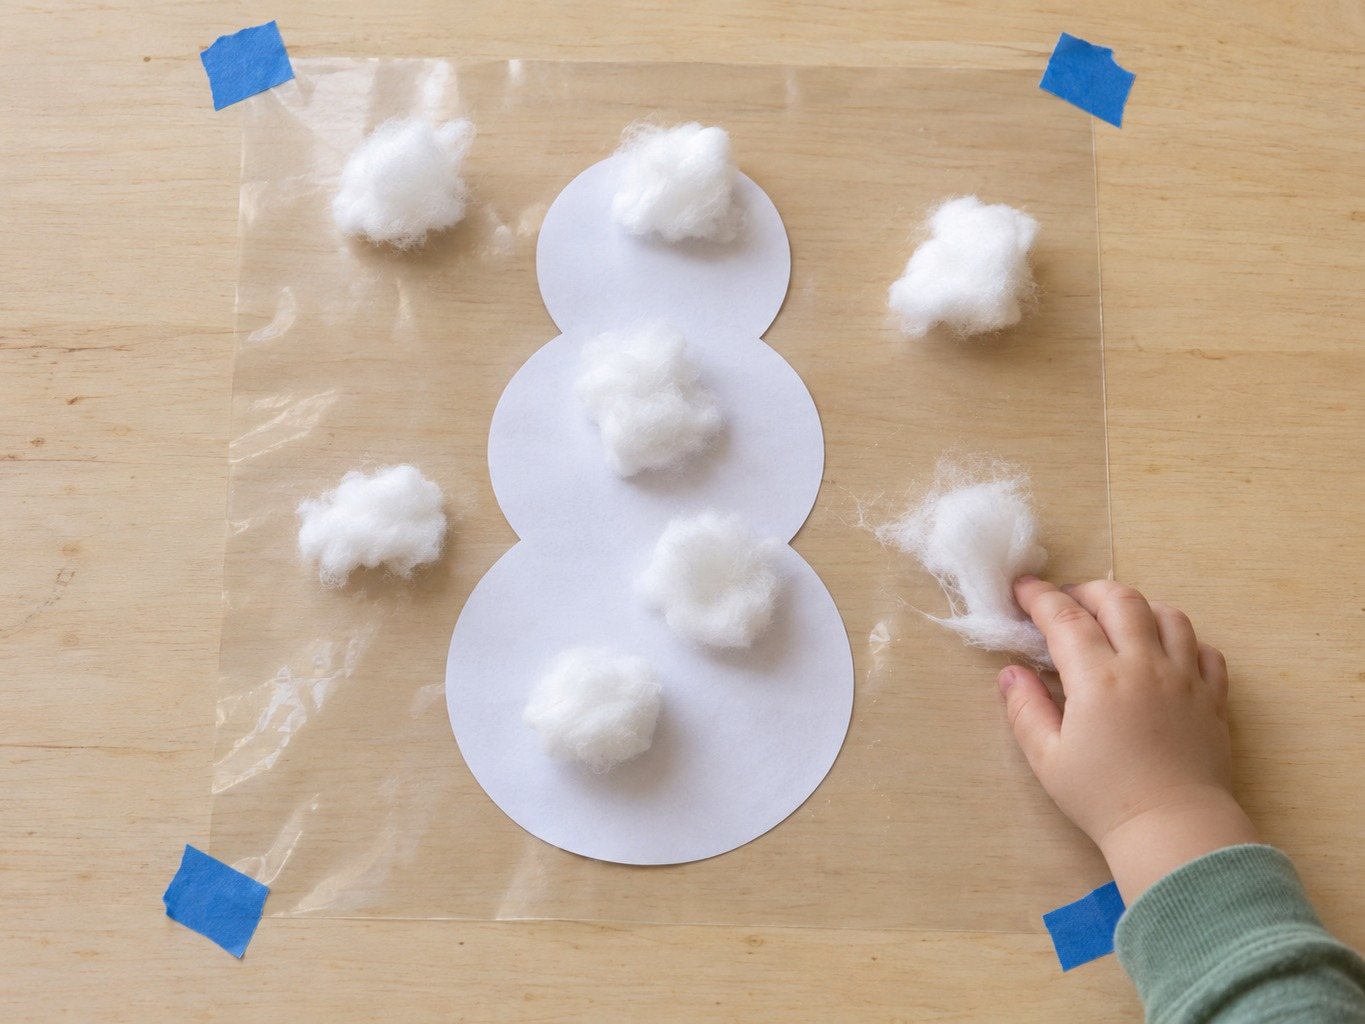
This is my default for 18 to 24 months, and it deserves its own section.
- Cut a piece of clear contact paper to about 9 by 12 inches.
- Peel off the backing and tape the sticky side up to the table or highchair tray. Use painter’s tape on all four corners.
- Easiest: stick a big pre-cut white paper snowman shape onto the sticky side first. Or trace the outline in thick marker on the backing paper and place it under the clear sheet.
- Hand over the cotton and watch it stick on contact.
There is no glue to pour, nothing to wash off hands, and when your toddler is done you can fold a second piece of contact paper over the top and seal it. It becomes a wipe-clean placemat or a window decoration. I did this with my own kid at 20 months and she mostly just stuck cotton on and pulled it off again, forty times, and was thrilled each time.
Step-by-Step: Build the Snowman
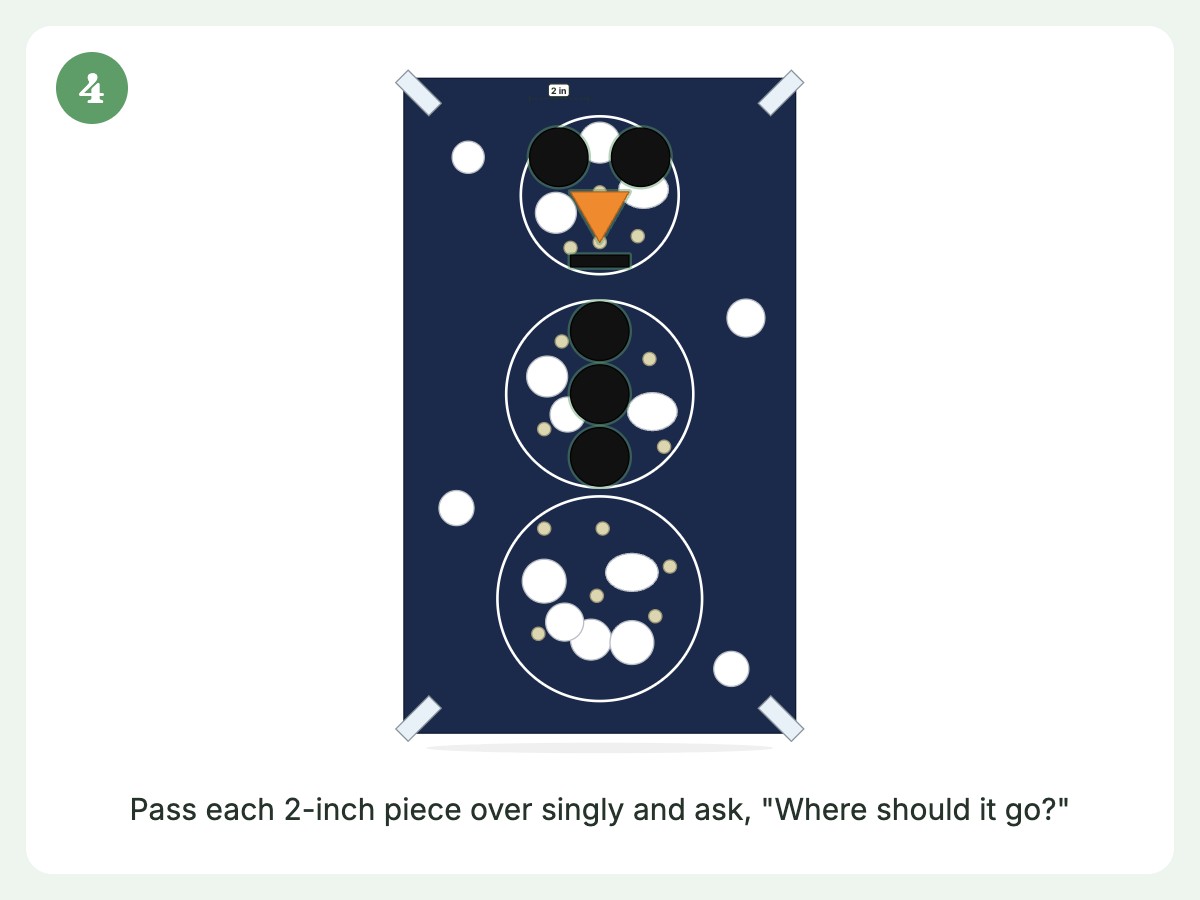
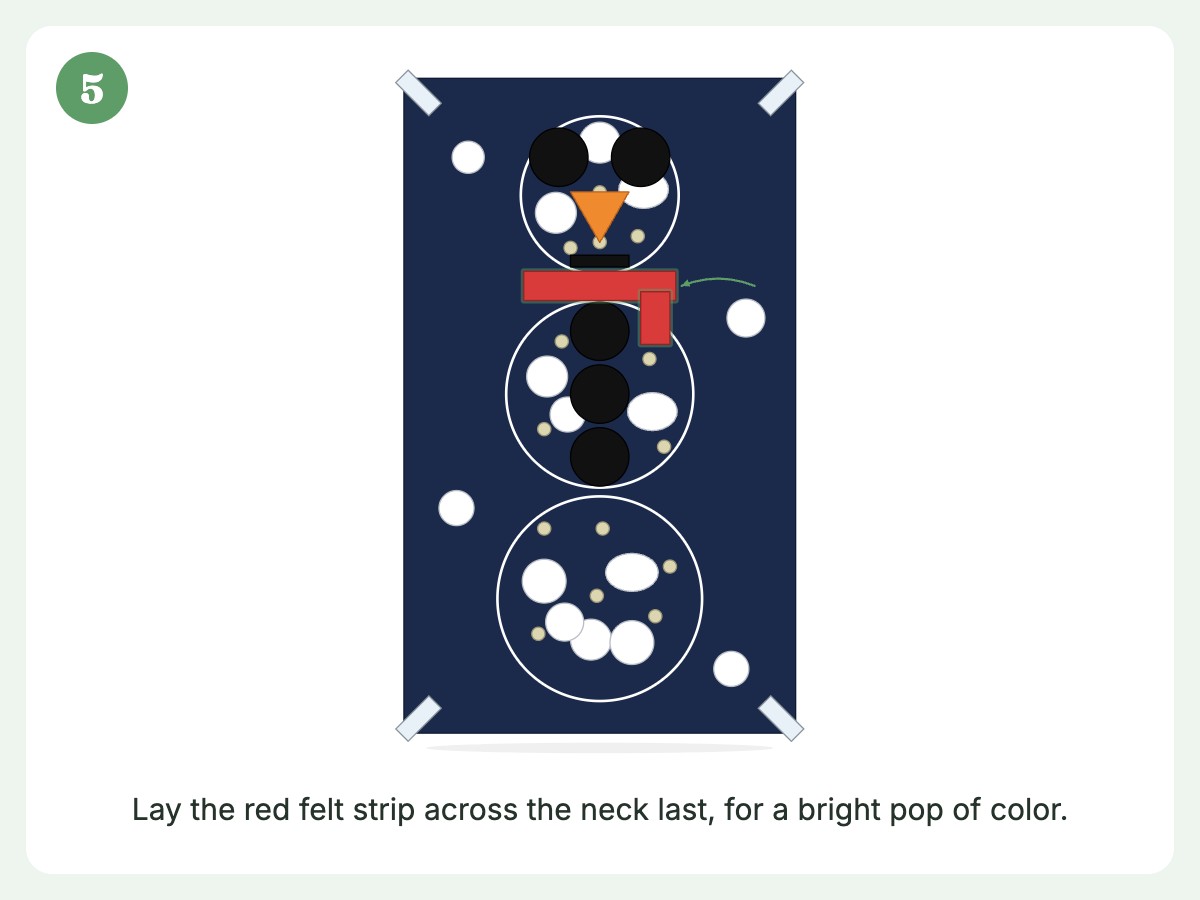
These steps work for any of the sticking methods above.
Before Your Toddler Sits Down (10 Minutes)
- Cover the table with a plastic cloth, and tape the paper down on all four corners.
- Cut the carrot nose (orange triangle, about 2 inches on each side), two black eyes and three black paper buttons (about 2 inches each), a mouth strip and a felt scarf, or cut them from the card pack template.
- Draw three stacked circles in white crayon or chalk on dark paper, or glue-stick cut white circles down in advance. Toddlers like a clear target.
- Set up the sticky spots with glue dots, dabs of glue, or contact paper.
- Pull the cotton apart into big, flat, wide pieces for an 18-month-old.
On the tray when your toddler sits down:
- Taped-down snowman paper with the sticky spots ready
- A small plate with 2 to 4 cotton pieces (2 to 3 for under-2s)
- Face pieces and scarf in a small bowl at your side, not in front of your child
- A damp cloth or wipes within your reach
With Your Toddler (5 to 20 Minutes)
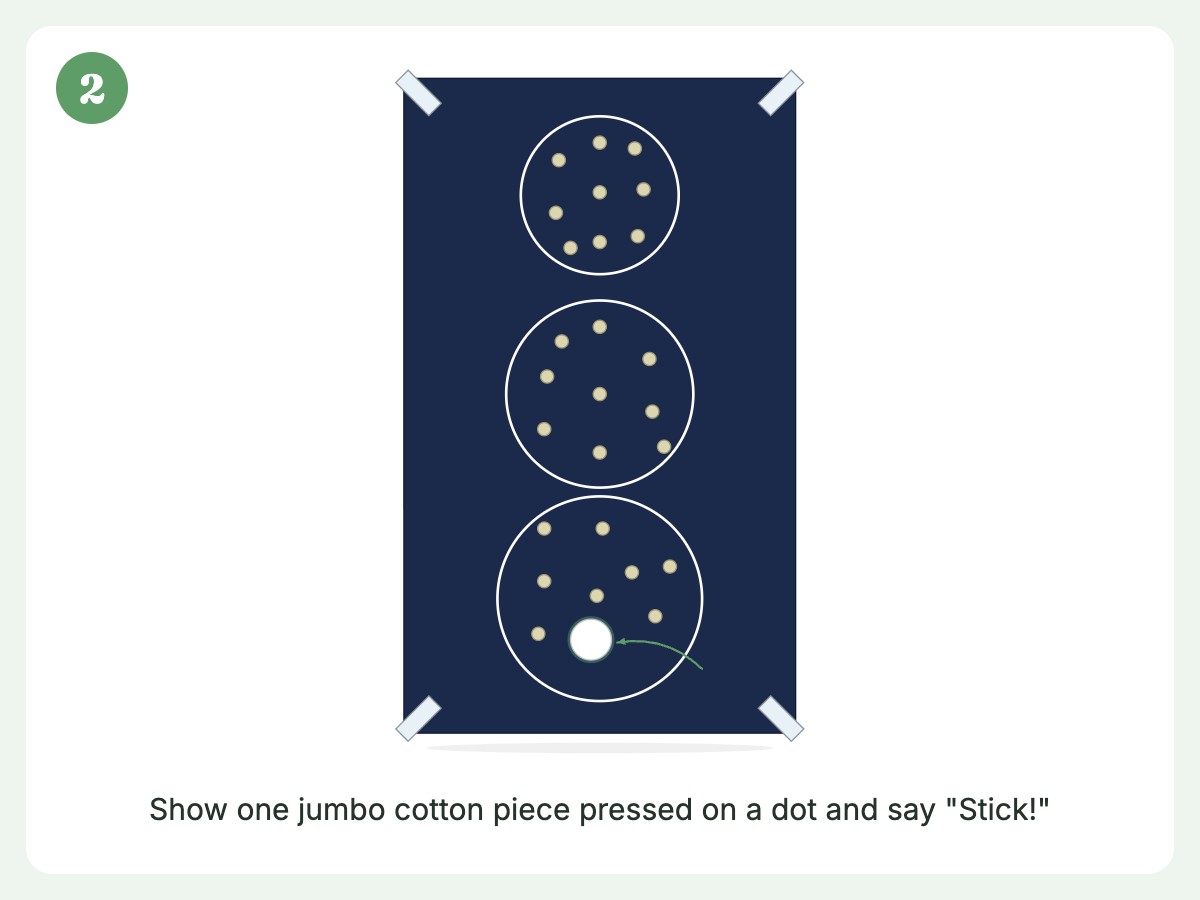
- Show, don’t tell. Press one cotton ball onto a dot. Say, “Stick!”
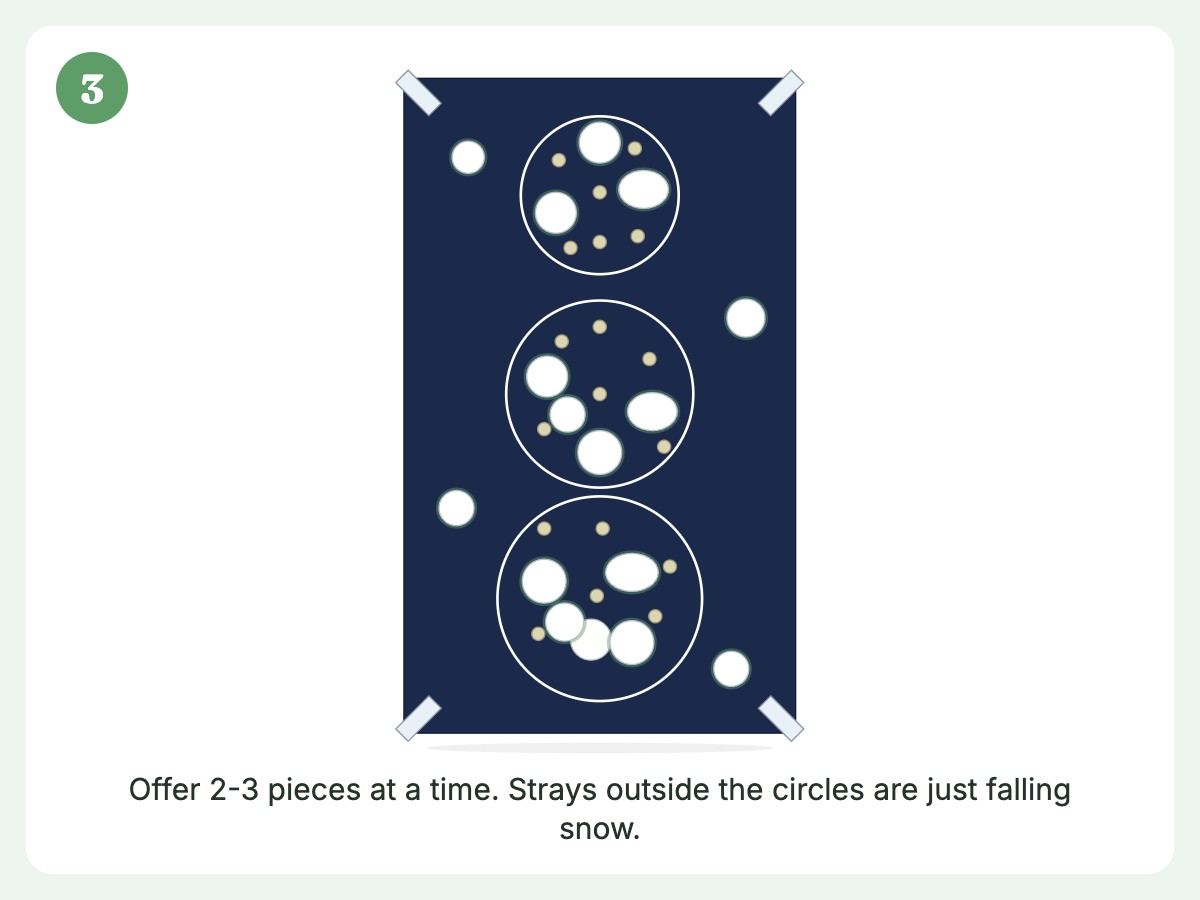
- Hand over the plate and let your child go at it. Don’t correct placement. If a cotton ball ends up on the dark paper outside the circles, that’s snow falling.
- Narrate lightly. “Soft. Fluffy. Cold snow!” Toddlers love sound words.
- When the cotton is stuck, hand over the face pieces one at a time. Say, “Where should the nose go?” and let them point or place.
- Add the scarf last. It’s the most fun because it’s a bright color on a white background.
After (Two Minutes)
- Lay flat, out of your toddler’s reach, until the glue sets. Glue dots and contact paper hold right away; liquid glue needs about 20 minutes.
- Write the date and your child’s age on the back.
- Vacuum or lint-roll the table. Cotton lifts right off.
Customizing the Craft by Age
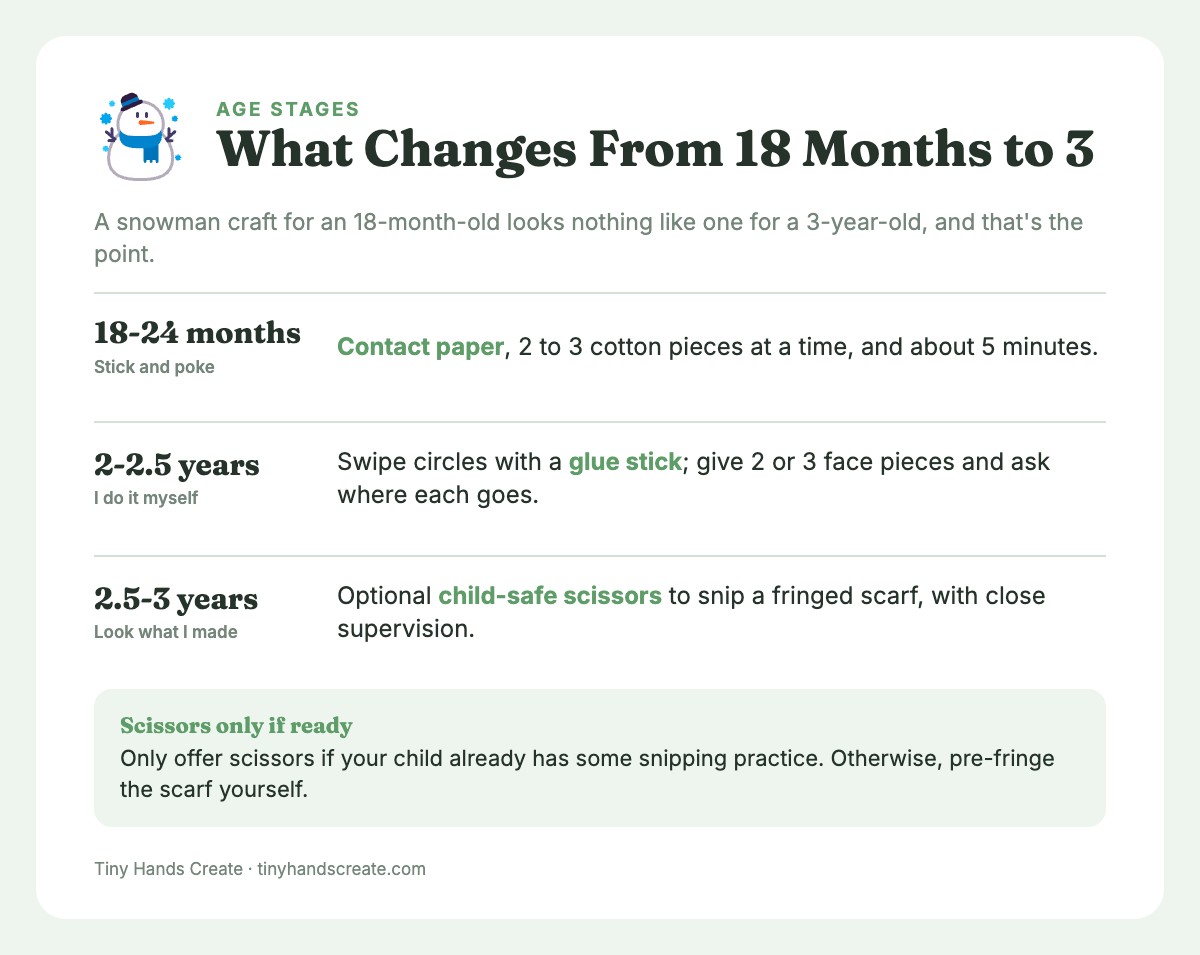
A snowman craft for an 18-month-old looks nothing like one for a 3-year-old, and that’s the point.
18 to 24 Months: The “Stick and Poke” Stage
At this age, the goal is sensory exploration. They want to feel the cotton, squish it, maybe rub it on their face.
- Use contact paper so there’s nothing to squeeze or pour.
- Offer 2 to 3 pieces of cotton at a time on a small plate.
- Skip the face pieces if they feel overwhelming. A cotton-covered snowman is already a win.
- Use big pre-cut shapes and let the child press them on if they want.
- Keep it short. Five minutes is a great run at this age.
2 to 2.5 Years: The “I Do It Myself” Stage
This age adores independence. Use that.
- Hand over a glue stick and let them swipe the circles.
- Give two or three face pieces and ask where each goes.
2.5 to 3 Years: The “Look What I Made” Stage
Older toddlers start to see the snowman as a thing.
- Offer child-safe scissors for snipping a fringed scarf, under close supervision and only if your child already has some snipping practice. Otherwise, pre-fringe the scarf yourself.
- Add a drawn snowy background with white crayon, then let them watercolor over it for a wax-resist effect. For techniques your child can graduate to, my guide to easy watercolor projects for kids has age-by-age ideas.
No-Cotton Alternatives (When You’d Rather Skip It)
If you or your pediatrician would rather not have cotton in the house, or your toddler is deep in a mouthing phase, here are four ways to get the same fluffy snowman without a single cotton ball.
Torn Tissue Paper Snow
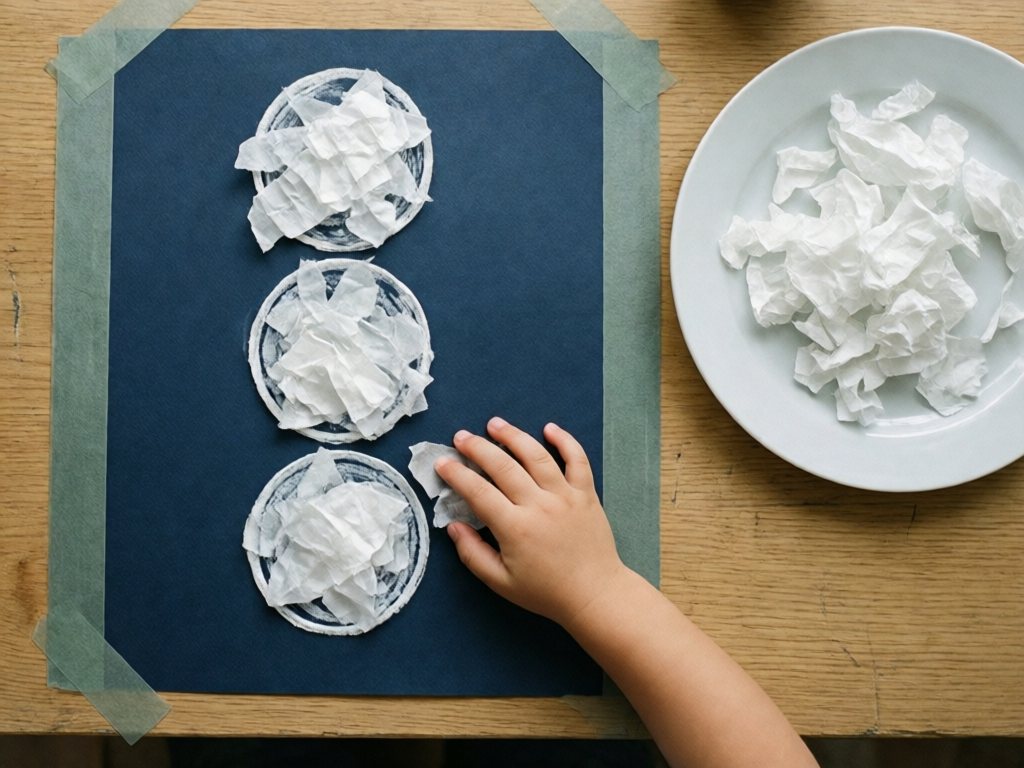
White tissue paper tears easily, feels crinkly and fun, and sticks to a glue dot or contact paper well. Tissue also has a bonus: toddlers love the sound. Tear it into palm-sized pieces yourself, and stay seated beside your child. Tissue isn’t a food, but it can still be mouthed, so the same hands-on supervision applies.
Pom-Pom Snowman
Large, jumbo pom-poms stick to contact paper or glue dots and give you a 3D snowman that feels great. Use jumbo pom-poms about 2 inches across, and skip them for children who still mouth objects. If you want more ways to use them, my post on pom-pom crafts for toddlers walks through safe sizes and sticking methods for little hands.
Playdough Snowman
Roll three balls of white playdough into a snowman shape, and let your toddler press on felt scraps for a face. It’s soft, squishy, and contained on a tray. If you need a recipe, my soft DIY playdough recipe takes about ten minutes. Keep it plain white dough with no additives.
Good to knowPlaydough is not food. It often contains wheat and a lot of salt, and salty homemade dough is the main concern for children who mouth it. Give it the same seated, hands-on supervision, and skip it for children who eat dough.
White Paper Scrap Snowman
Collect junk-mail scraps, coffee filters, or paper towel pieces. Tear them up together, and stick the pieces to contact paper. This is truly the cheapest version, and the tearing is great for fine motor practice.
Comparison: Which Version Fits Your Day?
| Version | Mess level | Prep time | Best age | Needs glue? |
|---|---|---|---|---|
| Jumbo cotton ball + glue dots | Low | 5 min | 18 mo to 3 yrs | Yes (dots) |
| Cotton + contact paper | Very low | 8 min | 18 mo to 2 yrs | No |
| Tissue paper snowman | Low | 5 min | 18 mo to 3 yrs | Optional |
| Pom-pom snowman | Low | 5 min | 2 to 3 yrs | Optional |
| Playdough snowman | Low | 2 min (if dough is made) | 2 to 3 yrs, if not mouthing dough | No |
| Torn paper snowman | Low | 5 min | 18 mo to 3 yrs | Optional |
Face and Accessory Ideas That Are Actually Toddler-Safe
The face is where many snowman crafts quietly go wrong for the under-3 crowd. Buttons, beads, googly eyes, and tiny pom-poms all appear in standard snowman tutorials, and they are all small parts.
| Traditional supply | Safer swap for toddlers |
|---|---|
| Real buttons | Large black paper or felt circles, about 2 inches or bigger |
| Googly eyes | Black paper circles, or draw the eyes with a thick marker |
| Beads for a smile | A black marker line or a paper strip |
| Tiny pom-pom nose | Orange paper or felt triangle |
| Twigs for arms | Brown paper strips or drawn marker lines |
| Fabric scarf | A felt strip, glued on in advance |
| Glitter | Skip it entirely (no one has ever regretted this) |
A rule of thumb: if you’re not sure whether a piece is safe, make it bigger or make it flat.
Sticker Faces for the Win
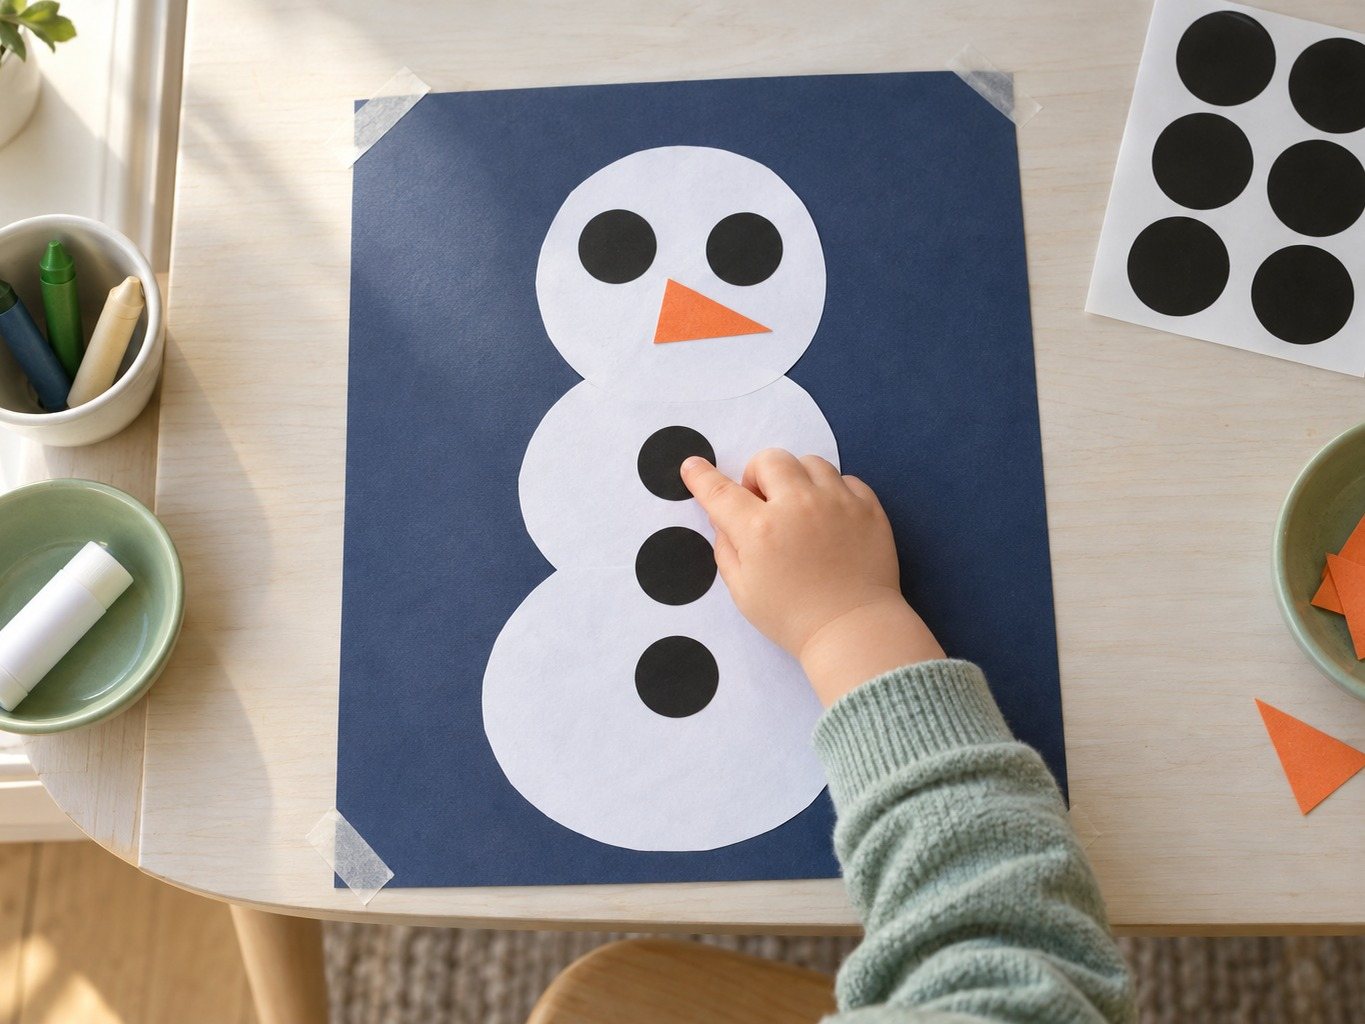
Foam stickers, big circle stickers, and sticker sheets with simple shapes are underrated snowman parts. A toddler can peel (or have you peel) a sticker and press it on in one move, with no glue and no mess. It also builds the pincer grasp. Use stickers at least 2 inches across, choose paper stickers over foam for children who tear things apart or mouth objects, and supervise the peeling.
Setup and Mess Management for Toddler Snowman Crafts
The Tray Trick
Put everything on a rimmed baking sheet or a shallow plastic tray. Paper in the middle, cotton on a plate at the side, glue and felt pieces in a small bowl. The rim catches stray cotton and keeps the whole project contained. When you’re done, tip the leftovers into the trash and wipe the tray.
Tape Everything Down
Painter’s tape on every corner of the paper. Toddlers pull, drag, and slide, and a paper that moves is a paper that gets frustrating. Taping it down also keeps glue dots from wandering.
Dress for the Mess You Don’t Expect
Even a low-mess craft can end with glue on a sleeve. Pop an old T-shirt or a smock over your child’s clothes. Roll their sleeves up past the elbows.
Pick a Good Time
A snack first can help mood, but supervision, not a full tummy, is the safeguard against mouthing. Pick a time of day when your child is calm and curious, not overtired. For us that’s mid-morning or just after a nap.
Troubleshooting: What Goes Wrong and How to Fix It
Most of these happen at least once, and none of them means the craft went wrong.
| What happened | Why | What to do |
|---|---|---|
| Cotton turned gray | It soaked up wet glue | Wait 1 to 2 minutes for glue to get tacky, or switch to glue dots or contact paper |
| Cotton won’t stay stuck | Glue dried before pressing, or cotton is too heavy | Press harder, use a fresh dot, or use jumbo balls with more surface area |
| Toddler pulls cotton off as fast as they stick it | They’re exploring, not decorating | Totally normal! Let them keep going, and add a few fresh dots yourself |
| Cotton on the floor, the dog, everywhere | Cotton is light and clingy | Lint roller or damp paper towel; it comes right up |
| Glue on hands | A glue dot or stick got swiped on skin | Wash with warm soapy water; washable school glue rinses off easily |
| Toddler won’t touch the cotton | Some kids dislike the dry, fibery feel | Offer tissue paper or pom-poms instead; sensory preferences are real |
| Toddler tries to eat the cotton | Mouthing is normal at this age | Calmly remove it, offer a safer material, and consider switching to a no-cotton version. See the Safety first box if they are coughing or struggling to breathe |
| Paper tears | Glue soaked through thin paper | Use cardstock or double up the paper |
Cleanup in Under Five Minutes
- Fold up the plastic tablecloth with cotton and scraps inside. Toss it, or shake it into the trash.
- Run a lint roller over the floor around the chair.
- Wipe the table with a damp cloth.
- Wash your toddler’s hands with warm soapy water.
- Bin the contact paper backing and any trimmed scraps right away.
- Put cotton and glue up, out of reach.
That’s it. If you did the tray trick, it takes a couple of minutes.
Extending the Snowman Fun All Week
One craft can become a mini winter unit if you stretch it. These are ideas I use when we’re in a snowy mood and the weather outside is too gross to go play in.
Snowman Sensory Play
Fill a shallow bin with a small amount of fluff. Use 3 or 4 jumbo or pulled-flat cotton pieces, 3 or 4 jumbo white pom-poms at least 2 inches across, and a couple of felt scarves. Let your toddler scoop, pile, and “dress” a toy snowman. If you like bin play, my fall sensory bin uses the same setup, just swap out the filler.
Safety firstA bin of loose pieces is freer play than the taped-down craft, so the rules get stricter. Skip this bin entirely for any child who still mouths objects, and use only pom-poms at least 2 inches across. Keep your child seated and stay right beside them. Add pieces a few at a time instead of the whole bag, then count everything back out and put it away when play ends.
“Melting Snowman” Water Play
Give your toddler a tray with a snowman drawn on it in dry-erase marker, a spray bottle, and a cloth. They spray the “snowman” and watch him melt. It’s cheap, quick, and ends with a clean tray.
Songs and Counting
Sing “Frosty the Snowman” while you work. For a finger-play, hold up five fingers for “Five Little Snowmen” and tuck one down each verse. Counting the cotton pieces as they stick on is a fun extra from about 2.5.
Give It Away
Toddlers adore giving things. Fold the dried snowman into a card for a grandparent, or tape it to a gift bag. If your family loves homemade gifts, I’ve got a whole list of DIY Christmas gifts kids can make for grandparents that pair well with this snowman.
Variations to Try When Your Toddler Wants a Second Round
Once your child has done the classic version, here are a few easy variations that keep it fresh.
- Snowman on a paper plate. A paper plate is already a perfect circle. Glue dots, cotton, and felt features, and you’ve got a snowman face.
- Window snowman. Use the contact paper version and stick it to a window. The light comes through the cotton in a lovely way.
- Snowman family. Make three snowmen in a row, one big, one medium, one small. Great for talking about sizes.
- Snowy night scene. Dark blue paper, a white crayon moon, and cotton for snowdrifts at the bottom.
- Winter animal friends. Add a paper cutout bunny or bird beside the snowman. Toddlers like to “feed” the animals.
- Snowman handprint. Press your toddler’s painted handprint on blue paper, and turn it into a snowman’s arms. (Non-toxic washable paint, of course.)
- Cotton snow globe. Draw a circle on paper, add a tiny snowman, and surround it with cotton snow.
What to Do When Your Toddler Won’t Do the Craft
Some days, no matter how cute the setup, a toddler says no. And honestly, that’s okay.
- Don’t push. Put the supplies away and try again another day, or never.
- Join in yourself. Sometimes kids need to see you enjoying it.
- Try a different material. A child who hates the feel of cotton might love tissue paper or pom-poms.
- Switch to a more physical activity. Some toddlers want to move more than craft. Try a rainy-day game or a bit of dancing and come back to the snowman later.
For a longer list of ideas when crafts flop, I like having a go-to collection of 30 crafts for 2-year-olds to do at home so I’m never stuck.
Frequently Asked Questions
Are cotton balls safe for a 1-year-old or 18-month-old?
This craft is written for 18 months and up. For under 18 months, skip cotton and ask your pediatrician. From 18 months, use jumbo or pulled-apart pieces, a few at a time, with your child seated and you hands-on beside them. If your child still mouths most objects, or your pediatrician has advised avoiding small parts, skip the cotton. This is general craft guidance, not medical advice.
What is the easiest mess-free way to stick cotton balls to paper?
Clear contact paper, taped sticky side up, because it needs no glue at all. Pre-placed glue dots are a close second: you do the gluing and your child does the pressing.
What can I use instead of cotton balls for a snowman craft?
You have several good options: torn white tissue paper, jumbo pom-poms (about 2 inches across, and only if your child doesn’t mouth things), white playdough, torn paper scraps, or coffee filters. Each one stays within the same easy stick-and-press idea. Pick the one that matches your child’s age and how much they still mouth objects.
How do I make an easy snowman craft for a 2-year-old?
Tape dark paper to the table, add a drawn or cut-out three-circle snowman, and place glue dots (or a swipe of glue stick) in each circle. Hand your 2-year-old a small plate of jumbo cotton balls and let them press the cotton onto the sticky spots. Finish with paper or felt face pieces (nose, eyes, scarf) about 2 inches across, bigger than a toilet paper tube opening, handed over one at a time. Expect 5 to 20 minutes of sticking, and the finished snowman doesn’t have to look like anything.
Why does my cotton turn gray when I use liquid glue?
Cotton soaks up wet glue like a sponge. Use glue dots, let homemade dots sit 1 to 2 minutes until tacky, or use contact paper instead.
How long should a toddler snowman craft take?
Plan for 5 to 20 minutes of crafting, plus about 10 minutes of setup and under 5 of cleanup. An 18-month-old may be done in 5 minutes. Don’t worry about finishing the snowman, because the squishing and sticking is the activity.
Can I do this craft with a group of toddlers, like at daycare or a playdate?
Yes, but keep the adult-to-child ratio high, since each toddler needs a close eye around cotton and small pieces. Pre-make each child’s paper with glue dots already in place, give each child their own small plate of cotton, and seat everyone at the table before you hand anything out. The contact paper version is especially good for groups because there’s no glue to share or spill.
Quick Recap: Mess-Free Toddler Snowman Craft
If your toddler’s snowman ends up as a paper rectangle with seven cotton balls in the top left corner, you did it right. The craft is the pressing, the fluff, the little giggle when something sticks. The snowman is just the excuse.
Set up your tray, pick the sticking method that matches your child’s age, stay close, and let them lead. Then stick the finished masterpiece on the fridge, vacuum up the stray fluff, and go have some hot cocoa. You earned it.