Dia de los Muertos Crafts for Preschoolers: A Gentle Intro
This post contains affiliate links. As an Amazon Associate I earn from qualifying purchases.
Last October, my four-year-old pointed at a sugar skull in a bakery and announced, “That’s a Halloween cookie!” The woman at the counter smiled and said, “Close. It’s for Día de los Muertos. It’s for remembering people we love.” My kid asked, “Who do we remember?” I had no good answer.
So we learned together. This post has five crafts for ages 3 to 6: tissue paper marigolds, a papel picado banner, a shoebox ofrenda, clay marigold medallions, and an optional paper plate calavera. You’ll also find a plain-language explainer, an age-by-age guide, and honest mess ratings. In a hurry? Skip to the heading Tissue Paper Marigold Craft (Ages 3-6).
I’m not an authority, just a mom who read, asked questions, and tried a few crafts with a very overconfident glue stick. Treat this as a gentle starting point.
If you’d like a ready-made set of cards, the free Día de los Muertos Gentle Craft Card Pack covers these projects too.
In this article (16 sections)
- What Día de los Muertos Actually Is (and Isn’t)
- Why Preschoolers Can Handle This (Better Than We Fear)
- Ground Rules for Respectful Day of the Dead Crafts
- Supplies and Setup
- Age-by-Age Guide: Which Craft When
- Tissue Paper Marigold Craft (Ages 3-6)
- Papel Picado Banner for Kids (Ages 4-6)
- Shoebox Ofrenda for Kids (Ages 3-6)
- Air-Dry Clay Marigold Medallions (Ages 4-6)
- Paper Plate Calavera (Ages 4-6, Optional)
- Beyond Crafts: Gentle Día de los Muertos Activities for Preschool
- How Messy Is Each Project? An Honest Chart
- Plan Your Crafts: One Afternoon or One Week
- Keeping It Separate From Halloween
- Frequently Asked Questions
- Start Small: One Craft, One Story
What Día de los Muertos Actually Is (and Isn’t)
Before any glue comes out, it helps to get the big picture straight. Here’s the one-page version, laid out so you can copy it into a notes app, or jot it on a card and tape it inside a cupboard door.
One-Page Parent Explainer
| Question | Short answer |
|---|---|
| What is it? | A Mexican holiday (also celebrated in parts of Latin America and by many Mexican-American families) for remembering and honoring loved ones who have died. |
| When is it? | Usually November 1 and 2, though dates vary. In many families and regions, November 1 honors children who have died (Día de los Angelitos, “Day of the Little Angels”). November 2 honors adults. Some families begin preparing around October 31. |
| Is it “Mexican Halloween”? | No. The two holidays fall at nearby times of year, but they’re separate traditions with different roots and different feelings. Halloween plays with fear; Día de los Muertos is about love, memory, and welcome. |
| Where does it come from? | Commonly traced to Indigenous Mesoamerican traditions of honoring the dead, blended over centuries with Catholic All Saints’ Day and All Souls’ Day. Scholars still discuss how much pre-Hispanic practice carried over. |
| Is it sad? | It holds some sadness, but the dominant mood is warm, colorful, and celebratory. Families share food, music, and stories about the people they miss. |
| What’s an ofrenda? | An altar built at home or in a community space, decorated with photos, flowers, candles, favorite foods, and small keepsakes for the person being remembered. It isn’t worship. It’s a welcome table. |
| Why marigolds? | Cempasúchil (Mexican marigolds) are the flower of the holiday. Their bright orange color and strong scent are traditionally said to guide spirits back to the ofrenda. |
| What’s papel picado? | Delicate cut-paper banners (the name means “pierced paper”) strung up for the celebration. They flutter in the breeze and are often said to represent the wind and the fragility of life. The symbolism varies by region. |
| What about skulls? | Calaveras (skulls) are playful, affectionate symbols. Sugar skulls are often decorated with a person’s name and placed on the ofrenda. Skulls here are friendly reminders of life and memory, not scary props. |
| What food is typical? | Pan de muerto (a sweet bread, often decorated with bone-shaped pieces), favorite dishes of the person remembered, hot chocolate, fruit. |
If you remember only one line from that table, make it this: this is a holiday about loving people who’ve died, not about scaring anyone. That single idea shapes every craft choice below.
A Note on Regional Variation
Traditions differ a lot from region to region and from family to family. A celebration in Oaxaca looks different from one in Michoacán, and a Mexican-American family in Chicago may blend customs in their own way. Colors, foods, and even dates shift. When you read or hear something that doesn’t match what I’ve written here, that’s usually variety, not a mistake. If you have friends, neighbors, or a local cultural center connected to the holiday, their version is worth more than any blog post (including this one).
Why Preschoolers Can Handle This (Better Than We Fear)
My first instinct was to wonder whether a four-year-old was too young for a holiday about death. Many preschoolers cope well with the tradition’s gentle framing, though every child is different, and it’s fine to wait a year.
Little kids already understand “I miss Grandpa” and “remember when we did that?”
Many preschoolers are curious about death anyway, often in blunt, sideways ways. Think of the dead beetle on the sidewalk, the goldfish that stopped swimming, or the grandparent they’ve heard about but never met. Día de los Muertos gives that curiosity a warm, concrete frame:
- People we love stay in our hearts and stories.
- We can make beautiful things to honor them.
- Remembering together is a happy kind of sad.
You don’t have to explain the afterlife, decide what you believe, or introduce complicated ideas. You can keep it this simple: we’re making pretty things to remember people we love.
Talking to Preschoolers in Plain Words
These phrasings worked at our table. Adapt them freely to fit your family’s beliefs.
- “This holiday is for remembering people we love who have died.” I use plain words like died at our house. Softer phrases like “went to sleep” can confuse literal-minded three- and four-year-olds, and I didn’t want to risk bedtime worries.
- “Marigolds are bright and smell strong. People say the smell helps their loved ones find their way to the party.” It’s a story about the tradition, so you can say “in this tradition, people believe…” without claiming it as fact.
- “Skulls on this holiday are friendly. They remind us that people are special.”
- “Is there someone you’d like to remember?” Then let them answer, even if the answer is a pet, a cartoon character, or a great-grandparent they never met.
If Your Family Is Grieving Right Now
If there’s been a recent loss in your home, this may be tender territory. Trust your read of the room. Some families find these crafts comforting; others would rather wait a season. There’s no right answer. If you proceed, let your child lead and be ready for tears alongside the glitter. For ideas on helping a little one through big feelings, the calm down activities for kids are a good companion for the days that get heavy.
Good to knowIf your child shows persistent distress, changes in sleep or appetite, or regression (such as new clinginess or toileting setbacks), talk with a pediatrician or a child grief counselor.
Ground Rules for Respectful Day of the Dead Crafts
A lot of parents search “respectful Day of the Dead crafts kids” because they want to join in without getting it wrong. That instinct is the right one. These are the guardrails I settled on.
| Do | Skip |
|---|---|
| Explain the meaning before making anything. | Treating it as a Halloween add-on or party theme. |
| Use marigolds, papel picado, and photos of real loved ones. | Scary or gory skeleton imagery. |
| Say Día de los Muertos or Day of the Dead. Try the Spanish pronunciation (DEE-ah deh lohs MWEHR-tohs). | Calling it Mexican Halloween. |
| Make crafts that honor someone specific. | Using sugar-skull face paint as casual dress-up. Many families feel strongly about this. |
| Learn from Mexican and Mexican-American voices (books, local events, friends). | Relying only on craft-store kits and party aisles. |
| Keep ofrenda items meaningful (a photo, a favorite food). | Treating the ofrenda as a spooky tabletop display. |
| Let kids know it’s a tradition from a particular culture. | Presenting it as a generic world-holiday activity. |
On Face Paint and Costumes
Calavera makeup (often called La Catrina style) has deep cultural meaning for many people, and some feel it’s used too casually outside the culture. For a preschool introduction, I skip face paint and stick to paper, flowers, and photos.
If You’re Part of the Culture
If your family already celebrates, your traditions may look nothing like what’s here, and that’s wonderful. Take what’s useful (the age adaptations, the mess warnings) and leave the rest.
Supplies and Setup
Most of this is craft-drawer stuff. Here’s what I used across all the projects below.
Supply Checklist
Copy this into your notes app or onto a sticky note for the shopping trip.
- Tissue paper in orange, yellow, purple, pink, and white. A multipack is cheapest.
- Green pipe cleaners for marigold stems. Use paper straws for 3-year-olds.
- Blunt-tip kid scissors for children, used on construction paper.
- Sharp adult scissors for adult-only pre-cutting of tissue. Store them out of reach.
- White school glue and glue sticks.
- Construction paper or cardstock. Any color works, plus some black or dark blue for contrast.
- Washable markers and crayons.
- String or yarn for hanging the papel picado banner.
- Tape. Painter’s tape works for walls.
- A small shoebox or tissue box for a mini ofrenda.
- A printed or hand-drawn family photo. Use a copy, not the original.
The optional extras depend on which crafts you pick.
- For the clay medallions: non-toxic air-dry clay, washable non-toxic kids’ paint, a plastic fork or craft stick, and a straw.
- For the ofrenda: an LED tea light whose battery compartment closes with a screw, or a drawn paper flame instead.
- For the calavera: a white paper plate.
- For the sensory bin: white rice, food coloring, vinegar, scoops, small cups, and a bin with a lid.
Safety firstStay with your child for every craft. Button batteries: many LED tea lights run on button batteries, which are dangerous if swallowed, and many have slide-off covers. Only use one with a screw-closed compartment. If you can’t confirm that, use a drawn paper flame, or keep the tea light out of your child’s reach entirely. Even a screw-closed tea light is small enough to mouth, so an adult handles it and it stays away from toddlers and babies.
If a battery may have been swallowed, go to the ER immediately and call the National Battery Ingestion Hotline at 800-498-8666. Don’t induce vomiting, and don’t give food or drink unless the hotline tells you to.
Safety firstStrings and banners: hang them well out of reach, avoid long loops, and never put them near cribs, beds, or play areas. Scissors: children use blunt-tip scissors on construction paper only. Adults pre-cut tissue with sharp scissors and store them out of reach.
Setup Tips From the Trenches
- Cover the table. An old shower curtain liner or a roll of kraft paper makes clearing the table itself a 30-second crumple. (Total cleanup is in the chart below.)
- Pre-cut for the youngest. Three-year-olds can tear tissue paper beautifully, but scissors work is still a hit-or-miss skill.
- Use a tray. Give each child a rimmed baking sheet for their supplies. It keeps glue and paper scraps in one zone and gives little hands a defined workspace.
- Pick a quiet time. These crafts hit differently when nobody is rushing. Right after a snack, with some soft music playing, was our sweet spot.
Age-by-Age Guide: Which Craft When
Not every project suits every preschooler. Pick by age, and check the adult pre-work column so you know what to prep.
| Age | Best crafts | Adult pre-work | Tips |
|---|---|---|---|
| 3 | Torn tissue marigold collage; adult-assembled mini ofrenda; photo story time (sensory bin only with close supervision) | Pre-cut tissue, assemble the box | Skip scissors. Focus on tearing, scrunching, and gluing. Keep sessions to 10-15 minutes. |
| 4 | Tissue marigolds (pom-pom style); shoebox ofrenda; clay medallions | Cut tissue squares, pre-fold paper; clay needs 48-72 hours to dry | Offer choices (two colors, not ten). Expect to do the tricky parts together. |
| 5 | Papel picado (with drawn guidelines); paper plate calavera; shoebox ofrenda | Fold the paper, draw cut lines | Let them lead. Add storytelling and name writing for extra depth. |
| 6 | Papel picado (more detailed cuts); clay medallions with painted details; multi-step ofrenda | Little; plan for clay drying time | Invite them to explain the holiday to a younger sibling or a friend. Explaining it helps it stick. |
What About Toddlers?
If a younger sibling is tagging along, give them a chunky crayon and a few large pieces of tissue paper to crinkle. Tape a sheet of contact paper down sticky side up so they can press the big pieces onto it.
Toddlers need constant adult supervision. Keep small scraps, crayon bits, and pipe-cleaner wire ends away from them, and clean up scraps right away. Our mess-free art activities for toddlers has more of this style.
Tissue Paper Marigold Craft (Ages 3-6)
If you only do one craft, make it this one. Marigolds are the flower of the holiday, and tissue paper stands in well. It’s crinkly, bright, and forgiving for small hands.
This one pairs well with our full tissue paper crafts guide if you want more ideas for working with the stuff.
Safety firstPipe cleaners have sharp wire ends. Bend each end back on itself before you hand one over, and stay close while kids twist. For 3-year-olds, swap in a paper straw stem or skip the stem. Sweep up small tissue scraps if anyone at the table still mouths things.
What You’ll Need
- Orange and yellow tissue paper
- Green pipe cleaners
- Scissors
- A tiny bit of tape
Step-by-Step
- Cut the squares. Cut orange and yellow tissue into roughly 4-inch squares. You’ll need about 6 to 8 per flower. (Grown-up job for threes; fours and up can try snipping with a little help.)
- Stack them. Layer the squares, alternating colors if you like, into a neat pile.
- Pinch the middle. Scrunch the stack in the center, like you’re making a bow tie.
- Wrap with a pipe cleaner. Twist the pipe cleaner tightly around the pinched middle and leave the rest as a stem. Tuck the sharp wire end into the twist. (Grown-up job.)
- Fluff! Gently pull each layer up and toward the center, one at a time, to build a pom-pom-style bloom. This is the best part, and the one that takes the most patience.
- Make a bunch. One marigold is cute. Ten marigolds look wonderful together.
Mess Level: Low
Tissue paper bits will drift around, but nothing sticks, spills, or stains. Expect scraps on the floor and one paper square inevitably stuck to someone’s sock.
Age Notes
- Age 3: Skip the fluffing and the pipe cleaner. Let them crumple, tear, and glue tissue pieces onto a paper cutout of a flower instead.
- Age 4-5: Fluffing works well at this age. Expect uneven but lovely flowers.
- Age 6: They can handle cutting petal shapes on their own and building multiple blooms.
Make It Meaningful
While you work, ask: “Who do you think would like these flowers?” It’s a simple, no-pressure way to bring the remembering into the craft.
Papel Picado Banner for Kids (Ages 4-6)
Traditional papel picado is cut from stacks of thin paper with small chisels and mallets. Scissors and punches are also used. The results are stunning.
We’re going for a simplified, preschooler-friendly version that captures the spirit: bright colors, snipped patterns, and a string of banners fluttering overhead.
Papel Picado and Marigold Templates (On-Page Version)
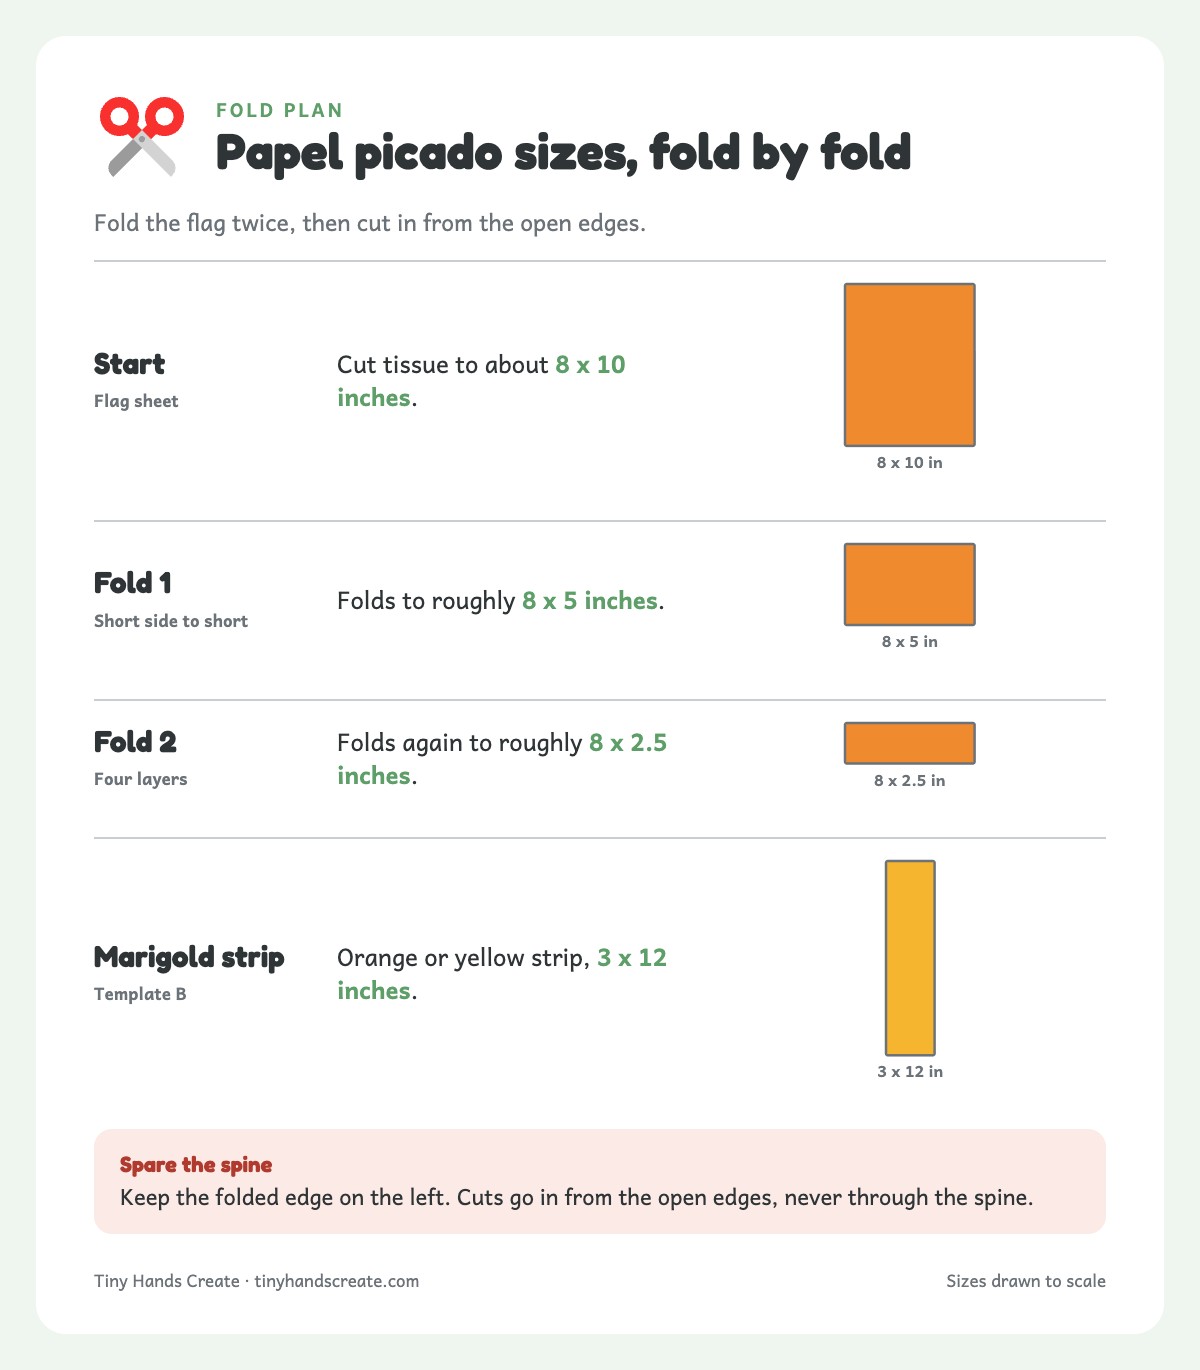
You can build these templates right from this page. The same templates come as cards in the free pack near the top of this post.
Template A: Papel Picado Flag
Start with: one sheet of tissue paper (any bright color), cut to a rectangle about 8 x 10 inches.
Fold plan:
| Step | What to do | Result |
|---|---|---|
| 1 | Fold the rectangle in half, short side to short side. | A rectangle roughly 8 x 5 inches. |
| 2 | Fold in half again the same direction. | A rectangle roughly 8 x 2.5 inches (four layers). |
| 3 | Keep the folded edge on the left. | The folded edge is your spine. The other three edges are open. Never cut through the spine. |
Cut guide. Cuts go in from the open edges, never fully through the folded spine.
| Cut | Where | What it makes |
|---|---|---|
| Triangle notches | Along the two long open edges (top and bottom of the folded strip). | Zig-zag borders. |
| Half-circles | Along the open edge opposite the spine. | Scalloped, flowery edges. |
| Little rectangles | Cut in from an open edge, partway toward the spine. | Windows that open into a pattern. |
| Snips | Small straight cuts, 1/2 inch deep, in rows. | Fringe-like texture. |
Unfold gently. The pattern appears when you open it, which is the magic moment for kids.
Finishing: Add a thin line of glue along the top edge, fold over a piece of string, press, and let dry. Space flags a hand-width apart.
Template B: Marigold Petal Strip
Start with: a strip of orange or yellow tissue paper, 3 inches wide by 12 inches long.
Steps:
- Lay the strip flat and snip a fringe along one long edge, cutting about two-thirds of the way across.
- Leave the other long edge uncut so the fringe stays attached.
- Roll the strip from one end, uncut edge at the bottom, and fluff the fringe into a curled flower.
- Secure the base with a dab of glue or a pipe cleaner stem.
This gives a shaggy, petal-packed marigold in about three minutes, and it’s a great fallback for kids who lose steam with the pom-pom version.
Color Guide
Colors vary by region and family, and sources differ. These are often-associated meanings, not rules.
| Color | Commonly associated with |
|---|---|
| Orange / yellow | Marigolds, the sun, and the path home. |
| Purple | Mourning. |
| White | Hope and purity. |
| Pink | Celebration. |
Making It Work for Small Hands
Real papel picado calls for precision scissor work. At this age, that’s a stretch.
TipKeep expectations loose. Their banner will look like a preschooler made it. That’s perfect.
Here’s how to keep it fun:
- Fold for them. Folding tissue paper accurately is surprisingly hard for fours. Do the folds yourself and let them do the cutting.
- Draw the cut lines. Use a marker to sketch dotted lines or simple shapes on the folded paper. They snip along the lines.
- Swap in construction paper. It’s easier to cut than tissue. Our first tissue flag tore in half the moment my kid unfolded it, and there were tears. Construction paper went much better. The look is chunkier, but the pride on their face is the same.
Mess Level: Medium
Confetti-sized snippets get everywhere. Cut over a tray or a big paper plate. Keep a handheld vacuum or a damp paper towel ready for the “dust.”
Shoebox Ofrenda for Kids (Ages 3-6)
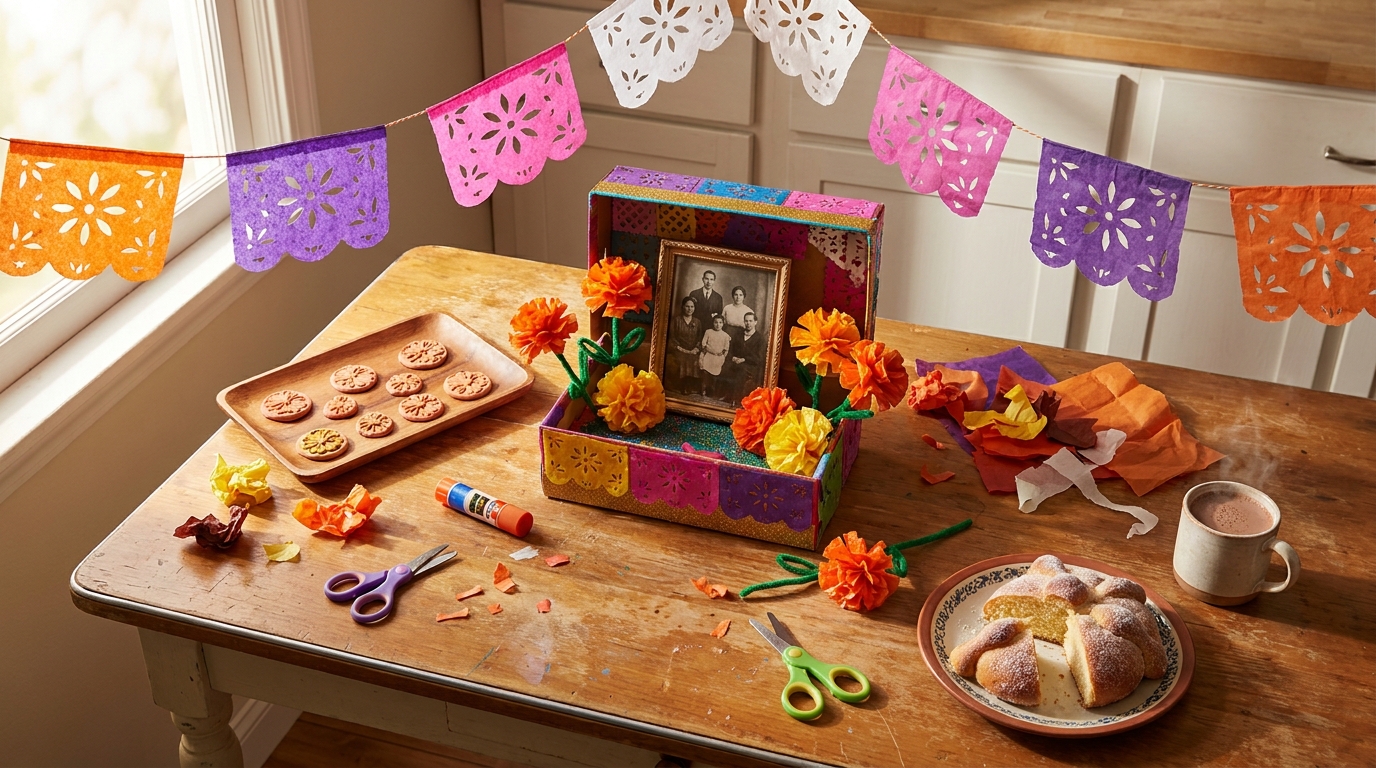
This was the one that made my kid’s whole face light up. An ofrenda is a family altar, but a miniature version in a shoebox is just the right scale for a preschooler: manageable, personal, and easy to tuck on a shelf.
What You’ll Need
- A small box (shoebox or tissue box, on its side).
- A copy of a family photo, or a drawing.
- Tissue paper marigolds from the marigold craft.
- A mini papel picado flag from the banner craft.
- Optional: a screw-closed LED tea light or a drawn paper flame, a small drawing of a favorite food, tiny keepsakes.
Step-by-Step
- Pick who to remember. Let your child choose. It might be a grandparent, a pet, or a relative they know only through stories. Hold gentle space for whatever they say.
- Decorate the box. Paint, color, or cover the inside with construction paper. Bright colors work best.
- Add a photo. Prop up a printed copy in the center. If you don’t have a photo, a child’s drawing of the person works beautifully.
- Add the marigolds. Place them around the photo like a garden.
- Hang a papel picado. Tape the mini banner across the top opening like a canopy.
- Add favorite things. Draw or cut out a picture of something the person loved: coffee, tamales, a favorite song, a fishing pole. This is the part where stories happen.
- Add a glow. A screw-closed LED tea light gives a candle-glow feel without an open flame. A grown-up checks that the battery compartment is screwed shut, switches it on, and sets it in place (see the safety note below). No screw-closed tea light? Draw a paper flame and glue it in instead.
Safety firstAn adult handles the tea light. Only use one with a screw-closed battery compartment. If you can’t confirm that, use a drawn paper flame instead (see the button battery note in Supplies). Keep the finished ofrenda away from toddlers and babies. Keep small keepsakes and paper flowers away from children under 3 and anyone who still mouths things. Hang the little banner out of reach, with no long loops.
The shoebox ofrenda turns a craft into a conversation. Pull it out at dinner and say, “Tell me about Grandma’s favorite food.” You’ll get answers you didn’t expect, and a few giggles, which is the whole point.
Mess Level: Low to Medium
Glue is the main variable. Let it dry flat and don’t rush the setup.
If You Don’t Have a Photo
Don’t panic. You can:
- Draw the person together.
- Use a symbol: a drawing of their favorite hobby, an object they loved, or a handwritten name.
- Honor a pet. Many families do, and it feels very natural to little kids.
Air-Dry Clay Marigold Medallions (Ages 4-6)
Once you’ve done the paper flowers, a clay version gives you something that sticks around. It also gives small hands something squishy to do on a quiet afternoon. Our air-dry clay projects for preschoolers guide covers the basics if you’re new to it.
What You’ll Need
- Non-toxic air-dry clay, white or orange.
- A plastic fork or craft stick.
- A straw, for the hanging hole.
- Washable, non-toxic kids’ paint in orange, yellow, and gold.
- A tray and smocks.
Step-by-Step
- Roll a ball. Start with a golf-ball-sized piece of white or orange air-dry clay.
- Flatten. Press into a thick disc, about the size of a cookie.
- Press texture. Use a plastic fork, a craft stick, or a dull pencil, with an adult nearby, to press radiating lines from the center outward. These look like petals.
- Make a hole. Poke a hole near the top with a straw if you want to hang it high on a wall or shelf later.
- Dry. Follow the package directions and flip once. Thick pieces can take 48 to 72 hours.
- Paint. Use washable, non-toxic kids’ paint in orange, yellow, and gold. Add a tiny green dot in the center if you like.
Mess Level: Medium
Clay dust and paint drips are the main culprits. A tray and smocks go a long way.
Safety firstAir-dry clay isn’t food. Choose one labeled non-toxic (ASTM D-4236 conforming) and keep it out of mouths. Medallions are for display only, never necklaces. Keep them, and any clay crumbs, away from toddlers and any child who still mouths things.
Add-On Idea: Name Tags
Press a letter into the clay (or write with a marker after it dries) to turn the medallion into a tag for a loved one’s place at the ofrenda.
Paper Plate Calavera (Ages 4-6, Optional)
Some families love calaveras. Others feel a skull craft belongs only after a fuller understanding of the culture. This is entirely optional, and I’d only try it after you’ve done the marigolds and talked about what skulls represent in this tradition: affection, humor, and remembering that life is precious.
What You’ll Need
- A white paper plate
- Washable markers or paint
- Tissue paper scraps
- Glue
Step-by-Step
- Cut or leave the plate round. A round plate reads as a head shape.
- Draw simple eye circles. Fill them with bright colors instead of black to keep the vibe friendly.
- Decorate with flowers. Draw swirls, dots, and petals around the eyes, on the forehead, and around the edge.
- Add a name. On many traditional sugar skulls, a loved one’s name is written on the forehead. Have your child write or dictate a name.
- Glue on tissue scraps. Tiny marigolds, hearts, and stripes finish the look.
Keep It Friendly
If it starts feeling too spooky, steer the colors toward cheerful: pink, yellow, turquoise. Swap black for bright. Add a smile. The goal is warm and a bit silly, not eerie.
Mess Level: Medium
Markers are cleaner than paint, but paint gives the best result. Pick based on your tolerance for scrubbing.
For more plate-based ideas, see our paper plate crafts for every season.
Beyond Crafts: Gentle Día de los Muertos Activities for Preschool
Crafting is the easy on-ramp, but these low-prep activities round out the experience and help the meaning sink in.
Marigold Scent Walk
If marigolds are growing near you (garden centers often carry them in fall), take a short walk to smell them. The strong, earthy scent is part of why they’re used in the tradition. Let your child describe it in their own words: “stinky,” “spicy,” “like grass.” There are no wrong answers.
Photo Story Time
Gather a few family photos and tell one short story about each person. Keep it light: what they loved to eat, what made them laugh, what they were good at. Preschoolers soak up stories, and this one has the bonus of building family identity.
Pan de Muerto Taste Test
Many bakeries and Latin markets sell pan de muerto in the weeks before November. Pick one up, slice it, and taste together. Talk about the bone-shaped decorations on top (they’re made of dough, so they’re delicious, not spooky). If you can’t find any, a sweet roll with a little orange zest makes a fine stand-in.
Safety firstCheck ingredients for allergens (wheat, egg, dairy, sesame, nuts), and confirm with parents before sharing in a classroom. Cut bread into pea-sized pieces for children under 4, and have them sit while they eat. Skip any with whole seeds or hard sugar toppings for this age. Serve hot chocolate warm, not hot, in a sturdy cup away from the table edge.
Marigold Sensory Bin
Fill a shallow bin with orange-dyed rice, some tissue paper marigolds, a few scoops, and small cups. To dye the rice, stir in a little food coloring and a splash of vinegar, then spread it on a tray and let it dry fully. Kids scoop, pour, and sort. For more fill ideas, check our DIY sensory bins roundup. It’s a quiet, absorbing way to keep little hands busy while you talk about the holiday.
Safety firstSupervise the bin the whole time. Rice and paper scraps are choking and mouthing risks for any child who still mouths objects, including some 3-year-olds. Keep toddlers away, or give them a separate bin with large items only. Use a bin with a lid and put it away after play. Throw the rice out if it gets damp or moldy.
Counting Flowers
Count marigolds in groups of five and ten, sort them by color, or line them up in patterns (orange, yellow, orange, yellow). It’s sneaky early math with a seasonal twist.
Draw a Memory
Give your child a piece of paper and say, “Draw something that makes you think of someone you love.” Write down what they say about the picture, then keep it on the ofrenda. Years from now, you’ll be glad you did.
Read Together
Check your library for picture books about Día de los Muertos, ideally written or illustrated by Mexican or Mexican-American authors. Browsing the children’s section for “Day of the Dead” usually turns up a handful. If your child has seen the movie Coco, it can be a familiar doorway into the themes of family and remembering, though the film is a story, not a how-to guide for the holiday.
How Messy Is Each Project? An Honest Chart
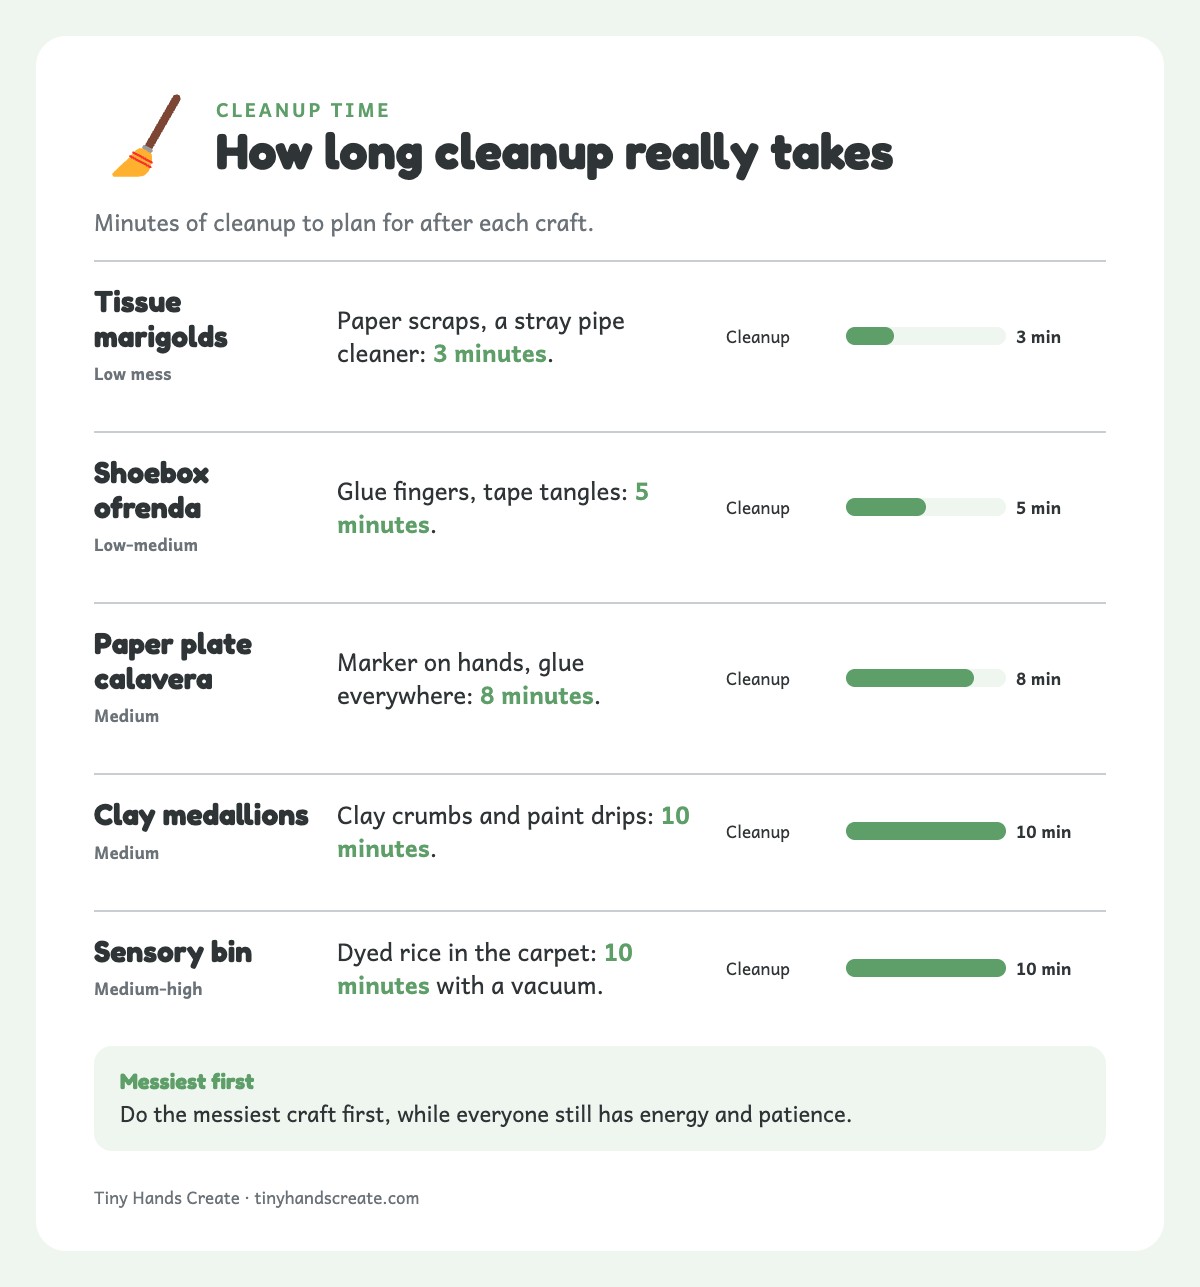
I promised realism. Here’s how each craft really plays out, with the level of cleanup you should plan for.
| Craft | Mess level | What to expect | Cleanup time |
|---|---|---|---|
| Tissue paper marigolds | Low | Paper scraps, a stray pipe cleaner. | 3 minutes |
| Papel picado banner | Medium | Confetti-like snippets everywhere. | 5-8 minutes |
| Shoebox ofrenda | Low-medium | Glue fingers, a few tape tangles. | 5 minutes |
| Clay marigold medallions | Medium | Clay crumbs, paint drips. | 10 minutes |
| Paper plate calavera | Medium | Marker on hands, glue everywhere. | 8 minutes |
| Sensory bin | Medium-high | Dyed rice in the carpet, always. | 10 minutes (with a vacuum) |
My Cleanup Rules
- Do the messiest craft first, while everyone still has energy and patience.
- Keep a damp washcloth within reach. It beats paper towels for sticky fingers.
- Declare the end of the craft before it spirals. “Two more flowers, and then we’re done” saves your sanity.
- Accept imperfection. The marigold that looks like a sad cabbage is still a marigold, and it still means something.
Plan Your Crafts: One Afternoon or One Week
The One-Afternoon Version
If you want to fold this into a single afternoon (about 90 minutes with snack breaks), here’s a schedule that worked for us. It suits ages 5 to 6. For younger kids, split it across days (see the week-long plan below), since 3-year-olds do best in 10 to 15 minute sessions.
| Time | Activity |
|---|---|
| 0:00 | Read the one-page explainer yourself. Then tell your child what the holiday is about in two sentences. |
| 0:10 | Look at family photos and choose someone to remember. |
| 0:20 | Make tissue paper marigolds. |
| 0:40 | Snack break: pan de muerto or a sweet roll. Add warm (not hot) chocolate if it’s chilly. |
| 0:55 | Cut and string papel picado. |
| 1:15 | Assemble the shoebox ofrenda. |
| 1:30 | Share a story about the person you chose. A grown-up adds the glow: a screw-closed tea light, or a drawn paper flame. |
You don’t have to do all of it. One craft plus one story is plenty for a preschooler.
The Week-Long Version
If an afternoon feels like too much, stretch it across the week leading up to November 1:
- Monday: Read the explainer; choose who to remember.
- Tuesday: Make tissue paper marigolds.
- Wednesday: Cut papel picado.
- Thursday: Build the shoebox ofrenda.
- Friday: Share stories and taste pan de muerto.
Short, daily sessions are friendlier to short attention spans and give the idea time to settle.
Keeping It Separate From Halloween
October can feel like a crowded craft calendar: pumpkins, leaves, Halloween, Thanksgiving. Día de los Muertos belongs in its own lane. I’d keep it separate from your spooky decorations, put the ofrenda somewhere visible but a little quieter (a shelf, not the Halloween mantel), and treat it as its own moment in the season.
If your little one is also in a pumpkin-and-costume mood, great! There’s room for both. Our non-scary Halloween crafts roundup pairs nicely for the more playful side of the month. The difference is in the framing: one is for fun and fantasy, the other is for remembering and love.
Frequently Asked Questions
Is it okay for non-Mexican families to do Día de los Muertos crafts with kids?
Many people from the culture welcome respectful participation when the goal is learning and honoring the holiday’s meaning. Learn what the tradition is about, skip costumes and party themes, and name the culture when you talk about it. When in doubt, follow the lead of Mexican and Mexican-American voices, such as books, local events, and friends.
Is Día de los Muertos too scary or morbid for a 3- or 4-year-old?
It doesn’t have to be. The holiday’s tone is warm and colorful, and the focus on marigolds, photos, and stories is easy for preschoolers to follow. Skip scary imagery, use simple language like “remembering people we love,” and let your child set the pace. If your family has experienced a recent loss, trust your instincts about timing. It’s fine to wait a year.
What’s the difference between Día de los Muertos and Halloween?
They happen around the same time of year, but they’re different traditions. Halloween has Celtic and Christian roots and leans into costumes, candy, and playful scares. Día de los Muertos has Indigenous Mesoamerican roots blended with Catholic observances and centers on welcoming back and honoring loved ones who have died, with altars, flowers, food, and stories. It’s best to treat them as separate celebrations.
What are the most important symbols to include in a kid-friendly craft?
Start with marigolds (cempasúchil) and papel picado, the two easiest and most iconic symbols. After that, family photos on a small ofrenda carry real meaning, since the holiday is about remembering specific people. Calaveras (skulls) are also traditional but optional for preschoolers. If you include them, keep them cheerful and explain that they’re friendly symbols of memory and life.
When should we do these crafts?
Anytime in the weeks before November 1 and 2 works well. Many families build their ofrenda in late October and keep it up through November 2. A week of short sessions fits preschool attention spans, and afterward you can pack the photos away or keep a memory shelf.
My child asks hard questions about death. What do I say?
Keep answers short, honest, and in line with your family’s beliefs. Using the word “died” instead of “went to sleep” helps avoid confusion. It’s okay to say “I don’t know” or “That’s a big question, let’s think about it together.” If your child seems overwhelmed, take a break, cuddle, and ask a pediatrician or child counselor for help.
What if we don’t have a photo of the person we want to remember?
No photo is needed. A drawing, a handwritten name, or a symbol of something they loved (a favorite food, hobby, or color) works just as well. Many families also honor pets, and for little kids that often feels the most natural place to start. The goal is the act of remembering, not a perfect display.
Start Small: One Craft, One Story
Here’s what I came away with after our first attempt. My four-year-old doesn’t remember the precise colors of papel picado or what cempasúchil means. But they remember the shoebox with Grandpa’s photo, the marigolds we made, and the question “What did he like to eat?”
That’s enough for a first year. You don’t need perfect crafts or a flawless explanation. You need a table, some tissue paper, a photo, and a few minutes to say, “Let’s remember someone we love.” Start small, stay curious, and let the marigolds do the rest.