Rock Painting Ideas for Kids
Discover how to make rock painting a fun, creative activity for your kids with this guide. You'll learn essential supplies, setup tips, and easy project ideas for various ages.
- Choose smooth, flat river rocks and wash them thoroughly before painting.
- Use acrylic craft paint for vibrant results; paint pens are great for details.
- Seal your painted rocks with clear acrylic spray or Mod Podge, especially for outdoor display.
- Elevate rocks on egg cartons or bottle caps to prevent paint from sticking to your surface.
- Try simple projects like Rainbow Dot Rocks or Monster Rocks for younger children.
A Handful of River Rocks Changed My Classroom Forever
It started with a bucket of smooth stones I hauled in from a weekend trip to the creek. I dumped them on the art table on a Monday morning, set out some acrylic paint, and stepped back. Within five minutes, every single child in my preschool class was hunched over a rock, painting with a level of focus I had never seen during regular paper art projects. Something about holding a three-dimensional, natural object in their hands unlocked a creative energy that flat paper never did. That was eight years ago, and rock painting has been my go-to art activity ever since.
Rock painting is inexpensive, endlessly adaptable, and produces keepsakes that children treasure for months. Whether your kids are toddlers doing simple dot art or older children painting detailed ladybugs, there is a rock painting project for every age and skill level. Let me walk you through my favorite ideas, the supplies that actually work, and the tips that will make your rock painting sessions smooth and successful.
Essential Supplies for Rock Painting Success
Before you dive into specific projects, getting the right supplies makes a tremendous difference in how the finished rocks look and how smoothly the painting process goes.
The Best Rocks to Use
Look for rocks that are smooth, flat on at least one side, and roughly palm-sized. River rocks from landscape supply stores work perfectly and are inexpensive when bought in bulk. Avoid porous or rough rocks because paint does not adhere well and the surface frustrates children trying to create details.
If you cannot find good rocks locally, craft stores carry bags of smooth river stones specifically for painting. Wash all rocks with soap and water and let them dry completely before painting. A clean, dry surface is essential for paint adhesion.
Paint and Sealant Choices
- Acrylic craft paint: The best all-around choice. It is vibrant, dries quickly, and sticks to rock surfaces beautifully. Brands like Apple Barrel or DecoArt are affordable and come in every color imaginable.
- Paint pens or acrylic markers: Perfect for adding details, outlines, eyes, and text. Posca pens are the gold standard but Artistro and similar brands work well for kids.
- Washable tempera paint: Use this for toddlers and young preschoolers who will get paint everywhere. It washes out of clothes easily but will fade or wash off rocks if left outdoors without sealant.
- Clear acrylic spray sealant or Mod Podge: Apply a coat after the paint dries to protect the design. This is essential if rocks will be displayed outdoors. Always have an adult handle spray sealant in a ventilated area.
Brushes and Tools
Stock a variety of brush sizes from flat wide brushes for base coats to thin detail brushes for eyes and small features. Cotton swabs are fantastic for making perfect dots. Old pencils with unused erasers create uniform polka dots when dipped in paint. Toothpicks work for tiny details like pupils and whiskers.
Setup tip: Paint rocks on top of egg cartons turned upside down or on bottle caps. This elevates the rock so paint does not pool underneath and stick to your work surface.
Rock Painting Ideas for Younger Kids (Ages 3-5)
Young children need projects with simple shapes, big brushstrokes, and forgiving designs where imperfect results still look charming.
Rainbow Dot Rocks
Paint the entire rock white as a base coat and let it dry. Then use cotton swabs dipped in rainbow colors to cover the rock in colorful dots. No pattern needed, just dots everywhere. The result looks like a gorgeous piece of dotted art regardless of placement. This is my top recommendation for first-time rock painters.
Monster Rocks
Paint the whole rock in a bright solid color: green, purple, blue, or orange. Once dry, glue on googly eyes, one, two, three, or even five eyes, the sillier the better. Use a paint pen or thin brush to add a zig-zag mouth, and suddenly you have an adorable monster. Children go wild for these and love creating entire monster families.
Handprint and Fingerprint Art Rocks
Press a child’s thumb or finger into paint and then onto the rock to create fingerprint flowers, caterpillars, bees, or ladybugs. A thumbprint with two tiny dot eyes becomes a little creature. A row of fingerprints with a painted stem becomes a flower. These are precious keepsakes because they capture your child’s tiny fingerprints.
Simple Stripes and Swirls
Show children how to paint stripes across a rock using different colors, or swirl two colors together with a brush while the paint is still wet. The marbled effect looks sophisticated even when done by a three-year-old. Use bold contrasting colors like blue and yellow or red and white for the most striking results.
Rock Painting Ideas for Older Kids (Ages 6-10)
Older children are ready for more detailed designs and multi-step techniques that produce impressive results.
Galaxy Rocks
Paint the base coat black and let it dry completely. Then sponge on dark blue and purple using a small piece of torn sponge, blending the edges. Splatter white paint using an old toothbrush for a starfield effect, by running your thumb across the bristles. Finish with a few larger white dots for bright stars. These rocks are stunning and children cannot believe they made something so beautiful.
Animal Rocks
The natural shape of rocks suggests different animals. A round rock becomes a ladybug: paint half red and half black, add spots, a center line, and two googly eyes. An oval rock becomes a fish: paint scales using overlapping semicircle strokes. A triangular rock becomes an owl: paint a solid base, add two big white circles for eyes with black pupils, and a small orange triangle beak. Provide children with a simple step-by-step visual guide for each animal.
Mandala Rocks
Start with a solid dark base coat, black or navy works best. Use the blunt end of paint brushes, dotting tools, or cotton swabs to create symmetrical dot patterns radiating outward from the center. Start with a large center dot, surround it with a ring of smaller dots, then another ring of a different color, and so on. The layered dot pattern creates mesmerizing mandala designs. This is deeply meditative and an excellent activity for children who need calming focus time.
Story Stones
Paint a set of 10 to 15 rocks with individual images: a house, a tree, a sun, a person, a dog, a car, a star, a rainbow, a flower, and a heart. Place them all in a drawstring bag. Children pull out three to five stones at random and create a story using those images as prompts. This combines art, literacy, and imaginative storytelling in one brilliant activity.
Seasonal and Holiday Rock Painting Projects
Rock painting adapts beautifully to every season and holiday, giving you fresh project ideas year-round.
- Spring: Paint rocks as flowers, butterflies, bumblebees, and rainbows. Create a painted rock garden by pressing finished rocks into a potted plant or flower bed.
- Summer: Paint watermelon slices, ice cream cones, fish, and sunshine rocks. Start a neighborhood rock hunt by hiding painted rocks in parks and public spaces for others to find.
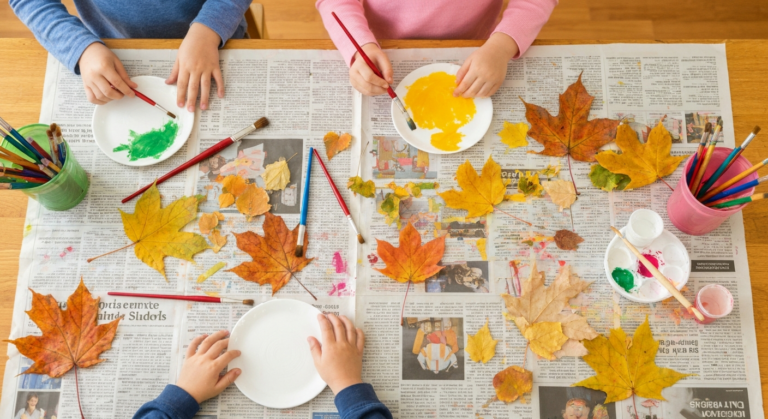
- Fall: Paint pumpkins, acorns, fall leaves, and owls. Use real leaves as stencils by holding them on the rock and sponging paint around the edges for a leaf silhouette.
- Winter: Paint snowmen, penguins, snowflakes, and gingerbread figures. Painted rocks make wonderful handmade holiday gifts. Place them in a small gift bag with tissue paper for grandparents, teachers, and friends.
For holidays specifically, rock painting creates meaningful keepsakes. Valentine’s Day heart rocks with messages, Easter egg-shaped painted rocks for basket fillers, and Halloween spooky character rocks for porch decorations are all projects children love returning to year after year.
Tips for a Mess-Free and Enjoyable Painting Session
Rock painting involves real paint on three-dimensional objects, so a little preparation goes a long way toward keeping the fun high and the stress low.
- Cover everything: Lay down a plastic tablecloth, old newspaper, or a cut-open garbage bag. Rock painting involves more paint dripping than paper painting because of the curved surfaces.
- Use a palette: Squeeze paint onto a paper plate or foam tray rather than letting children dip directly into bottles. This prevents contaminated paint colors and wasted product.
- Wear smocks: Acrylic paint does not wash out of clothing easily. Old oversized t-shirts worn backwards work as free smocks.
- Dry in stages: Let each layer dry before adding the next. Set rocks on a cardboard drying station labeled with each child’s name. A hair dryer on low heat can speed up drying between layers.
- Keep water cups stable: Use wide, heavy containers for brush-rinsing water instead of lightweight cups that tip easily. Mason jars or ceramic mugs work well.
- End with sealant: Once everything is completely dry, usually the next day, spray or brush on a clear sealant to protect the artwork. This step transforms a painted rock from fragile to durable.
Rock painting teaches children that art can happen on any surface, not just paper. It connects them to natural materials, builds patience through the multi-layer painting process, and produces tangible objects they are proud to display, gift, or hide for others to discover. Grab a bag of smooth stones this weekend and see what your little artists create.
Crafty Mama
Crafty Mama is a former elementary art teacher turned stay-at-home parent who believes every child is creative — they just need the right invitation. She develops age-appropriate activities, crafts, and projects that spark imagination while keeping mess (and parent stress) to a minimum.