Watercolor Painting for Kids: Easy Techniques and Projects for Every Age
Discover why watercolor is an ideal first art medium for your kids, offering a forgiving, beautiful, and screen-free creative outlet. This guide will teach you what supplies to buy, age-appropriate techniques, and specific projects.
- Understand why watercolor is a forgiving, screen-free art medium for kids.
- Get a budget-friendly guide to essential watercolor supplies for your child.
- Learn age-specific techniques and projects for toddlers to 8-year-olds.
- Discover how watercolor builds fine motor skills and encourages patience.
- See why watercolor is a less messy and more rewarding option than tempera.
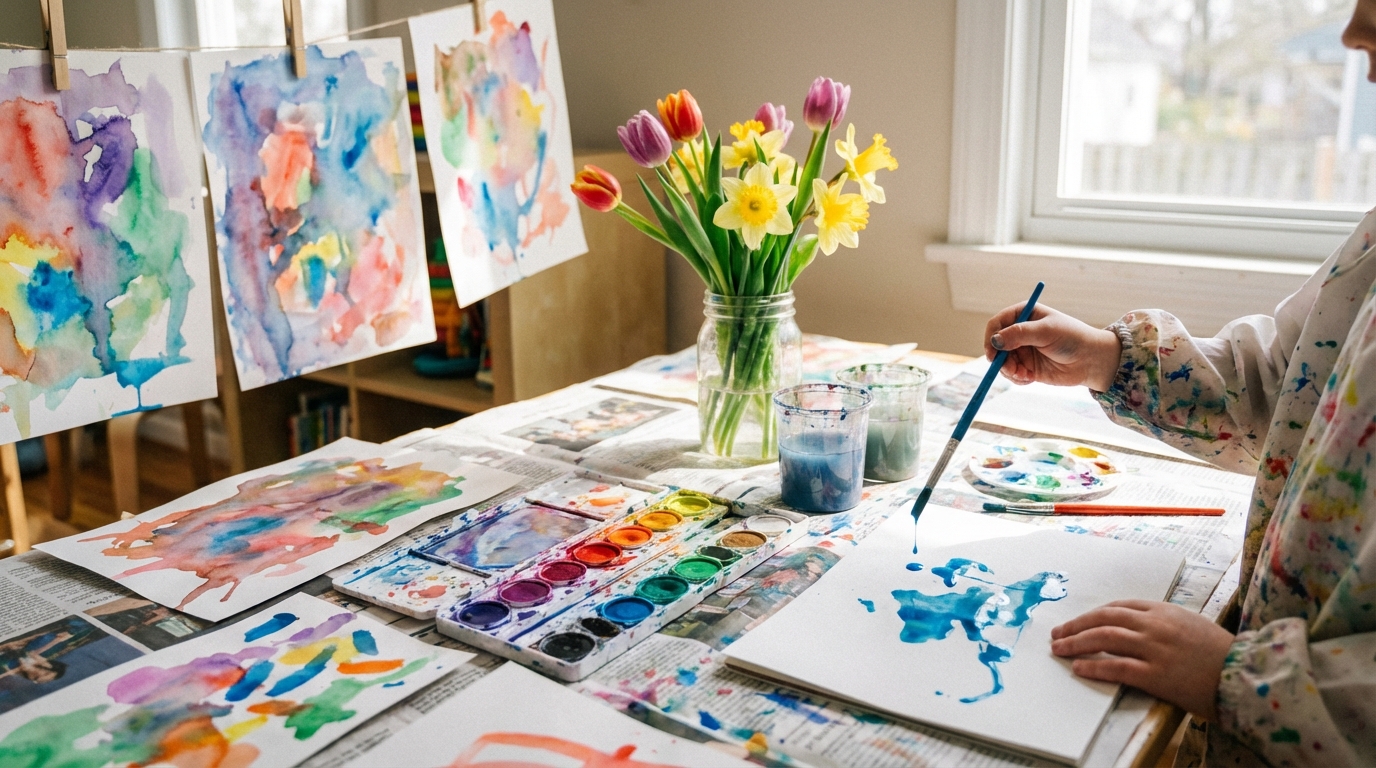
There’s a moment — maybe you’ve had it — where your child dips a brush into water for the first time, touches it to a dry cake of paint, and watches color bloom across the paper. Their whole face changes. It’s not excitement exactly. It’s more like recognition. Like they’ve discovered something that was always supposed to be theirs.
Watercolor does that. There’s something about the way the pigment moves on its own — bleeding, blending, pooling in ways nobody fully controls — that meets children exactly where they are. They don’t need to draw a perfect circle or stay inside a line. They just need to put wet paint on paper and watch what happens. For a toddler, that’s the whole point. For a seven-year-old, it’s a launchpad into real artistic technique. For the parent standing nearby, it’s twenty to forty minutes of genuine creative engagement that didn’t come from a screen.
I started doing watercolors with my kids because I was tired of the tempera paint cycle — the setup, the coverage of every visible surface in primary colors, the bath that follows. Watercolors are still messy (I’m not going to lie to you), but they’re a different kind of messy. The mess is more contained, the cleanup is faster, and the results are genuinely beautiful in a way that makes you want to hang them on the fridge instead of quietly recycling them after bedtime. This guide covers everything I’ve learned: what to buy, what techniques actually work at each age, and specific projects that range from “my toddler did this during lunch prep” to “my eight-year-old spent an entire rainy afternoon on this and was genuinely proud.”
Let’s get into it.
Why Watercolor Is the Best First Medium for Kids
Before we get to supplies and projects, let me make the case for watercolor specifically — because there are a lot of art supplies competing for your money and storage space.
It’s forgiving. Unlike acrylics or markers, watercolor lets kids layer, blend, and even lift color back off the paper. There’s no “I messed up and now it’s ruined.” There’s just “now it looks different.”
It teaches patience and observation. Watercolor behaves differently depending on how much water you use, how wet the paper is, and how long you wait between layers. Kids learn to slow down and watch what’s happening — which is a rare and valuable thing in 2026.
It’s genuinely beautiful. Even a toddler’s random washes of color look lovely in watercolor. The medium does half the work. This matters because children are more likely to keep creating when they like what they produce.
It builds fine motor skills. Brush control, water management, and the delicate touch required for watercolor techniques all strengthen the same hand muscles kids need for writing. If you’ve been working on fine motor activities with your toddler, watercolor painting is a natural next step.
It’s affordable and lasts forever. A single set of watercolor cakes can last months — even years — because you’re reactivating dried pigment with water each time. Compare that to tempera, which dries out in open containers, or markers that die after being left uncapped for eleven seconds.
It connects to the analog childhood movement. In a moment where families are actively pulling back from screens and algorithmic entertainment, watercolor painting is about as pure an analog experience as it gets. Just pigment, water, paper, and whatever your child’s imagination produces.
The Complete Watercolor Supplies Guide (Budget-Friendly)
You don’t need to spend a lot. You really don’t. Here’s what actually matters, what’s nice to have, and what’s a waste of money when your artists are under ten.
Essential Supplies
| Item | What to Get | Price Range | Why It Matters |
|---|---|---|---|
| Watercolor paint set | Crayola or Prang 16-color oval pan set | $3–$8 | Bright colors, easy to activate, replaceable |
| Brushes | Variety pack with round brushes, sizes 4–12 | $5–$10 | Different sizes = different techniques |
| Paper | Mixed media or watercolor paper pad (90lb+) | $5–$12 | Heavier paper won’t buckle and warp |
| Water cups | Two sturdy, wide-mouth plastic cups | Free (from your kitchen) | One for rinsing, one for clean water |
| Palette | White plate or plastic palette | Free–$3 | For mixing colors |
| Table covering | Plastic tablecloth or garbage bags | $1–$3 | Protects your table (non-negotiable) |
Total starter cost: $14–$36. That’s it. That’s less than one trip to a trampoline park.
Nice-to-Have Upgrades
- Liquid watercolors (like Colorations brand): More vibrant than pan sets, amazing for process art. Worth it if your child paints frequently.
- Watercolor pencils: Draw like colored pencils, then add water to blend. Great for school-age kids who want more control.
- Spray bottles: For wet-on-wet techniques and splatter effects.
- Salt, rubbing alcohol, plastic wrap: Household items that create incredible texture effects (more on these below).
- Painter’s tape or washi tape: For masking/resist techniques.
- Round watercolor paper: A fun shape change that makes kids feel like “real artists.”
What NOT to Buy
- Expensive artist-grade paints. Your four-year-old will mix them all into brown within three minutes. Student grade is perfect.
- Tiny detail brushes. Young kids need big brushes for big movements. Don’t hand a toddler a size 0 liner brush.
- Cheap copier paper. This is the one place I’ll tell you not to skimp. Regular printer paper buckles immediately under water and tears easily. Even the cheapest watercolor paper pad transforms the experience.
- Watercolor “kits” with stamps and stencils. They look cute in the store. In practice, kids use the stamps once and then just paint, and you’ve paid $20 for a $5 paint set with packaging.
Watercolor Techniques by Age: What Actually Works
Not every technique works at every age. Here’s what I’ve found actually succeeds, broken down honestly.
Toddlers (Ages 18 Months – 3 Years)
At this age, watercolor painting is 100% about the process, not the product. Your toddler is exploring cause and effect: “I put the brush in the water. The water turns colors. I touch it to the paper. Color appears.” That’s the entire curriculum, and it’s plenty.
Techniques that work:
- Big washes of color. Give them a fat brush and let them cover the whole page. That’s the activity.
- Water-first method. Wet the entire paper with a sponge, then let them touch paint to it and watch it spread. The “wow” factor is high.
- Finger watercoloring. Dip fingers directly into wet paint cakes. It’s messier but more developmentally appropriate for kids still building brush grip.
- Dot painting. Dip the handle end of a brush (or a cotton swab) into liquid watercolor and make dots. Simple, satisfying, builds hand-eye coordination.
What to expect: Short attention spans (5–15 minutes), paint in their mouth (use non-toxic only), one color used exclusively, brown paintings from mixing everything, and occasional attempts to drink the rinse water. All normal.
Setup tip: If the mess factor feels like too much, check out these mess-free painting ideas for toddlers — ziplock bag painting and similar techniques can ease you both into watercolor work.
> Crafty Mama Tip: Put the paint cups on a cookie sheet or in a shallow baking pan. When (not if) they get knocked over, the water stays on the tray instead of flooding the table.
Preschoolers (Ages 3 – 5)
This is where it gets fun. Preschoolers have enough brush control to try real techniques, and they’re old enough to follow simple multi-step instructions. They’re also endlessly curious about “what happens if I…” — which is exactly the right mindset for watercolor.
Techniques that work:
- Wet-on-dry. Paint on dry paper for more controlled lines and shapes. They can “draw” with their brush — flowers, houses, suns, people.
- Wet-on-wet. Wet the paper first, then add color. The bleeding and blending produces gorgeous effects and teaches kids about how water behaves.
- Color mixing. Give them only red, yellow, and blue and challenge them to make as many colors as possible. This never gets old.
- Salt texture. Paint a wet wash, then sprinkle coarse salt on top. As it dries, the salt absorbs pigment and creates a crystalline starburst pattern. Kids think it’s actual magic.
- Resist techniques. Draw with a white crayon on white paper (invisible drawing!), then paint over it with watercolor. The crayon resists the paint and the drawing appears.
What to expect: Longer engagement (15–30 minutes), strong opinions about colors, requests to “do another one,” and occasionally, real recognizable images emerging from the paint.
School-Age Kids (Ages 6 – 10)
School-age kids can learn genuine watercolor techniques and produce work they’re genuinely proud of. This is the age where art goes from “fun activity” to potential lifelong hobby. Treat them like real artists — teach them real vocabulary, show them real techniques, and let them make real choices.
Techniques that work:
- Gradient washes. Load the brush with one color, paint a stripe, add water, paint another stripe slightly overlapping. Repeat until the color fades to white. This is a foundational skill that looks impressive.
- Layering/glazing. Paint a wash, let it dry completely, then paint another color on top. The first color shows through, creating depth. This teaches patience — you genuinely have to wait.
- Lifting. Use a clean, damp brush to lift color off the paper while it’s still wet. Great for creating clouds, highlights, or fixing mistakes.
- Dry brush. Load a brush with pigment but very little water, then drag it across textured paper. Creates a scratchy, organic texture perfect for grass, fur, or tree bark.
- Splatter. Load a toothbrush with diluted paint, hold it over the paper, and run your thumb across the bristles. Instant galaxy or snow effect.
- Plastic wrap texture. Paint a wet wash, lay crumpled plastic wrap on top, and let it dry completely. When you peel the wrap away, there’s a complex, organic texture underneath. This never fails to impress.
- Masking. Apply painter’s tape in shapes or patterns before painting. Remove after drying to reveal crisp white shapes against the painted background.
What to expect: Extended focus (30–60+ minutes), desire for “real” techniques, frustration when results don’t match their vision (good opportunity to talk about process), and paintings you genuinely want to display.
15 Watercolor Projects for Kids: Step-by-Step
Here are specific projects organized by complexity. Each one has been tested with actual children in actual kitchens with actual time constraints.
Beginner Projects (Ages 2+)
1. Rainbow Wash Bookmarks
Time: 10–15 minutes (plus drying)
Materials: Watercolor paper cut into bookmark strips (about 2″ x 7″), watercolor paints, brush, water
Steps:
- Wet the entire bookmark strip with clean water using a wide brush
- Starting at the top, paint a stripe of red
- Below it, paint orange (or let the red blend into yellow)
- Continue down the rainbow — yellow, green, blue, purple
- Let the colors bleed into each other naturally
- Once dry, you can punch a hole at the top and add a ribbon or yarn tassel
Why kids love it: Instant gratification. The wet-on-wet bleeding looks beautiful no matter what. And they made something useful — every kid wants to use a bookmark they painted themselves.
2. Watercolor Coffee Filter Butterflies
Time: 15–20 minutes (plus drying)
Materials: Basket-style coffee filters, liquid watercolors or diluted food coloring, spray bottle or eyedropper, clothespin, pipe cleaners
Steps:
- Flatten a coffee filter and place it on a protected surface
- Drop or spray liquid watercolors onto the filter — the color spreads and blends beautifully on the absorbent paper
- Use multiple colors and watch them merge
- Let dry completely (this is the hard part for toddlers — do a few at once)
- Pinch the center of the dried filter and clip with a clothespin (the body)
- Add pipe cleaner antennae by wrapping around the clothespin top
Why kids love it: The color spreading is mesmerizing, and the final butterfly looks impressive. If your kids enjoyed this, they’ll love the other coffee filter crafts we’ve done.
3. Crayon Resist Night Sky
Time: 15–20 minutes
Materials: White watercolor paper, white crayon, watercolor paints (dark blue, purple, black), big brush, optional star stickers
Steps:
- Using a white crayon on white paper, draw stars, a moon, constellations — anything you want to “hide”
- Press hard with the crayon (this is important — light marks won’t resist well)
- Paint over the entire paper with dark blue and purple watercolor washes
- Watch the white crayon drawings magically appear as the paint rolls off the wax
- Optional: while the paint is still wet, sprinkle a tiny bit of salt for a starry texture effect
Why kids love it: The reveal is thrilling every single time. It feels like a magic trick. Toddlers love it because they get to paint over the whole page (their favorite thing). Older kids love it because they can plan elaborate hidden drawings.
4. Blow Painting Trees
Time: 15 minutes
Materials: Watercolor paper, brown and green liquid watercolors or concentrated watercolor, straw or eyedropper, thin brush
Steps:
- Drop a blob of brown paint near the bottom center of the paper
- Using a straw, blow the paint upward and outward to create tree trunk and branch shapes
- Keep blowing to extend branches in different directions
- Once the “tree” shape looks good, use a brush or fingertips to dab green paint as leaves along the branch ends
- For spring trees: add tiny dots of pink and white for blossoms
Why kids love it: Blowing through a straw is inherently hilarious to children. And the tree shapes look surprisingly realistic and artistic. This is one of many great painting-without-brushes techniques that keeps things fresh.
Intermediate Projects (Ages 4+)
5. Salt and Watercolor Galaxy
Time: 20–30 minutes (plus drying)
Materials: Watercolor paper, watercolor paints (dark blue, purple, black), coarse salt (kosher or sea salt), white paint or white gel pen, big brush, spray bottle
Steps:
- Wet the entire paper with a spray bottle or wide brush
- Apply dark blue paint in sweeping strokes, leaving some areas lighter
- Add deep purple and black patches — don’t try to make it even; galaxies aren’t even
- While the paint is still very wet, sprinkle coarse salt generously across the surface
- Watch the salt start to absorb the pigment (it takes 10–20 minutes to fully work)
- Let dry COMPLETELY — do not touch or move it
- Once dry, brush all the salt off gently with your hand
- Use white paint and a toothbrush to splatter stars: dip the brush in white, hold over paper, flick bristles with your thumb
- Optional: add larger stars or a crescent moon with a white gel pen
Why kids love it: The salt effect looks genuinely cosmic. Every single one turns out different, and they all look spectacular. This is a project where kids say “wait, I made that?”
6. Tape Resist Abstract Art
Time: 20 minutes (plus drying)
Materials: Watercolor paper, painter’s tape or washi tape, watercolor paints, brush, water
Steps:
- Apply tape strips across the paper in any pattern — straight lines, geometric shapes, random angles, letters of their name
- Press the tape edges down firmly (this prevents paint from seeping under)
- Paint the entire surface with watercolor — different colors in different sections, blending where colors meet
- Let dry completely (patience! pulling tape off wet paper tears it)
- Carefully peel the tape away to reveal crisp white lines and shapes
- The contrast between the painted areas and the white tape lines is stunning
Why kids love it: The peel-off reveal is deeply satisfying (like peeling a sticker — they’d do it all day if they could). And the final result looks like real modern art.
7. Wet-on-Wet Sunset Landscape
Time: 20–25 minutes
Materials: Watercolor paper, watercolor paints (yellow, orange, red, purple, black), wide brush, thin brush
Steps:
- Wet the top two-thirds of the paper with clean water
- Starting at the top, paint a band of purple/dark blue
- Below it, paint red, letting it bleed into the purple
- Below that, orange, bleeding into red
- At the horizon line, paint yellow — the lightest color at the bottom of the sky
- Let this dry at least halfway
- Using black paint and a thin brush, paint a simple silhouette along the bottom — a tree line, a city skyline, rolling hills, or even just grass
- Optional: add a setting sun (circle of yellow/orange near the horizon) before the sky dries
Why kids love it: Sunsets are universally beautiful, and the wet-on-wet technique makes even a first attempt look gorgeous. The silhouette at the end gives them a “real painting” feeling.
8. Watercolor Resist Nature Journal Page
Time: 25–30 minutes
Materials: Watercolor paper, crayons, watercolor paints, brush, water, collected nature items for reference (optional)
Steps:
- Go outside for 10 minutes and collect a few natural items — a leaf, flower, rock, feather, or interesting stick. Or just sit outside and observe. This is a great add-on to any outdoor nature activity.
- Back inside, use crayons to draw the collected items on watercolor paper — pressing firmly for good wax resist
- Add labels, the date, observations (“this leaf was curly at the edges”), or decorative borders
- Paint watercolor washes over the whole page — greens and earth tones work beautifully
- The crayon drawings resist the paint and pop off the page
- Let dry and add to a growing nature journal
Why kids love it: It combines outdoor exploration with art, and creating a “real journal” makes them feel like scientists and artists. Preschoolers draw what they see; older kids add detail, labels, and observations.
9. Plastic Wrap Texture Ocean
Time: 20 minutes active, 1+ hour drying
Materials: Watercolor paper, watercolor paints (blues, greens, teals), plastic wrap, wide brush, thin brush
Steps:
- Paint the entire paper with overlapping washes of blue, teal, and green — vary the intensity and let colors mingle
- While the paint is still wet, tear a piece of plastic wrap slightly larger than the paper
- Crumple the wrap loosely, then lay it across the wet painted surface
- Push and scrunch the wrap into the paint — the wrinkles create texture
- Leave the plastic wrap in place and let it dry COMPLETELY (at least 1–2 hours or overnight)
- Peel the wrap away to reveal gorgeous water/wave textures
- Use a thin brush to add fish, seaweed, a whale, jellyfish — whatever ocean creatures your child wants
Why kids love it: The reveal when the plastic wrap comes off is genuinely jaw-dropping. The texture looks like actual ocean water, and they get to add their own sea creatures on top.
10. Watercolor Greeting Cards
Time: 15–25 minutes per card
Materials: Watercolor paper cut to card size (fold a 5″x7″ sheet in half), watercolor paints, brushes, thin markers (for writing after the paint dries)
Steps:
- Fold the watercolor paper in half to create a card
- On the front, create any watercolor design — abstract washes, a painted flower, a heart, a rainbow, an animal
- Younger kids: just do a beautiful free-form color wash — it still looks amazing
- Older kids: try a specific image with techniques they’ve learned (wet-on-wet background with a dry-brush detail on top)
- Let dry completely
- Use markers to add a message — “Happy Birthday,” “Thank You,” “I Love You,” “Sorry I bit you” (real card my kid made)
- Write a message inside
Why kids love it: They made something for someone else. The pride of handing over a handmade card is enormous, especially when the recipient’s reaction is genuine because watercolors actually look beautiful.
Advanced Projects (Ages 6+)
11. Layered Landscape with Foreground, Middle, and Background
Time: 30–45 minutes
Materials: Watercolor paper, watercolor paints, multiple brush sizes, pencil
Steps:
- Lightly sketch three zones on the paper with pencil: background (sky and distant mountains/hills), middle ground (fields, trees, buildings), foreground (detailed items close up)
- Paint the background first — sky washes, distant blue-purple mountains (lighter, less detailed)
- Let dry partially
- Paint the middle ground — greener, slightly more detailed, medium values
- Let dry
- Paint the foreground — the most detail, darkest colors, sharpest edges
- This teaches atmospheric perspective: things far away are lighter, bluer, and less detailed
Why kids love it: They learn a real art concept (atmospheric perspective) and end up with a painting that has genuine depth. It looks like something from an art class, not a kitchen table.
12. Watercolor Galaxy with Silhouette
Time: 30–40 minutes (plus drying)
Materials: Watercolor paper, watercolor paints (blues, purples, black), white gouache or white acrylic, black construction paper or black paint, scissors, glue, toothbrush
Steps:
- Create a galaxy background (similar to the salt galaxy project above, but without salt this time)
- Layer dark blues, purples, and touches of teal in wet-on-wet washes
- While wet, drop in concentrated dark areas and let the colors merge
- Let dry completely
- Splatter white paint with a toothbrush for stars
- Separately, cut a silhouette from black paper — a person looking through a telescope, a wolf howling on a hill, a child on a swing, a jar with fireflies
- Glue the black silhouette onto the galaxy background
- Optional: add small white dots or a painted moon to the sky area
Why kids love it: The combination of the swirly galaxy background and the crisp black silhouette creates an incredibly dramatic finished piece. This is “frame it for the bedroom” quality.
13. Monochrome Value Study
Time: 25–30 minutes
Materials: Watercolor paper, ONE color of watercolor paint (blue works great), brush, water, pencil
Steps:
- Draw 5–7 squares or rectangles in a row on the paper
- In the first square, paint the full-strength color — as dark as the pigment will go
- In the next square, add a little more water to lighten the color
- Continue across, adding progressively more water to each square until the last one is barely tinted
- Below the value scale, try painting a simple object (an apple, a mug, a ball) using only that one color at different values — dark for shadows, medium for the body, light for highlights
Why kids love it: This feels like “real art school” to older kids. It demystifies how artists create the illusion of light and form, and it introduces the concept that you can make any single color do a tremendous amount of work.
14. Watercolor and Ink Nature Illustration
Time: 30–45 minutes
Materials: Watercolor paper, watercolor paints, thin black marker or fine-tip pen (like a Micron), pencil
Steps:
- Lightly pencil sketch a natural subject — a flower, bird, insect, tree, mushroom
- Go over the pencil lines with a thin black ink pen (waterproof ink is ideal so it doesn’t bleed later)
- Let the ink dry for a few minutes
- Add watercolor washes to fill in the illustration — staying loose, letting colors bleed slightly outside the lines
- The combination of crisp ink lines and soft watercolor fills creates a professional illustration style
Why kids love it: The ink lines give structure and confidence (they can see what they drew), and the watercolor adds life and color without the pressure of precision. This style is popular in bullet journals, nature guides, and illustrated books — kids recognize it as “real.”
15. Collaborative Family Mural
Time: 45–60 minutes
Materials: Large watercolor paper (tape several sheets together or use a roll), watercolor paints, brushes for everyone, water cups
Steps:
- Tape a large paper to the table (or the floor, or a wall you’ve covered with a plastic drop cloth)
- Choose a theme together — “underwater world,” “our neighborhood,” “magical forest,” “outer space”
- Divide the paper loosely into zones, or don’t — just start painting
- Each family member works on their section, and where sections meet, colors blend together
- Younger kids do washes and big shapes; older kids add details; adults can contribute too or just manage water cups
- No one “owns” any part of it — this is collective art
- When finished, let dry and display prominently
Why kids love it: Making art together as a family is special. The mural captures a specific moment in time — how old everyone was, what they were interested in, what colors they chose. It’s the kind of thing you photograph and save.
Setting Up and Managing the Mess (Honestly)
Watercolor is less catastrophic than tempera or finger paint, but “less catastrophic” still means you need a plan. Here’s what works.
Before You Start
| Task | Why | Time |
|---|---|---|
| Cover the table with a plastic tablecloth or cut-open garbage bag | Paint + water WILL get on the table | 1 minute |
| Put a towel on the floor under the chair | Drips happen, especially with younger kids | 30 seconds |
| Fill two water cups (one for rinsing, one for clean water) | Dirty water = muddy colors. Two cups solves this. | 30 seconds |
| Have a rag or paper towels within arm’s reach | For blotting brushes, wiping spills, dabbing away excess water | 30 seconds |
| Dress kids in old clothes or a smock (an old adult t-shirt works great) | Watercolor does stain some fabrics, especially liquid watercolors | 1 minute |
| Pre-cut paper to size | Avoids the “can you cut this for me” interruption mid-painting | 2 minutes |
Total setup time: about 5 minutes. Honestly, the setup is the part parents dread most, and it’s five minutes. Just do it. Future you will be grateful.
During Painting
- Refresh the rinse water if it turns opaque. Muddy rinse water = muddy paintings = frustrated kids.
- Keep the paint set on a separate plate or tray — not directly on the tablecloth, where it’ll slide around.
- Have extra paper ready. Kids who are enjoying themselves will want to do multiple paintings. Don’t break the flow by having to hunt for more paper.
- Resist the urge to direct. This is a big one. If your child is painting the sky green and the grass purple, that’s their painting. The surest way to kill a kid’s enthusiasm for art is to correct their creative choices. If you’re looking for more on this philosophy, our guide to process art for toddlers goes deep on why the process matters more than the product.
After Painting
- Lay paintings flat to dry on a drying rack, newspaper, or the counter. Don’t stack them — they’ll stick together.
- Rinse brushes in clean water and reshape the tips. Store upright (bristle-end up) in a cup to dry. This is the single biggest thing you can do to extend brush life.
- Let the paint set dry open for a few minutes so the cakes aren’t sopping when you close the lid.
- Wipe the table covering — don’t throw it away. A reusable plastic tablecloth lasts months.
- Have kids wash hands with soap and warm water. Liquid watercolors especially can temporarily stain fingers — this is normal and fades within a day.
> Crafty Mama Tip: If you set up a dedicated “art station” — even if it’s just one end of the kitchen table with the plastic cloth pre-spread — the activation energy drops to near zero. You stop thinking “ugh, I need to set up for painting” and start thinking “hey, want to paint?” That mindset shift is everything.
If you’re navigating the toddler years and the mess factor still feels overwhelming, start with some mess-free art activities and gradually introduce watercolors as your comfort level (and your child’s focus) increases.
How Watercolor Painting Builds Developmental Skills
This section is for the part of your brain that wants to justify craft time as “educational.” (It is, but honestly? Even if it weren’t, the sheer joy on their faces would be enough.)
Fine Motor Development
Holding a brush, controlling pressure, dipping into water cups, opening and closing paint sets — every part of watercolor painting strengthens the small muscles in hands and fingers. The precise movements required for brush control directly support pencil grip and handwriting readiness.
Color Theory and Visual Literacy
Kids learn through direct experience that red + yellow = orange, that adding water lightens a color, that certain colors placed next to each other vibrate while others recede. This isn’t abstract knowledge — it’s embodied understanding built through hundreds of small experiments.
Patience and Delayed Gratification
Watercolor is one of the few art media that requires waiting. You have to wait for layers to dry. You have to wait to peel off tape or plastic wrap. You have to wait to sprinkle salt until the paint is the right wetness. In a world that delivers everything instantly, learning to wait — and having the wait be worth it — is a valuable experience.
Emotional Expression and Regulation
Art gives children a nonverbal channel for expressing emotions they can’t yet name. A child who’s angry might paint in furious red strokes. A child who’s calm might produce gentle blue washes. The act of creating is inherently regulating — it engages the parasympathetic nervous system, slows breathing, and provides a sense of agency and control.
Scientific Thinking
Watercolor is full of science: how water carries pigment, why colors blend the way they do, what happens when salt meets wet paint, how capillary action pulls color through a coffee filter. Kids who paint are conducting experiments, forming hypotheses (“what if I add more water?”), and observing results — whether they know it or not.
Executive Function
Planning a painting, gathering materials, following multi-step instructions, managing multiple tools simultaneously, deciding when a layer is dry enough for the next step — all of this exercises executive function skills that generalize to academic settings.
| Skill | How Watercolor Builds It |
|---|---|
| Fine motor control | Brush grip, pressure modulation, precise movements |
| Color recognition | Mixing, naming, and comparing colors through hands-on use |
| Patience | Waiting for layers to dry, following multi-step projects |
| Creativity | Open-ended exploration, problem-solving when things go unexpected |
| Focus & attention | Sustained engagement during painting sessions |
| Self-expression | Choosing colors, subjects, and techniques to convey ideas and feelings |
| Scientific reasoning | Observing cause and effect with water, pigment, salt, resist materials |
| Vocabulary | Learning art terms: wash, blend, gradient, resist, pigment, value |
Seasonal Watercolor Ideas to Keep It Fresh All Year
One of the best things about watercolor is that you can tie it to whatever’s happening outside your window. Here’s a year’s worth of seasonal inspiration:
Spring (March – May)
- Cherry blossom branches (brown ink branches + pink watercolor dabs)
- Rain puddle reflections (wet-on-wet with blue-gray washes)
- Flower garden paintings (great for color mixing practice)
- Butterfly life cycle illustration
- Rainbow watercolor washes (perfect after a spring rainstorm)
- Easter egg watercolor resist (draw patterns in white crayon, wash over with color)
Summer (June – August)
- Sunset/sunrise scenes (warm color gradient practice)
- Ocean waves with plastic wrap texture
- Popsicle and ice cream paintings (bright, fun subjects)
- Outdoor watercolor plein air session (bring supplies to the park)
- Fireworks on dark paper (splatter white and colors onto pre-painted navy paper)
Fall (September – November)
- Leaf prints (paint a real leaf, press it on paper)
- Warm-toned gradient trees (practice the wet-on-wet technique in autumn colors)
- Halloween silhouettes (galaxy background + black paper cutouts)
- Pumpkin studies (great for teaching value/shading)
Winter (December – February)
- Snowflake salt paintings (blue washes + salt = crystalline patterns)
- Cold-palette color studies (only blues, purples, whites, silvers)
- Holiday cards (painted watercolor fronts with handwritten messages inside)
- Arctic animal illustrations (polar bears, penguins, snowy owls)
Troubleshooting Common Watercolor Frustrations
Even Crafty Mama has days where things don’t go as planned. Here’s how to handle the most common watercolor issues kids (and parents) face.
“My paper keeps wrinkling and buckling.”
Your paper is too thin. Upgrade to at least 90lb mixed media paper, or ideally 140lb watercolor paper. For thinner paper, you can tape all four edges down to a board with painter’s tape before painting — this holds it flat while it dries.
“All the colors turn brown/gray.”
Two solutions: teach kids to rinse their brush THOROUGHLY between colors (the two-cup system helps — rinse in the dirty cup, dip in the clean cup), and limit the palette. Sometimes giving kids only 3–4 colors prevents the “mix everything together” impulse.
“My child gets frustrated that their painting doesn’t look like [reference/my painting/the example].”
This is the most important frustration to handle well. Normalize that watercolor is unpredictable — even professional artists are surprised by their results. Redirect from “it should look like X” to “what do you notice happening?” and “what do you like about what you made?” Praise the process and specific choices (“I love how you let those two colors blend together”) rather than the accuracy of the result.
“The paint looks washed out and pale.”
Not enough pigment, too much water. Show kids how to scrub the brush gently into the paint cake to load it well, and use less water when they want intense color. Liquid watercolors also solve this — they’re consistently vibrant.
“My toddler just wants to eat the paint/drink the water.”
Use only non-toxic paints (Crayola and Prang are both AP-certified non-toxic). For chronic taste-testers, use very diluted liquid watercolors and keep water cups out of reach — hand them the brush already loaded with paint. And honestly? A tiny taste of non-toxic watercolor never hurt anyone. They usually stop after the first time because it tastes terrible.
Crafty Mama
Crafty Mama is a former elementary art teacher turned stay-at-home parent who believes every child is creative — they just need the right invitation. She develops age-appropriate activities, crafts, and projects that spark imagination while keeping mess (and parent stress) to a minimum.
Frequently Asked Questions
What age can kids start watercolor painting?
Most children can begin exploring watercolors around 18 months, with full adult supervision. At this age, it’s purely sensory exploration — they’re feeling the wet brush, watching color appear on paper, and experiencing cause and effect. Use large paper, fat brushes, and non-toxic pan watercolors. Keep sessions short (5–10 minutes) and expect more mess than masterpiece. By age 3, most kids can handle watercolors with moderate independence, and by 5–6, they can learn real techniques.
Are watercolor paints safe for toddlers?
Yes, as long as you use paints labeled “non-toxic” and bearing the AP (Approved Product) seal from the Art & Creative Materials Institute. Crayola, Prang, and Colorations brands are all safe choices. That said, watercolors aren’t intended for consumption — if your toddler is in a heavy “everything goes in my mouth” phase, consider starting with mess-free painting alternatives and transitioning to open watercolors when the oral exploration phase settles down.
What’s the difference between pan watercolors, tube watercolors, and liquid watercolors?
Pan watercolors (the cakes in a tray) are the most common for kids. You wet the brush and scrub it on the dry cake to pick up pigment. They’re affordable, long-lasting, and low-mess. Tube watercolors are more concentrated — you squeeze pigment onto a palette and mix with water. They’re richer but more expensive and messier; better for older kids and adults. Liquid watercolors come pre-diluted in bottles. They’re incredibly vibrant, great for process art and projects like coffee filter butterflies, but they stain more easily. For most families, start with a pan set and add liquid watercolors later.
How do I keep watercolor paintings from wrinkling?
Three approaches. First, use heavier paper — 140lb watercolor paper barely buckles at all, while 90lb mixed media paper buckles moderately. Second, tape all four edges of the paper to a board or the table with painter’s tape before painting; the tape holds the paper flat as it dries, and when you remove it, you also get a clean white border. Third, if a painting has already dried wrinkled, place it face-down on a clean towel, mist the back with water, cover with another towel, and press under heavy books overnight. It won’t be perfectly flat, but it’ll be much improved.
Can watercolors stain clothes, furniture, or skin?
Standard pan watercolors (Crayola, Prang) wash out of most fabrics with soap and warm water if treated promptly. Liquid watercolors are more concentrated and can leave temporary stains on skin (fades within 24 hours) and more stubborn stains on fabric — treat with stain remover before washing. For furniture, a plastic tablecloth and immediate wipe-up prevents issues. For clothes, just use a smock or old shirt. I’ve never had a permanent stain from any kids’ watercolor product on skin or standard cotton clothing.
How do I display or preserve kids’ watercolor art?
Watercolors are actually among the most display-worthy kids’ art — they look genuinely beautiful. Options: frame favorites in inexpensive frames from the dollar store (a white mat makes anything look gallery-quality), clip them to a wire or string with mini clothespins for a rotating gallery wall, photograph them for a digital album or photobook, scan them for high-quality digital preservation, or use them functionally — as gift wrap, bookmarks, card fronts, or book covers. For long-term preservation, keep paintings away from direct sunlight, which fades watercolor pigments over time.
My child says “I can’t draw” or “I’m bad at art.” What should I do?
This breaks my heart every time I hear it, and it usually starts around age 6–7 when kids become more aware of the gap between what they imagine and what they can produce. Three things help. First, emphasize process over product — “tell me about what you’re making” instead of “what is that?” Second, provide techniques that produce beautiful results regardless of drawing ability (wet-on-wet washes, salt textures, tape resist) so they experience success. Third, model imperfection yourself — paint alongside them, make “mistakes,” and talk about how you like the unexpected results. Never say “I can’t draw either” — say “I’m still learning too, and look what happened when I tried this.”
Your Watercolor Journey Starts with One Brush Stroke
Here’s what I want you to take from this guide: you don’t need a dedicated art room, a background in fine art, or a high tolerance for chaos. You need watercolor cakes, paper, water, and a willingness to let your kid explore.
Start small. One project. One afternoon. Tape some paper to the table, hand them a wet brush, and step back. Watch what happens when they discover that watercolor has a mind of its own — that the pigment moves and blooms and does things they didn’t plan. Watch them lean in. Watch them try again.
That’s the whole thing. That’s the beginning of a creative life.
And if the first session ends in a puddle of gray-brown water and a painting that looks like nothing recognizable? That’s perfect. That’s exactly right. They showed up, they experimented, they made something that didn’t exist before. Tomorrow’s painting will be different. Next week’s will be different again.
The brushes will be in the cabinet. The paints will be waiting. And your tiny artist will be ready to go again.
Happy painting, friends.